Saturday, December 13, 2014

How to Send Digital Cards with Punchbowl

In case you're unfamiliar with Punchbowl, it's a free service that allows you to send digital cards to anyone with an e-mail address or anyone on your social media site(s). Users can choose from hundreds of designs, quickly create an eCard and send it without ever having to run to the post office.  This post gives an overview of Punchbowl and this one tells you how to send a digital invitation.
Sometimes, though, you just need to send a "regular" card -- not an invitation. 
As a classroom teacher, you could use Punchbowl to send holiday cards, "welcome back to school" cards, reminders about big events or projects, thank you cards to volunteers, etc. When sending a digital card via Punchbowl {as opposed to an invitation}, you have the ability to include a gift card, which I think is pretty cool. Here's how to send a "regular" digital card via Punchbowl:


2. On the home page, you should see something like this at the top:

The top of your page may look slightly different, depending on the time of of year when you log in.

Hover over the sections at the top to see more options, click "greeting cards" in the top, right to see all options, or type something into the "search" bar to look for something specific.

3. Click a card to choose it. I chose a holiday card for this tutorial so I can post it on my class blog and social media...killing two birds with one stone and all that. :) 


4.  Click the green, "continue" button in the top, right when you decide on a design.
5. Include a gift card? Or not? Click the answer that most appeals to you..
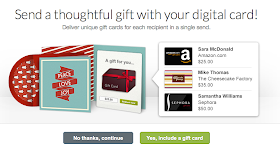
FYI: if you choose to include a gift card at the beginning of making your card, you can always take it out later if you change your mind. Gift card options include Amazon, Sephora, The Cheesecake Factory, Panera Bread, Regal Cinemas, Gap, Home Depot, Old Navy, Nike, Athleta, LL Bean, Spa Week, Golfsmith, Charity Choice, Banana Republic, Game Stop, Bass Pro, and Zappos. Gift card amounts start at $10 and can go all the way to $500. You can also send a gift card to more than one person in your card.
6. Personalize.

 
Change your card design at any time by clicking the blue, "pick a new design" button in the top, left corner. 

Clicking on the text lets you edit the font, size, and color.

Clicking the green "next" button in the top, right corner lets you move to the next personalization option.

Customize your envelope stamp, postage, and liner:


Punchbowl always puts coordinating liner, stamp, and postage on your card, so it looks great even if you don't want to mess with customizing it. However, for those that like the option, there are tons of designs to choose from, and you can "view all" or view only the ones in a certain category {for instance, "holiday"} to make your life easier. 

7. Click the green, "save and continue" button at the top of the screen when you are ready to "seal the envelope" and send your card.

6. Add recipients. 


As you can see in the picture above, you can add e-mail addresses and/or names individually, or you can import them from your e-mail's contact book. You can also send your card via Facebook, Twitter, or link {like I will probably do on my class Instagram account}.

Choose to receive an e-mail when each recipient views the card, get a copy sent to your inbox, and/or send the card at a later date.

Click the "view preview" button on the right to see what your guests will see when they open the card.

Click the green "send now" button in the bottom, right when you're ready to "mail" your card.

Here is my finished product:
http://www.punchbowl.com/ecards/share/815d48fa22463348c846
 
 
post signature

Friday, December 12, 2014

How to Send Digital Invitations with Punchbowl

I've talked before about using Punchbowl to send digital cards, but now that I'm more familiar with it, I wanted to write a tutorial post.

In case you're unfamiliar with Punchbowl, it's a free service that allows you to send digital cards to anyone with an e-mail address or anyone on your social media site(s). Users can choose from hundreds of designs, quickly create an eCard and send it without ever having to run to the post office.  

Invitations let recipients RSVP to your event directly from your e-mailed card, and they send a reminder to people who RSVPed "yes" a couple days before the event. 

As far as invitations go, I use Punchbowl to send invites to Science Fair judges, and I think I'll post an invitation to Family Science Night on my class social media accounts next year. As a regular classroom teacher, you could send invitations to parents for class parties, field trips, presentations, etc. 
Here's how to send an invitation:

1. Create a Punchbowl account. 

2. On the home page, you should see something like this at the top:

The top of your page may look slightly different, depending on the time of of year when you log in.

Hover over the sections at the top to see more options, or click "browse all invitations" in the top, left to see all options, or type something into the "search" bar to look for something specific.

3. Choose your card. I'm going to choose an invitation to an ugly Christmas sweater party for this tutorial. :) All I did was click the design of the card I want to use:


4.  Click "personalize design" and start personalizing! 
Change your card design at any time by clicking the gray, "change design" button in the top, left corner. 

Click the drop-down menu under "event type" to choose whether to send an invitation with an RSVP or a "save the date" without an RSVP. Then just type the appropriate information in the correct fields.

Clicking on the text lets you edit the font, size, and color.


Clicking on the "envelope" tab at the top lets you edit the digital envelope, lining, postage, and stamp. 

You could probably spend quite a bit of time looking through all the customization options if that's your thing -- there is lots of choose from. 

5. Click the green, "save and continue" button in the top, right corner when you are finished personalizing your card and envelope.

6. Add guests. 
As you can see in the picture above, you can add e-mail addresses and/or names individually, or you can import them from your e-mail's contact book. Click the "view preview" button on the right to see what your guests will see when they open the card. Click the green "next" button in the top, right corner when you're finished. {FYI: you can click "next" even if you didn't add any e-mail addresses.}

7. Toggle options.
Most are self-explanatory, but I thought I'd throw this in: the message board feature sort-of reminds me of the eVite we get from CEF if our grant is funded.

You obviously can get as detailed as you want! Click the "?" next to any option to get more information.
Click the green, "next" button when you're finished.

8. Unless you have e-mail addresses typed in to the "to" field, you can only send a test card to yourself. But if you typed in addresses earlier, you can send your invitation now. 
9. After you've sent the invitation, manage it. Obviously, I can't manage my ugly Christmas sweater party invitation because I didn't send it to anyone. :) But here's what management looked like on my science fair judge invitation this year:

I love the ability to copy the invitation -- makes it easy to duplicate it next year, if I want
See who even opened the card {and when}, see the ratio of "yes" RSVPs to undecideds or nos, re-send your invitation to select guests, delete guests, or send a message to one or all guests, Pressing "actions" in the top, right corner lets you print your design, add the date to your calendar, or delete the card as a whole.
Very easy and very convenient!

Check back tomorrow for a tutorial on how to send digital cards {with an option for an included gift card}.
 
post signature

Tuesday, November 11, 2014

Use IFTTT to Help With Recess Duty

If you're at CISD with me, you know that students cannot have outside recess or PE classes when the temperature or wind chill drops below 36°. You can designate someone on your team to go to The Weather Channel's website every school day during the winter months...or you can let IFTTT {pronounced like "gift" without the "g"} do the work for you.

I've written in the past about how IFTTT can help you manage your life, but this post will talk primarily about using the service to help you know the temperature before recess {sorry, secondary teachers -- I know this doesn't apply to you!}.

1. Get an IFTTT account. It's free. All you need is a valid e-mail address. 
 
Once logged in, you should be at your IFTTT dashboard. It will look like this at the top, except your username will be displayed in the top, right corner. 


2. Click "Create a Recipe." Now you see this screen:


3. Click "this." Type "weather" in the search box:
 
 
4. There are 2 potential weather triggers, as shown below. Click the "weather" one {second option}.


5. Choose "today's weather report" {first option}. Your screen should change to the picture below.


6. Put about 10-15 minutes before your recess time into the "time of day" slot and click "create trigger." You should see the screen below, except the time under your weather icon should display the time you specified.


7. Click "that."

 
8. IFTTT offers lots of action choices. Personally, I would choose the text message action {"SMS" if you're an iPhone user and "Android SMS" if you have a 'Droid}, but the e-mail or phone call action would also work for this. For the purpose of this tutorial, I'll choose "SMS." You'll see this screen if this is your first time to use IFTTT or your first time to use text messages from IFTTT:


9.  Click "activate" if it appears. Be on the lookout for a pop-up {you may have to turn off your pop-up blocker for a second} that looks like this:


Type in your phone number. IFTTT will send you a PIN number, which you'll then type in to the next screen...just to confirm that they're connecting your IFTTT account to the right phone number.

 
10. Once your phone number is hooked up to your IFTTT account, you'll see the screen below. Click "Send me an SMS."


11. Now you should see this screen:

 
If you click inside the message box, it'll change slightly:

 
Click the beaker to reveal this drop-down menu of choices:


Unfortunately, there currently is not an option for wind chill, but I did inquire about it. :) You can see IFTTT's reply when/if they tweet back by clicking here. In the meantime, you can combine the "CurrentTempFahrenheit," the "WindSpeedMph," and the "WindDirection" actions.  
 
Just click in the text box and delete everything IFTTT automatically wrote. Type "Current temperature," click the beaker, click "CurrentTempFahrenheit," and click "add ingredient." It'll look like this:


Type "Wind speed," click the beaker, "click "WindSpeedMph," and click "add ingredient." Now the text box should look like this:
 
Type "Wind direction," click the beaker, click "WindDirection," and click "add ingredient." Now you have this in your text box:
 
12. Click "Create Action." You'll see a confirmation screen that looks something like this:


13. Click "Create Recipe." You'll get a text message every single day at the same time -- unfortunately, I have not figured out a way to specify which days to text. When the winter months are over, just go into your IFTTT dashboard and turn the weather text recipe off until next year. 

IFTTT texts me from a certain phone number, and I just programed that into my contact list as "IFTTT" so I know who it is. Because I often have morning duty outside during the school year, the weather is texted to me every morning at 6:02 am. {I put my phone on "do not disturb" when I go to bed, so I never even hear the texts on weekend mornings when I try to sleep in.} Here's what my current text thread from IFTTT looks like:

 
You can see that I spiced up my text message by making it tell me good morning and remind me to have a good day. Don't judge me...you gotta take the encouragement where you can get it, amiright? ;)

Obviously, if you receive a text like my last one, where there was a 15 mph wind from the NW, you might want to jump on the weather app and check out the wind chill before taking the kiddos outside.
In the meantime, I'll cross my fingers that IFTTT implements a wind chill ingredient soon!
 
post signature

Saturday, November 8, 2014

Tackk

If you're a fan of Smore {read my post about it here}, you'll love Tackk! I heard about it over the summer, but I figured there was no reason for me to have accounts at two very similar websites. Now I'm kicking myself for not investigating it earlier... 
What It Is
Tackk allows users to create online posters with text, videos, audio recordings, pictures, and embedded widgets and links. Each Tackk {poster} is stored at its own unique URL for easy sharing. 


Features
  • 100% free
  • Account not necessary to create a Tackk {only downside? Anonymous Tackks are deleted after 7 days.}
  • E-mail address not needed to create an account or sign in -- kids can sign in with a social media account or with Edmodo
  • Free iOS app
  • Customize the poster's text, colors, and design
  • Add headlines of different sizes, colors, and fonts to make them stand out next to regular body text
  • Add photos -- upload your own, grab from Instagram or a specific URL, or use Tackk's partnership with 500px or Giphy to find a photo to use
  • Adjust the size and add captions to photos
  • Add video from 150+ {YouTube, Vimeo, Instagram, U-Stream, Animoto, ShowMe, etc. included -- here's the complete list}
  • Add audio from 22 sources {SoundCloud, Spotify, Rdio, Grooveshark, etc. included -- here's the complete list}
  • Add a button to make links more visible:
  • Ability to add "listings" of things you can sell directly from your Tackk {PTO and spirit shops, I'm lookin' at you.}
  • Add a contact form -- all responses are sent to your e-mail inbox
  • Embed widgets to things like other Tackks, a Poll Everywhere poll, Prezi, Listly, Screenr, SlideShare, Twitter, etc.
  • Add an RSVP {I'm thinking of field trip, class party, extracurricular group event, etc.}
  • Make your Tackk public or private
  • Option to add password protection to a private Tackk
  • "Tag" Tackks -- similar to tagging in Blogger or Evernote -- as a way to collect and/or organize data. {For instance, I would have my students tag their Tackks with special phrases to ensure I could find them easily.}
  • Customize the URL {only downside? the URL is an extension of tackk.com and not your profile, so no other Tackk user can ever personalize their poster with the same name}
  •  Add an interactive comment stream -- great for encouraging conversation between your students. {Admin rights gives ability to moderate.}
  • Create an assignment template so students only have to click and edit {more about that below}
  • Saves automatically every few seconds -- similar to LiveBinders 
  • Duplicate your Tackks to save yourself time creating similar posters
  • Transfer ownership of your Tackks to a different account
  • Variety of sharing options when you're finished:

I like that I could embed all the class's Tackks onto my school webpage, or even create a Tackk that links to everyone's Tackk {how's that for a confusing sentence?} to show off student work to parents and the community.

Assignment Template Feature
I have to  share the assignment template feature with you. There is currently no tutorial on the Tackk blog that tells how to utilize the lesson template feature, but I got the inside scoop from a sweet and knowledgeable Tackk rep {shout-out to Andria!}. She's going to write a blog post about it soon, but I thought I'd share here, too. 

The assignment template feature lets you create a Tackk that is editable and share that with students. So instead of sharing a static page that no one can edit {here's example I created about ABCD drawings in a science notebook}, you share this editable page that acts as a template for the assignment. For instance, here's an editable template about the scientific method. If you give students the special link to your template, they can edit a copy of your template without ever changing your original. 
To create an editable assignment template:
  1. Create a Tackk. 
  2. Customize the URL under "Tackk options." 
  3. Make the Tackk private, and then publish it so it's live.
  4. Before sharing the link with students, edit it so that "/create/copy" in written after tackk.com. For instance, my scientific method page is www.tackk.com/scientificmethod. So to let kids edit it, I would share this link, instead: www.tackk.com/create/copy/scientificmethod
I love the idea of this for my elementary students! 

Because I only have 50-60 minutes total with each class per week in Science Lab, I often print a recording sheet to glue into the notebook -- especially for my youngest students. Not only does it help prompt them about what step in the scientific method comes next, it's a way to help speed up their writing so that we have time to do an experiment and write about it in our notebooks, too.

I can definitely see myself transferring some of my recording sheets into Tackk templates. From there, I envision students tagging each assignment with a specific phrase so that I can assess and share. 

I'll leave you with my first full assignment created on Tackk {link here if you want to see the full version on the Tackk website}. My fourth graders are actually in the middle of this assignment, so I probably will not get to use Tackk for it until next year. But now that I know the process, I'm sure there will be plenty more Tackk projects to come.


Wednesday, October 29, 2014

How to Add Social Media Buttons to an Outlook E-mail Signature

I talked in this blog post about adding social media buttons under your e-mail signature, so I thought I'd write another post to show you how to do that. :) You can click on any of the photos on this page to see an enlarged version.

1. Find social media buttons. {They're also sometimes called "social media icons."} This Pinterest board has several pins with free social media buttons for you to choose from, or you can just run a Google search for free ones.

2. Download the social media buttons to your computer. A lot of times, artists will make several different sizes of buttons and let the customer choose which ones to use. If that happens, the social media buttons will probably download in a zipped file. You can read this post to refresh your memory on how to unzip files.

3. Pick which buttons you're going to use. You can pick the size and which icons you need. For instance, in my work e-mail signature, I used a button for my science lab website ("homepage"), Instagram, Twitter, and Facebook. Since I don't personally use Facebook in the classroom, I linked to our campus's Facebook page.

The buttons I used
You won't typically find a social media icon for a homepage -- I made that one myself. But some button sets will come with a blank template. From there, I just found a picture of a white house and layered it over the blank template. You may also need to re-size buttons if none are to your liking. You can read this post to refresh your memory on editing pictures in PowerPoint.

4. In the Outlook program on your computer, click "file." 


5. Click "options" near the bottom of the list.


6. When the pop-up below shows, click "mail." 


7. Click "signatures." 


8. Type your signature as you normally would. If you want to add a funky font to your signature, you may want to refer to this post and this post.

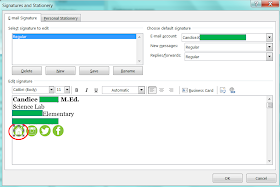
Some information blocked for privacy reasons -- I don't actually have big green rectangles in my signature. :)
9. Click the picture frame icon (shown below) and insert a picture from your computer. {You can insert your social media button(s), your signature in a special font, our mascot/logo, or any other picture you want.} Keep doing this until all your pictures are in place.
"insert picture" icon

 10. Add link(s) to your picture(s). Select the picture you want to add the link to, as shown below {this example shows my homepage button selected}:


 11. While your picture is still selected, click the link button:

12. Make sure "existing file or web page" is selected, and then type the desired URL in the "address" bar. {Make sure to link directly to your profile on social media. For instance, don't link to the Twitter homepage at www.Twitter.com; rather, link to your profile page like this: www.Twitter.com/YourUsernameHere.} You can continue this process of linking individual pictures as much as you want.


 13.  When you're totally finished, click "OK" twice, as shown below:


If you're in CISD, shoot me an e-mail so I can see your new signature. :)
  
post signature