Wednesday, October 29, 2014

How to Add Social Media Buttons to an Outlook E-mail Signature

I talked in this blog post about adding social media buttons under your e-mail signature, so I thought I'd write another post to show you how to do that. :) You can click on any of the photos on this page to see an enlarged version.

1. Find social media buttons. {They're also sometimes called "social media icons."} This Pinterest board has several pins with free social media buttons for you to choose from, or you can just run a Google search for free ones.

2. Download the social media buttons to your computer. A lot of times, artists will make several different sizes of buttons and let the customer choose which ones to use. If that happens, the social media buttons will probably download in a zipped file. You can read this post to refresh your memory on how to unzip files.

3. Pick which buttons you're going to use. You can pick the size and which icons you need. For instance, in my work e-mail signature, I used a button for my science lab website ("homepage"), Instagram, Twitter, and Facebook. Since I don't personally use Facebook in the classroom, I linked to our campus's Facebook page.

The buttons I used
You won't typically find a social media icon for a homepage -- I made that one myself. But some button sets will come with a blank template. From there, I just found a picture of a white house and layered it over the blank template. You may also need to re-size buttons if none are to your liking. You can read this post to refresh your memory on editing pictures in PowerPoint.

4. In the Outlook program on your computer, click "file." 


5. Click "options" near the bottom of the list.


6. When the pop-up below shows, click "mail." 


7. Click "signatures." 


8. Type your signature as you normally would. If you want to add a funky font to your signature, you may want to refer to this post and this post.

Some information blocked for privacy reasons -- I don't actually have big green rectangles in my signature. :)
9. Click the picture frame icon (shown below) and insert a picture from your computer. {You can insert your social media button(s), your signature in a special font, our mascot/logo, or any other picture you want.} Keep doing this until all your pictures are in place.
"insert picture" icon

 10. Add link(s) to your picture(s). Select the picture you want to add the link to, as shown below {this example shows my homepage button selected}:
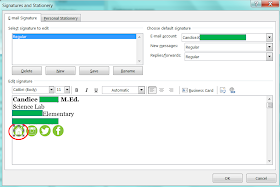

  
 11. While your picture is still selected, click the link button:

12. Make sure "existing file or web page" is selected, and then type the desired URL in the "address" bar. {Make sure to link directly to your profile on social media. For instance, don't link to the Twitter homepage at www.Twitter.com; rather, link to your profile page like this: www.Twitter.com/YourUsernameHere.} You can continue this process of linking individual pictures as much as you want.


 13.  When you're totally finished, click "OK" twice, as shown below:


If you're in CISD, shoot me an e-mail so I can see your new signature. :)
  
post signature

Tuesday, October 28, 2014

How to Increase Parent Followers on Social Media Sites

Let's say you've already set up a classroom Instagram, Twitter, and/or Facebook. Now you need to get the word out to your students and their parents. How do you do that? Here are some suggestions:
  • Feature the students. From what I understand, CISD employees are allowed to post student photos on a classroom website, so long as the parent has signed the permission slip. My kids still get excited when they see me taking pictures of them because they know there's a good chance they could wind up on our class Instagram and be "famous!" 
  • Let the kids post for you. I did this 2 years ago on Twitter {and need to do it again!}, and the kids were so excited to tweet that they excitedly ran home and told their parents.
  • E-mail parents. Be direct and let parents know you just started a classroom social media account and would love for them to follow the updates.
  • Put a reminder in your e-mail signature. You can do something as simple as writing "Follow me on Twitter! @MrsKaras," for example. You can link to your profile(s) if you want to get a bit fancier. And if you have multiple sites you'd like to share, you can add social media buttons to your e-mail signature:
This is currently at the bottom of my work e-mail signature
  • Put links on your classroom website or blog. Everyone at CISD has an Edline page to customize, and most of us have blogs, too. Link to your social media sites in the sidebar so that they're always visible to visitors. 
  • On a similar note: embed a stream of your latest updates on your website. I know you can embed Twitter and Instagram feeds onto a website, but I'm not sure about Facebook since I don't use it for the classroom. On Twitter, go to settings >> widgets >> "create new." You can generate a simple HTML code to put onto your site, which could look something like this:

           
Instagram is mobile-based but you can view photos from the web now. I used SnapWidget to create my embed codes. You can see examples of my embedded Instagram feeds by visiting individual grade level pages on my classroom website.

The good thing about embedding feeds directly into your website is that visitors don't have to do any extra clicking or navigating to see your updates -- it all appears right there on your main website.

  • Interact with others in the community. I think my professional Twitter account pretty much flew under the radar until I started interacting with other CISD accounts. Something as simple as favoriting, re-tweeting, or mentioning another user might help you gain followers.
  • Put it in announcements. Simply telling the kids via announcements -- either school-wide or just at the beginning of class -- can do wonders.
Keep in mind that parents can see your updates by visiting your profile even if they don't officially "follow" or "like" it. I'm always surprised to find that I have a lot more readers than my "following" number shows.
Above all, the point of social media isn't to get "likes" or "followers" -- it's about connecting with others. Don't get too caught up in your numbers!
 
post signature

Monday, October 13, 2014

Finding the Right Font When You Have Tons Installed

If you caught this post about installing fonts, you might be overwhelmed when trying to decide on the perfect font to use. As a self-professed font snob, I totally understand. I don't necessarily have a lot of time to test all 1,200+ fonts on my computer for each document I create, but I also want to use "the perfect font" for the occasion. 

There's a neat little website called Wordmark that will help you decide on a font more quickly. 

When you go to the website, you see this very simple screen:


Click on the white "wordmark" word in the middle, top of the screen. When you do, the word "wordmark" will disappear, and you'll be able to type whatever you want in that box. After you type, press "enter." 

The screen will automatically load that phrase in all the fonts you have on your device. You can scroll down to see what that phrase would look like in each font on your computer so you can make a quick decision.


When/if you download new fonts and re-visit Wordmark, the new font options will appear on the screen without you having to do anything extra.
 
post signature

How to Edit and Save Pictures in PowerPoint

I edit and save pictures in PowerPoint all the time, so I thought I'd share it with you.
The two most useful ways to use this trick:
  1. Use in lieu of photo-editing software to quickly crop or adjust pictures and save the new version.
  2. Remember in this post when I said that only people who have your font can see it on their device? This goes for e-mail signatures, too. But you can still use a unique handwriting font if you're willing to turn it into a picture file before putting it in your signature {like the signature on my blog posts}.
I work with Microsoft Office 2011 on a Mac at home and with Microsoft Office 2013 on a PC at work. Be aware that the prompts, buttons, or placement of items on your PowerPoint program may look slightly different than mine, depending on which version of PowerPoint you have.

To edit a photo:
1. Open your photo in PowerPoint.
2. Activate the "Format Pictures" or "Picture Tools/Format" bar by double-clicking on the picture.
3.  You should see a bar at the top of the PowerPoint program that has all the photo-formating options. You should see options like crop, rotate, recolor, etc. Sometimes you can also access these options by clicking on the photo, right-clicking, and selecting "format picture." If you're using PowerPoint 2013, it will look something like this:

Click on this picture to enlarge it

4. Click on the option you need in the toolbar above. For instance, if you want to crop, click on "crop" and adjust the borders of the photo by dragging the black bars on the edges to the correct places.

Notice you have the option to "remove background." I find that super-convenient! I use it mostly when I'm trying to make a flipchart for a lesson and need to use a picture I found on Google images or a picture I took myself. I really just want the kids to see the topic of the photo -- not everything around it -- so I remove the background before inserting it into my flipchart.

To save a photo:
1. Open your photo in PowerPoint. If you are trying to create a signature, open PowerPoint and type your signature in the font you want. 
2. Edit or adjust the photo if needed. A lot of times, I add a circle or arrow over a picture to allow students to focus on one specific spot in the image. Be aware that if you add something {like another text box or a clipart icon}, you'll need to select both -- hold down the "shift" key while clicking on each item -- right-click, and "group" the items before saving.
3. Right-click and select "save as picture." Specify where you'd like the picture saved and what you'd like it named. It usually defaults to saving in "my pictures."

If you tried this and a portion of your picture is missing {say, a clipart icon or another text box that you added}, revisit step #2 above and make sure that every component of the picture you want saved is "grouped."

If you're trying to add a signature to your e-mail {as mentioned here}, you'll need to go into your e-mail settings and to the "signature" screen. From there, you can insert the picture or copy/paste it into your signature.
 
 
post signature

How to Install Fonts

Someone last week asked me how to install fonts, so I thought I'd post the answer here, too.

Some things to understand about fonts before downloading:
How to Install Fonts on your Computer:

1. Find the font you want to install and download it to your computer. Some of my favorite fonts are Kimberly Geswein's collection and Kevin & Amanda's Fonts for Peas and Scrapbooking Fonts collections. Find the one you want and click "download." The 3 sites listed above also let you download every font available in 1 click -- just select "download all."

2. In most cases, you'll need to unzip the folder before you can access its contents. On a PC, right-click and select "extract all." The screen will prompt you with what to do -- just keep clicking "extract" or "next" until it's finished. On a Mac, just double-click. Zipped folders look like this on a PC:


and like this on a Mac:

Once you've unzipped them, it'll just look like a regular folder icon.

3. Open the download. Double-click on the unzipped folder. You'll always see a .ttf file, which is your font. In some cases, you may also see a .txt, .jpg, .png, and/or .PDF file. Those typically depict the creator's logo and/or their terms of use {TOU} for using the font. You don't usually have to worry about the TOU unless you plan to create a document with that font and sell the document, but it might be a good idea to read over it, no matter your intentions.

In some cases {particularly in some of Kimberly Geswein's fonts}, you'll see multiple .ttf files, as shown below. 

On a Mac

On a PC
That just means you're getting multiple versions of the font. For instance, if you look at the first picture, you can see that the KGHAPPY font is black with a striped shadow, KGHAPPYSHADOWS is white with a striped shadow, and KGHAPPYSOLID is just plain black.

4. Install the font. Double-click on the .ttf file(s). A pop-up will appear that shows you what all the characters in that font look like. At the bottom {Mac} or top {PC} of that pop-up will be a button that says "Install." Click. On a Mac, a new pop-up will appear that says "Font Book." On a PC, the "install" button will be grayed out if the installation was successful.

If you're installing a lot of fonts {for instance, all of Kimberly Geswein's fonts}, you'll see a ton of .ttf files in the unzipped folder, and it would be a huge waste of time to install each font individually.

How to quickly save multiple fonts on a PC:
Click the "start" button in the bottom, left corner of your screen. Click on the control panel, and then on "fonts." This will open a window that displays all the fonts you currently have installed on your device. Scoot that font book window over on your screen so you can see the unzipped folder {with the new font inside} on your screen at the same time, as shown below:


Click somewhere inside that new font folder {on a white part -- not on any words or icons}. Hold down Control + A to select everything in that window. Press the shift button with one hand, and keep it pressed down as you use your other hand on the mouse to click on one of the selected fonts and drag it over to your font book. When you're dragging everything over, your mouse should turn into a plus sign with a number underneath {to indicate how many files you're moving} when you hover the mouse over the font book. 

How to quickly save multiple fonts on a Mac: 
In the top, right corner of your desktop, there should be a magnifying glass. If you type "font book" in that search bar and hit "enter," you should see a search result for the font folder. Clicking on that search result will open the folder. From there, just drag and drop the new fonts into your font book -- just like you would on a PC.
5. Shut down any Microsoft Office programs you have running. You need to restart them in order to see and use your new fonts in those programs.

6. Delete the zipped and unzipped folders of the font from your computer. You don't need them anymore since the font is installed. :)

Have so many fonts you don't know which one to pick? Check out this post on Wordmark -- it'll help you out. 

post signature