I love systems like Socrative and Kahoot, but they aren't as conducive for younger students who can't read as well or as quickly as some of my older students.
Luckily, Poll Everywhere has a cool, unique feature that is SO helpful in assessing the little ones. It's called the "clickable image" feature. (Poll Everywhere has lots of options and is free to use, so I definitely recommend signing up for an account!)
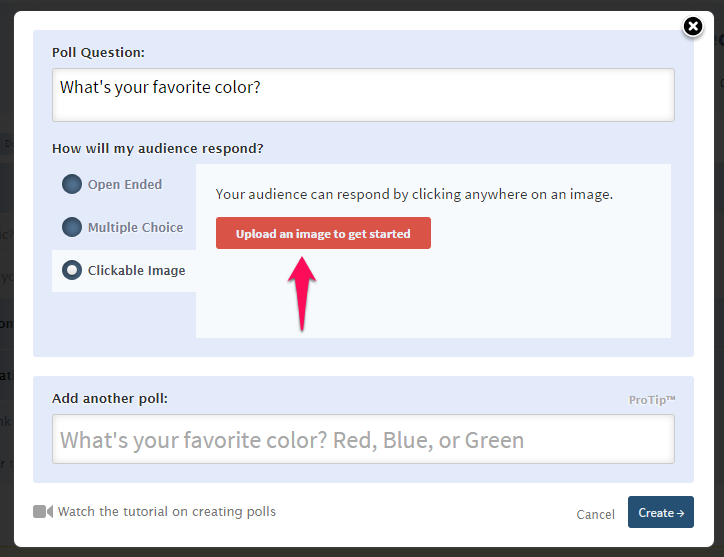
When you start a new poll, Poll Everywhere lets you choose how you want that poll to look. Just select the "clickable image" button to utilize this feature.

After that, you can upload your image and get started:
For this example, I just uploaded a picture from Google of 5 lessons from Dr. Seuss. Of course, you can use any picture you want (or make a collage). After the image is uploaded, click on it to set parameters for the answers. So in the picture below, you can see the translucent white box around "1. Today you are you, that is truer than true. There is no one alive who is youer than you" -- that means that portion is a potential answer for voters. Set as many parameters as you want and adjust the size of each. If someone taking this poll clicks anywhere within the translucent box shown below, their answer will be counted for life lesson number one.

After you set answer parameters, move on to the poll display page. It might look a little something like the picture below (notice I changed the question so it fits the image now!):

If you look at the row of icons on the right side of my picture, you'll see 7 options of things you can do with your poll at this point. Here is what each icon means:
For a weather poll for my kindergarten students, I displayed this while they were working:

I didn't make this collage myself (I found it on a free flipchart I got from Promethean Planet), but it's easy to do so with a photo-editing tool or in PowerPoint.
You can string several questions together so that students can take a multi-question quiz; this is what I did for the kindergarten weather poll. I believe Poll Everywhere gives teachers the option for students to have an account so you know who is answering in which way, but there was something that kept me from activating that option... I can't remember if it's because it costs money to do that, or if it's because my students are too young to have e-mail accounts or register for something like this. Or both. ;) In any case, walking the room while students are answering is a quick fix to being able to see which answers below to which students. They can only vote once, so that green pin will stay on the screen until you clear it or move on to the next question.
Here's an example of what students see on their screen:

Below is a collage I quickly made in PowerPoint to use as a warm-up for my 4th graders when we did a matter investigation involving water content of fruit:

I wanted them to be able to see the fruit as they chose the answer, so the clickable image worked well for my 4th graders in this instance.
The possibilities are really endless with this clickable image option! How would you use this in your class (or would you)?

Luckily, Poll Everywhere has a cool, unique feature that is SO helpful in assessing the little ones. It's called the "clickable image" feature. (Poll Everywhere has lots of options and is free to use, so I definitely recommend signing up for an account!)
When you start a new poll, Poll Everywhere lets you choose how you want that poll to look. Just select the "clickable image" button to utilize this feature.
After that, you can upload your image and get started:
For this example, I just uploaded a picture from Google of 5 lessons from Dr. Seuss. Of course, you can use any picture you want (or make a collage). After the image is uploaded, click on it to set parameters for the answers. So in the picture below, you can see the translucent white box around "1. Today you are you, that is truer than true. There is no one alive who is youer than you" -- that means that portion is a potential answer for voters. Set as many parameters as you want and adjust the size of each. If someone taking this poll clicks anywhere within the translucent box shown below, their answer will be counted for life lesson number one.
After you set answer parameters, move on to the poll display page. It might look a little something like the picture below (notice I changed the question so it fits the image now!):
If you look at the row of icons on the right side of my picture, you'll see 7 options of things you can do with your poll at this point. Here is what each icon means:
- Paintbrush: change the color scheme of the poll
- 2nd button from the top: activate the poll and "push" it to student devices
- Eye with a slash: toggle whether or not the question parameters are seen
- Green pin: toggle whether or not the green pins are shown when people click answers (as students touch the screen to answer, a green pin will appear on their screen where they clicked)
- Stop sign: stop the poll
- File cabinet: clear the answers from this poll
- 4 arrows: display the poll in full screen
There are even more customization options in the blue boxes to the right of all the icons -- I'll let you explore those for yourself.
In the picture above, you can see a URL displayed right under the question; students can use that URL to quickly participate in the poll from any device with a browser, so this is perfect for the BYOD classroom. If anyone visits this URL before the poll has been activated, they'll just see a picture of a pie. Not sure why that's the chosen icon, but it definitely makes it easy for students to recognize when they're at the correct page. :)
For a weather poll for my kindergarten students, I displayed this while they were working:
I didn't make this collage myself (I found it on a free flipchart I got from Promethean Planet), but it's easy to do so with a photo-editing tool or in PowerPoint.
You can string several questions together so that students can take a multi-question quiz; this is what I did for the kindergarten weather poll. I believe Poll Everywhere gives teachers the option for students to have an account so you know who is answering in which way, but there was something that kept me from activating that option... I can't remember if it's because it costs money to do that, or if it's because my students are too young to have e-mail accounts or register for something like this. Or both. ;) In any case, walking the room while students are answering is a quick fix to being able to see which answers below to which students. They can only vote once, so that green pin will stay on the screen until you clear it or move on to the next question.
Here's an example of what students see on their screen:
Below is a collage I quickly made in PowerPoint to use as a warm-up for my 4th graders when we did a matter investigation involving water content of fruit:
I wanted them to be able to see the fruit as they chose the answer, so the clickable image worked well for my 4th graders in this instance.
The possibilities are really endless with this clickable image option! How would you use this in your class (or would you)?