Image Map
Showing posts with label organization. Show all posts

Wednesday, September 30, 2015

How to Create and Customize a Symbaloo Webmix

Symbaloo is one of my favorite tools for sharing lots of links. I wrote about it in 2013 but wanted to write an updated post with its newest features! This post turned out to be pretty long, but I tried to create clear headings so you can fast forward to the part(s) you're most interested in! :)

In case you are unfamiliar, Symbaloo is a free web tool that provides a place to save all your bookmarks. One advantage of using Symbaloo is that all your links are saved online, so as long as you have Internet access, you can view all your links! Another advantage is that Symbaloo has a free app for both Android and iOS devices. The app is slightly limited but does provide you with the most important capability: viewing all your bookmarks.

You can keep your collections of links public or private. If you choose to share with others, you can share with only select people or the entire WWW, and you can embed your Symbaloo on any website that accepts HTML (which includes EdLine, our CISD webpage host). This makes it so easy for students or parents to access your links directly from your CISD teacher page.

There are also some nice organizational features, such as color-coding links, grouping links in folders, and creating color-coded sections. 

First things first: I'm the realest a tour and some vocabulary:
click to open the photo in a new window and see it at full size
  • Webmix - your collection or page of links (the entire green portion in the picture above). You can create as many webmixes as you want, and you re-size your webmixes so that they hold more links.
  • Tile - box that contains a link. The empty or unused tiles just look like the background photo or color, while the used tiles (that have a link inside) typically have a picture (icon or logo from a website) and maybe some words on it. If you click on a used tile, the link opens. 
  • Tabs - you can create as many webmixes as you want, and they all appear in a horizontal row at the top of your page. To get to a different webmix, just click on the tab with the name of the webmix you want to view. 
  • Navigation buttons - because your webmixes appear in tabs at the top and you can create as many webmixes as you want, use the arrows on the left and right side of the tab row to navigate through a lot of webmixes. 
  • Your profile - click the person silhouette to see a drop down menu with choices such as your profile (which shows all your public webmixes), account settings, preferences, sign out button, etc.
  • Search - click on the word "tiles" (in blue) to see a drop-down menu with choices for webmixes and profiles. Then type in the search box and click "enter." This is a great way to find great level or content-specific material without having to reinvent the wheel!
  • Middle box - there's probably an official name for this, but I don't know what it is. :) You can change what's in the box but not delete it completely. You can make it an editable box, a Google search, the weather... there are a lot of choices. Whatever you choose to be in the middle box on one of your webmixes if what you'll see on all of your webmixes. 
  • Folder  - available on the free, educational version (not the regular, free version) -- you can group tiles together in the same little box. You can also force tiles in a folder to play in sequence -- more about that below. 
  • More options - click to rename your webmix, change the background picture/color, re-size the webmix, etc. 
  • Remove  - delete your webmix completely. 
  • Share - edit sharing options
  • Refresh  - pushes your latest update out to followers -- only shows after you've shared the webmix.

Create a webmix:
1. Sign up for a free account, if you don't already have one. 

2. Symbaloo creates a webmix for you so that you have an example. You can delete these example webmixes at any time. 

3. To create a webmix, click the + in the top, right corner.


4. Type the name of your webmix (you can change it later) and click the orange "add" button. 
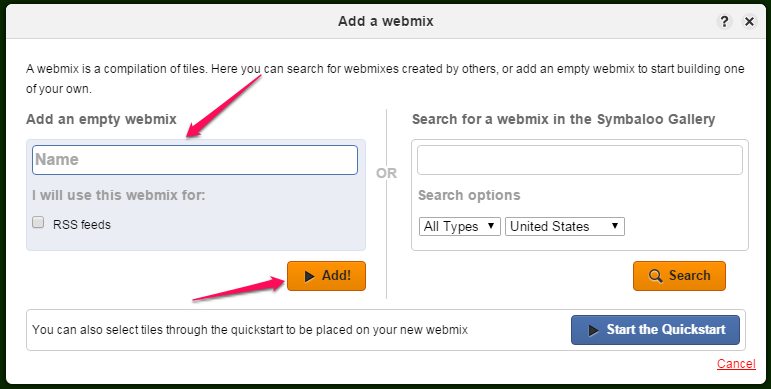

5. Your new webmix opens, and will probably look something like this:


6. Click on any tile to add your first link. A pop-up like the one shown below should appear on the left side of the screen:


7. Tons of tiles have already been added to other Symbaloo users' webmixes, so you can browse those tiles by clicking one of the bottom two options. (I've never used this option.) If you want to add a very specific link of your own, click the top option ("create a tile").

8. Add information as directed to the screen shown below:


  • Paste the link in the text box that says "http://"
  • Click where it says "add a name for the tile." The field will automatically populate with the link's name, but you can change the label to whatever you want
  • Check the "show text?" box if you want the title you just typed to show up on the tile
tile with a caption
tile without a caption

  •  The colored but plain boxes control the background color of that entire tile, as shown below:


  • Choose an icon or image for the tile. Symbaloo has lots of icons already uploaded to their site. Click "choose icon" to see all available icons (shown below). Hovering over any of the icons will show an enlarged view of that icon on your tile at the top of the pop-up window. Once you choose your icon, press "save."


You can also upload your own image to a tile. To do that, click "upload an image." You'll see a pop-up like the one below:


Click "choose file." Choose from any of the files on your computer. Then you'll see the pop-up like this, where the file name appears. Then click "upload."


Your image will appear with a small box inside. Whatever is inside that box is what will be displayed on your tile. (It's easy to remember because the part that won't be displayed on the tile is sort-of darkened or grayed out.)


After the selection box is covering all of the picture that you want shown, click "use selection to tile."


That original pop-up bar will still be visible on the left side of the screen; be sure to click "save" before clicking anywhere else! Then your tile icon will appear on the webmix with the photo you uploaded:


{Can't find a suitable image for your tile? Create your own! This post quickly tells how to create and edit your own images in PowerPoint. If you're a video-lover, click here to watch how to use PowerPoint to create my own images -- just fast forward to the 4-minute mark to bypass leading information about ThingLink.}

The scoop on the free, educational version:
If you're a teacher, you can get your account "upgraded" to the free, educational version by e-mailing the company, explaining your situation, and asking to switch to the educational version.

Once you're switched over, access your new account by visiting edu.symbaloo.com.

I'm sure there are more features, but the edu features I love include:

  • ability to group tiles into folders (so you can fit more links in a smaller amount of space)
  • ability to "lock" the audience into viewing links in folders in a certain order (helpful if you're flipping your lesson, are showing tutorials, giving instructions, etc.)


Sharing your webmixes: 
View the webmix you want to share. At the top of the screen, press "share."


Decide if you want to share publicly (with the entire WWW or, at least, anyone who finds your Symbaloo profile) or privately (just with people who have the link). Toggle this option with the blue buttons right above the orange "share my webmix" button.


After clicking "share my webmix," the right side -- which was previously grayed out -- will generate links. Just copy and paste the link to share, or click "embedded code" to get the HTML code. 


Ideas for use:
  • Create a webmix for yourself with all your key links. I have one for home where I link to all the sites I use to pay bills online. I have another webmix for school where I linked to Aesop, Eduphoria, Skyward, etc. (seen below):
 
  • Create a webmix that houses lesson ideas, organized by unit or subject. (Similar to Pinterest, but with a smaller preview picture.)
  • Create a webmix with links to games for your students. For example, when I taught Science Lab, I had a webmix for each grade level where I shared science games that related to what we did in the lab. Below is one such webmix I created for my kindergarten Science Lab classes:
 
  • Create a webmix with instructional videos for your kids. I created short tutorials for my students using Shadow Puppet Edu, and then linked them in a webmix. I linked the webmix to a QR code, and posted the QR around the room so that students could watch whatever tutorials they needed whenever they needed them. Here's that webmix, if you're interested.
  • Create a webmix with kid-friendly research links.
  • Create a webmix for a flipped lesson, where you post links to all the parts of the lesson and have students visit them in a certain order. 
  • Create a webmix for parents. I just helped our dyslexia team create a webmix with parent training videos and links to commonly used websites; they did an awesome job and will get to share it with parents for years to come!
  • Create a webmix of apps you want students to download on their device before bringing it to school. It can be nice to have the direct link to an app so students are sure to download the correct tool. 
  • Create a webmix of brain breaks. I haven't used this much since I discovered Go Noodle, but I used to use this webmix of brain breaks by Carla Stone. Another perk to this webmix: the YouTube videos open right inside of Symbaloo, so you don't have to deal with annoying sidebar ads on the YouTube site.
  • Create a webmix with links to online books. Matt Gomez has two: eBooks 1 & eBooks 2. 
...and how many times can I say "webmix" in one blog post?! Sheesh.

Feel free to check out more of my webmixes by clicking HERE, and leave a comment with your other webmix ideas!

Thursday, May 21, 2015

Organize Your Life With OneNote

Are you a person that has stacks of handwritten to-do lists, meeting notes, data analysis, lesson plans, and just paper of any kind? If so, you need to read this post!

I'll be the first to admit that I never used any Microsoft product except the Office Suite until this year. A colleague introduced me to OneNote (a Microsoft product) last year, and I didn't see the value. I already had an Evernote account, so why switch to OneNote?

Earlier this year, though, I went to TCEA with several teachers from my building. One of them is a Microsoft advocate (hi, Scott!) and kept raving about OneNote, so I finally decided to see what all the fuss was about.

I can now say that I've transferred all my Evernote contents to OneNote, and I don't even use Evernote anymore! For me, OneNote is the way to go for organizing files in my personal and professional life.


In a Nutshell
The concept of OneNote is simple: create virtual binders in which you can add virtual dividers and pages for optimal organization.


Features
  • Create as many binders as you want with as many tabs and pages as you want
  • Color-code tabs and pages
  • Use any font on your system (I'm a font snob, so that capability is import to me! Kidding...kind of)
  • Add tags to notes for further organization
  • Create to-do lists that you can actually check off
  • Import or create tables, graphs, charts, pictures, links, screenshots, or spreadsheets so they are visible without having to click and open documents
    • Upload any of the above-mentioned items -- this shows an icon with the item for you to click and open
  • Record audio and video directly within the binder
  • Use free page templates to easily format your pages to look however you'd wish
  • Draw on a page in any color (highlight, too!)
  • Insert shapes
  • Export pages in a variety of formats
  • Password protect sections of any binder
  • Put a binder within a binder
  • Share binders with others -- they can have viewing or editing rights
    • See recent edits in the binder and who made them

How I Use OneNote Professionally
I have one binder all my lesson plans. It looks like this:


I have four tabs -- called "sections" in OneNote -- they're the blue, orange, pink, and purple colors you see in the picture above. Each has several pages inside. So, for instance, the "materials" tab has 26 pages -- one for each letter of the alphabet -- where I keep track of materials I have in the Science Lab and which cabinet they're in. 

After that, I have a separate section group for each of the grade levels I teach + one for PO information. When I click on a section group, it opens to what basically looks like a binder within a binder. So, for instance, this is what my 1st grade binder looks like:


In this way, I think OneNote is even more versatile than a real binder because I can't keep physical binders within physical binders. :) And obviously, you can't really put attachments into physical binders, either. 

In my grade level binders, each section contains every lesson I teach in that unit. I also have a page at the top of each section for the materials I need for that unit -- all consumables are written in green so I can make my Walmart list quickly, and any printable materials are written in red.

A look at the pages I have inside my 1st grade matter section

I also have another binder that's for teaching but doesn't have anything to do with my lesson plans:


Instead of a notepad that I'll promptly lose, I take my iPad to meetings and use the free app to take notes in the "meetings" section of this binder. You'll also notice the "PD" tab, where I take notes at any professional development workshops or conferences I attend.

I love the seemingly endless amount of capabilities OneNote has and how users can customize it to fit their life and needs!

Other Ideas

  1. Student conferencing tool - Create a tab for each student. When you meet with students about, say, their reading, create a new page to document the meeting. Record a student reading and store in his/her OneNote tab so you can more easily track his/her progress. 
  2. Professional development - Organize meeting, conference, or workshop notes
  3. Resources - Do you have a lot of random sheets of paper you have to file away for your class? Attach them all in OneNote so they're easy to preview, find, and store.
  4. Parent contact log  - Use the table option to create a log for parent contacts. You can record text or audio notes about who was contacted, what the meeting was about, the method of contact, etc. 
  5. Student examples  - scan and attach student examples for big projects so you'll have something to show future students.

Sunday, May 3, 2015

Dropbox Adds Commenting Feature

I've written about Dropbox in the past, but their most recent update is pretty cool, so I thought I'd share!
As a reminder, Dropbox is a place for you to securely store files of all kinds on the web and access those files from any device that is connected to the Internet. Two nice bonuses are that you never have to worry about losing or corrupting a flash drive again, and that you can recover recently deleted files fairly easily.

I've advocated for Dropbox over other cloud storage services because I just think the layout is simple and intuitive, but there was a feature I thought was missing...until now. :)

Dropbox now offers the ability for users to comment on any file. Additionally, you can specifically "mention" Dropbox users who have access to your files -- almost like the mentioning feature on Twitter or Instagram. 

Any user who is the owner of that particular folder, was mentioned in the comment by using the @ symbol, or has participated in commenting on that file before will receive an e-mail about any addition to the conversation.

I could see this being a real asset to teaching teams who use shared Dropbox folders. Easily make a comment to give more information about a particular file is, what time or year or part of the Scope and Sequence this file pertains to, changes that need to be made on a lesson plan before next year, etc.

Learn more about Dropbox's new commenting feature by clicking HERE.

Sunday, February 8, 2015

Schedule Meetings Easily with Doodle

Doodle is a tool meant to help ease the pain of scheduling a meeting or other event with multiple people. So if you're like me and struggle to find a common time for your team to meet and plan, Doodle is going to come in handy for you!

A basic account at Doodle is free, although there are upgrade options.


How It Works:

1. Create a free account. 

2. After logging in, click "schedule an event" at the top of the page. 


3. The only information that is absolutely necessary to provide is the title of the event + your name and e-mail address -- and the latter two fields are pre-populated for you based on your login information. You are encouraged to type a location and brief description, though, so that your attendees are less likely to be confused. 

4. Click "next" at the bottom of the page to go to the scheduling section. Click the calendar to highlight the potential meeting times:


5. Add in potential meeting times to each date selected:


6. From there, either choose a basic poll to complete the set-up, OR toggle the settings options. 


Here are the settings options:


If you pay for the premium Doodle service, you could also choose from any of these 3 additional options:


7. Once the set-up of your event is completed, it's time to invite participants! You can connect to Google or your iCloud for easy retrieval of the e-mail addresses, and you can invite up to 250 people to one event. Choose to add a personal message that will appear in the e-mail, if you want. For instance, the very first time I sent a Doodle link, I included a message about what Doodle is and how it might work for our team. 


8. Toggle the share settings:


You can decide if you want to limit your event RSVPs to only those that you send the e-mail invitation to, or if you're okay with RSVPs from anyone who has the link {so your original recipients can forward your invitation}. 


A link to your event is then sent to each recipients' e-mail inbox. You can access your open events {polls} by clicking "my polls" at the top of your account page or by finding the "my polls" section on your dashboard.


After you send the invitation, you'll get two e-mails from Doodle: one with the participation link and the another with the administration link. The administration link allows you to go directly to your event page to edit it, but you can also just log in to your Doodle account to edit your polls. Click the "participation link" to check off the times that you are available and give all participants an example. 

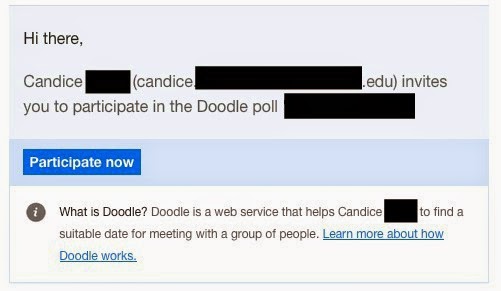
Your invitees, on the other hand, will receive an e-mail similar to this:

This is the e-mail my team received when we were trying to meet for our annual December meeting/Christmas celebration.

Here's a test poll I created for this post so you can see what invitees see when they go to the poll page:


Invitees can see when the poll was created, who created it, who was invited, other invitees' schedule votes, and any comments left on the poll. They can also print the invitation if they want {or you can print it and put it in the mailbox of a colleague who maybe isn't as comfortable answering online}. 

Recipients only have to enter their name, check the box(es) under the dates/times that work for them and click "save." 

As guests participate in the poll, the administrator receives e-mail updates about their votes and any comments that are made. I'm not sure how long a poll stays open; I only know the one I created around the second week of December is no longer in my account. It could expire after a certain amount of time, or it could expire after the date of the event! 

If you need to edit your poll at any time, you can do so by visiting the administration link sent to your e-mail, or by going to your participation link and clicking the "administration" tab at the top. 


See below to view your administration options for each open poll:


I've only used Doodle a couple of times, but my experience with it has been nothing but great. It's a neat tool to help large groups of people with busy schedules find a common meeting time! 

post signature

Sunday, August 24, 2014

Manage Online Accounts with IFTTT

If you ever get overwhelmed with how many online accounts you have and the stress of managing them all, you should check out IFTTT, which stands for If This Then That.

IFTTT is a free, online service that helps you manage your online accounts and/or create automatic notifications of routine events. Users connect their IFTTT account to dozens of other online accounts, their phone, their Nest thermostat at home, their Fitbit, etc. and tell IFTTT what to do with those accounts. When you tell IFTTT to do something, it's always in this format:

IF {this} happens, THEN, I want you to {do that}.

For instance, let's say that I have a blog for my class, and I want to post a link to my class Twitter every time I publish a new post on the blog. IFTTT makes that easy by allowing you to create a "recipe" (or instructions) to do it automatically.

For this recipe, I would go to "Channels" and choose "Blogger." You must activate each channel to give IFTTT permission to access your account and do things on your behalf (things that you tell it to do... nothing creepy. :) ). Once you activate your Blogger channel, you can choose which blog you'd like to connect. I have several blogs, so I chose from a drop-down list which blog I'd like to focus on:

Once activated, you can scroll down the page to see common recipes that Blogger uses. Those are great to get your mind thinking of all the possible things IFTTT can do for you on each channel.

It just so happens that the recipe I want -- post my blog posts to Twitter -- was the first suggested recipe.

Click on a recipe to use it.

Since my Twitter account is already connected to my IFTTT account, all I had to do was finish the recipe by telling it what to post on my Twitter account. Since this recipe was already created by another user, most of the work was done for me; I just edited the wording a bit by typing in the box below:


Then I clicked "use recipe" to finish. Click the recipe picture below if you'd like to use it on your own IFTTT account:

IFTTT Recipe: Send a tweet when you post something on your Blog connects blogger to twitter


You don't have to use pre-created IFTTT recipes, either -- you can create your own. On your "My Recipes" page, you'll see a blue button in the top, right corner that says, "Create a Recipe." 


When you click on it, IFTTT walks you through the steps of creating your own recipe. For instance, the first page looks like this:


I would click on "this" to decide what the trigger should be. Once you choose a channel, IFTTT shows you all the things that channel can do, and you just click on the one you want. IFTTT will continue to walk you through the recipe creation process until you have your very own.

You can use IFTTT for a variety of school-related things. Here are some ideas you might like:
  • Connect class social media accounts {IF I post a picture on the class Instagram, THEN upload it to a certain album on the class Facebook page}
  • Organize online information {IF I post a photo to the class Instagram, THEN upload a copy to my Dropbox account}
  • Know when you have to have indoor recess {IF the head index goes above 100 degrees, THEN send me a text... IF it's going to rain, THEN send me a text}
  • Track tutoring payments {IF I get a new payment on my Square account, THEN add the information to my Google spreadsheet}
  • Get apps for free {IF the App Store posts apps that are free for the day, THEN e-mail me}
  • Tell parents when you and the bus have arrived at field trip locations {IF I arrive at this zoo, THEN text these people}
  • Remind yourself when the grading period is ending {IF it's the end of the semester, THEN call me}
You can turn your recipes off or trash them completely at any time by going to your "My Recipes" page and using the gray buttons to the right of each recipe:
Turning a recipe off means it's deactivated but not deleted from your account. This way, your school-specific recipes can be activated during the school year {remember the heat index one from above?} and deactivated during the summer.

You can embed recipes into your blog posts {or another class website that accepts HTML codes} to help classroom parents organize all the information from you throughout the year. For instance, you might embed a recipe for "IF Mr./Mrs. X publishes a new blog post, THEN e-mail me," or "IF Mr./Mrs. e-mails me, THEN call my cell phone" or "IF Mr./Mrs. e-mails me an attachment, THEN put that attachment in this Dropbox folder."

After you create a recipe, you can copy the HTML embed code and paste it anywhere on your site {like below the spot earlier in this post where I said, "Here's the recipe in case you want to use it on your own IFTTT account"}. This way, parents don't have to necessarily know how to navigate IFTTT for it to work for them -- tell them just to create an account and add your recipe.

Finally, you could use your IFTTT account to teach students about cause and effect. Show your IFTTT account to students, let them choose a trigger and a result, and show them what happens afterwards. Then students could create "recipes" on paper for other, non-technological events in their life {like "IF I study for my spelling test, THEN I will get a better grade"}.

Saturday, February 8, 2014

LiveBinders

I love organizing. Because of that, three-ring binders have played a huge part in my life ever since elementary school. Binders were {and still are} a great way to organize tons of paper.

But with the push toward paperless classrooms and storage in the cloud, the traditional three-ring binder is becoming obsolete as we eliminate paper from our lives.

However, we still need a good way to organize files. I've talked before about my love affair with Dropbox {shameless plug: use my referral link to sign up, and we'll both get more free space!} and how much it has helped me store and organize my digital files. But there are times when a prettier visual and more than just file storage is needed. This is where LiveBinders comes in.

Logo from the Live Binder website
How It Works
  1. Create a virtual "binder" via the LiveBinders website. 
  2. Add tabs and subtabs to organize your binder. 
  3. Upload files, import links from around the web, or type directly into the binder. 
  4. Make multiple binders and organize them on virtual shelves for easy access. 
  5. Share your binder(s) with others or keep them private. 
  6. Make copies of others' public binders and edit them to your liking. 
Ways to Use Live Binder in Your Class
  1. Have students create ePortfolios using LiveBinders.
  2. Create a tab for each student in your class. Use subtabs to upload files you would keep on those students -- RtI information, assessments, examples of work, etc. 
  3. Create a "back to school parent binder." Upload all the information you would normally print for "meet the teacher" day at school, and pass out the link, instead. 
  4. Store lesson plans and their corresponding materials online and share them with your team, across the district, and/or with teachers from around the world.
  5. Create a substitute binder where you've pre-loaded information about your classroom procedures, schedule, and even emergency lesson plans. When you're sick, the sub just has to pull up the link to your binder, and you can go back to bed and rest. 
  6. Create a professional portfolio for yourself if you're job hunting.
  7. Create a binder full of common links students will need to visit in a digital classroom. {Here's an example.}
  8. Create a binder full of instructions for accessing classroom websites, navigating classroom digital tools, etc. 
  9. Have students turn in work via LiveBinders -- you just need access to their binder. Then you can grade it and not have to print anything at all. 
  10. Not sure what to do with all the links and files you get from professional development? Upload them to a binder
Here's a binder about how teachers are using this site in their classroom:


Cool Features
  • Go paperless! Stop trying to keep up with pages of paper. Scan things in to your computer and file them away in LiveBinders. It's a three-ring binder for your computer!
  • Add others' public binders to your shelf so you can access their information quickly and easily. 
  • Link to your LiveBinders and/or embed them into your classroom website.
There are even free apps so you can access binders via your tablet or smartphone.
Click here to visit the iTunes store to download this app
Other Helpful Info