Image Map

Tuesday, June 30, 2015

New Dropbox Feature: File Request

If you're not using an LMS, it can be a challenge to find a way for students to submit documents to you online. In the past, I've used Dropbox teamed up with Drop It To Me to let kids submit work. That works just fine, but Dropbox just launched a feature called file request that takes out the middle man. 

Here's an overview:

The notice I received when I logged onto my DB account online

Dropbox's explanation

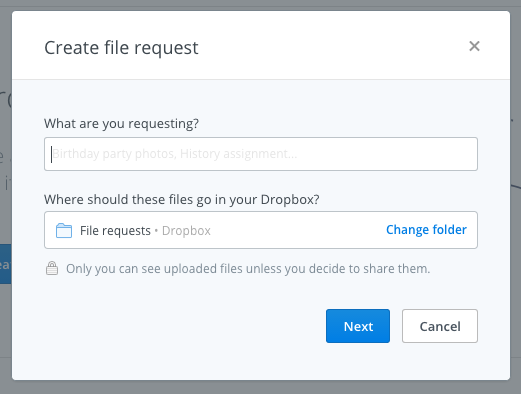
I decided to give it a try. If you choose to use it, here's how it will look {I just clicked "create file request" on the screen above}:


Type the name of what you're requesting. For teachers, this may be the name of an assignment or a unit. I just wrote "test." Dropbox then creates a new folder for you, based on the name of whatever you're requesting {although you can change the file destination if you want}. Notice that once the files are turned in, you are the only one who can see them!

Type in older kids' e-mail addresses to send them the link directly from Dropbox. For younger students, I'd copy the link above and shorten it or turn it into a QR code.
That's it! I actually just e-mailed the link to myself to see what that prompt would look like... Here's the e-mail I got:


When I clicked "upload files" in the e-mail, I was taken to a page like this. I would assume this is the page someone would see if you just sent the link -- not an e-mail -- but I haven't tested it to be sure.

From here, the recipient just needs to click the blue "choose files" button, and a pop-up of files from their computer appears. After uploading, the file appears in your folder, and no one but you can see it unless you choose to share the folder. 

Ideas for Using Dropbox's File Request Feature in Education:
  1. Students can submit digital assignments to their teacher.
  2. Parents can submit pictures from class parties, field trips, etc to the teacher. 
  3. Parents can submit permission slips and/or notes {about transportation, tutoring, etc.} to the teacher.
  4. Teachers can submit paperwork to administrators. 

Sunday, June 21, 2015

How to Send a Link to Students {Without E-mail}

Have you ever tried to have your students visit a specific URL, only to still hear comments like this 15 minutes later:

"Hey...what am I supposed to type again?"

"Mrs. X! I can't find the page!"

"Is THIS it?" *turns computer screen around so you can see that no, that is not, in fact, the page she is supposed to be on*

It can be frustrating. And let's face it, nobody has enough instructional time to spend 15 minutes getting to one website. It's enough to almost make you not want to use technology... I get it. Luckily, there are a couple of solutions.

If your kiddos have the newer iPad model, just AirDrop the URL to their device(s). But if you're working on desktop or laptop computers, try using Google Tone.


Google Tone is a free Chrome extension that allows you to broadcast your URL to any nearby computer on WiFi.

To Use: 
1. Make sure all devices are using Google Chrome {click here to download it for your computer}.

2. Make sure all Chrome browsers have the Google Tone extension installed {click here to visit the extension page directly and press the blue button that says, 'Add to Chrome'}.


3. Go to the website you'd like to share. Make sure your speakers are turned up, all receiving devices have their microphone on, and that you are logged in to your Google account. Press the blue megaphone extension {pictured at the very right of the URL bar below}:


4. Your computer will broadcast the URL to all other computers within earshot {including any computers that are listening over the phone, Google Hangout, or webcam}. The other computers will receive your profile picture and Google profile name along with the URL so they can know if they want to accept the link or not.

Although I do think even the youngest students need to learn what a URL is and where to type it, Google Tone and AirDrop can be real time savers if you need students to visit a complicated link {ex: a Google-shortened URL that's just a jumble of numbers and letters}!

Saturday, June 6, 2015

Interactive Images on ThingLink

Happy summer break! I'm always torn at this time of year -- do I take a break or use this time "off" to start exploring ideas for next year?

For those of you on board with the latter idea, here's a tool you might want to play with over the summer: ThingLink

logo via the ThingLink website

I've known about ThingLink for a couple years now but didn't start using it until this year....and I wish I had started sooner. :) It's such a unique tool with so many possibilities!

What is ThingLink?

ThingLink describes themselves as a way to create interactive images. Basically, you upload a picture and then add "tags" to it. Adding a tag creates a bubble that pops up when moused over; this bubble can provide a link and/or text. 

via the ThingLink website

Free Features
  • Access via the web, iOS app, or Android app 
  • Create 1 group of up to 100 students by registering the students under your account (so kids don't need an e-mail address in order to log in) OR students can log themselves in with their existing Google account
  • Tag images and videos with text and links
  • Create slideshows with your ThingLinks
  • Students who are logged in can only see other students' and teachers' ThingLinks

Premium Features -- $35/year for the teacher (my fav capabilities are italicized)
  • Advanced tagging tools (like these rich media tag options)
  • Create up to 30 groups with up to 1,000 students
  • Students who are logged into their student account (under your name) have the same abilities as you do (except they can't tag videos)
  • Ability to present your ThingLink full-screen 
  • Replace the image on your ThingLink without losing any of your tags or other information
  • Access to wider variety of tag icons (100+ options)
  • Ability to make icons always appear (so that people don't have to mouse over the image in order to see the tags)
  • Upload custom tag icons
  • Use the rich-text editor on tags (include bold/italicized text)
  • Make images private
  • Customize the bubble and text color of your tags
  • Add multiple interactive images to create one slideshow (unlimited images can be added to a show)
  • Google Drive links work directly within the image (see the feedback form embedded into the bottom, right corner of this presentation ThingLink)
  • Remove the ThingLink logo at the bottom, right of your slides or replace with your own image

Gettin' Fancy

You can upload any picture to create a ThingLink, but I like to upload images I've created on my own. Click here for an example of a ThingLink where I created the image.

You can create your own image in basically any photo-editing site or app, but I actually just use Microsoft PowerPoint to create my images. This post reviews how to edit and save pictures in PPT. I just use a colored shape for the background, import the pictures I need, group it all together, and save as a picture. This post has a video tutorial that shows how I use PowerPoint and digital scrapbooking elements to create an image


Ideas for Use
  • Teachers (for students): give your students a paperless or flipped lesson (like this, this, and this) -- works really well if you're incorporating a lot of media (like a Blendspace + EDpuzzle or YouTube video + Prezi + Socrative quiz, etc.) 
  • Teachers (for other teachers): create a professional development session/workshop in ThingLink (like this)
  • Students (any subject): ask students to create a ThingLink as part of a culminating project to show their learning
  • Students (any subject): create a mini-research project 
  • Students (back to school): tag a personal image to create a "getting to know me" ThingLink at the beginning of the year
  • Students (ELA): upload a student-made illustration, and then place tags that tell a story all around the illustration (Ooh...could you do a "choose your own adventure" story with this?! My wheels are turning...)
  • Students (ELA): tag the image of a book cover to give reviews on the book, favorite quotes, descriptions of characters, and/or examples of literary elements
  • Students (geography): tag a collage of land forms with a student voice recording explaining what each land form is/looks like and can be found
  • Students (geography): tag the capitals on a map 
  • Students (history): tag a map where each battle in a war took place (describing each battle and telling who won)
  • Students (history/social studies): tag an image of a person as a mini-biography (this would be particularly handy if students were using lots of different tools to display facts about the person -- like a video or audio recording of the person from YouTube, a mock Facebook page for the person, a Voki depicting what that person might have said about issue, an iMovie with photos from the person's life, etc)
  • Students (science): tag a collage of the steps or results of an experiment with a student voice recording explaining what's happening in each picture, a website or video explaining why the results occurred, etc.
  • Students (science): tag a diagram -- say, of a cell or a flower -- with labels, and explain each part's function