
There are a plethora of uses for Google forms in the classroom. Two
super-simple ways I use them in the classroom are for letting students
register for Science Fair and for letting students sign in to the
recycling club meetings. This post will focus on
exactly how to set up a Google form so as to gain information from your
students.
1. Sign up for a Google account if you don't already have one. {If you do have one, just sign in.}
2. Go to www.google.com/drive
If you see a screen like this:

just click "go to Google Drive."
3. This is my dashboard:

Yours will look a bit different, depending on how much/what you have in your drive and whether or not you've updated to the newest version of Google Drive {I have not}.
Click "create" in the top, left corner:

4. Click "form" in the drop-down menu that appears after you click "create."
FYI: The arrow going up -- to the right of the "create" button -- means that you are going to upload a non-Google document to your drive. So, for instance, you could upload any Microsoft Office {Word, PowerPoint, Excel, Publisher, etc.} document to your drive. The fonts may not look the same after upload, especially if you used any non-default fonts {which may throw the spacing off a bit}, but everything else should remain intact. I typically only upload PDFs for the reasons mentioned above.

More FYIs:
5. You should see a screen like this:

This is your blank Google form, and now you get to personalize it. There are lots of things you could do, so I'm just going to show you the basics and let you play with it on your own to find the rest. :)
Title the form. This helps others know what your form's topic is, as well as helps you organize your forms in your Google cloud drive.

Add a description. Tell others what your form is about. This is totally optional but sometimes comes in handy!

Type your question in the "title" bar. You can add optional help text, which acts like notes to your readers.

Change the question type. If you look at the picture above, you can see a button that says "multiple choice." If you click on that, you'll see a drop-down menu that shows you all the kinds of questions you can ask. This can come in handy if you need a certain answer from your audience. For instance, When I needed students to tell me the name of their homeroom teacher upon registering for the science fair, I chose the "choose from a list" option. This way, all homeroom teachers would be identified by their last name only, and all names would be spelled correctly so that I could sort the answers later.

Choose what participants will see when they submit your form. Click in the text box to change the words "Your response has been recorded." For instance, for the science fair form, I included my school e-mail address and encouraged participants to e-mail me by x date if they still had not received their entry number. Below, you'll see I have "Show link to submit another response" checked. This comes in handy when lots of people are going to use the same device to access the form. For instance, I check this box in my recycling club sign in form, because all the kids use my laptop to record their attendance.

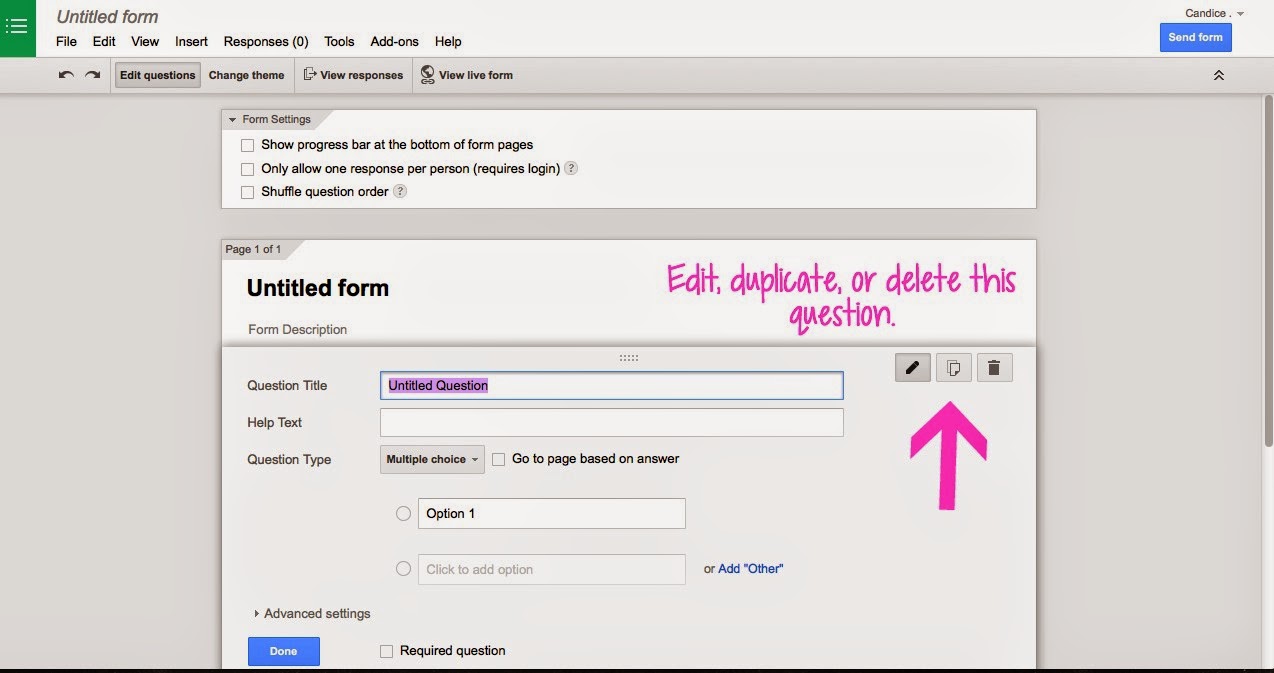
Use the gray buttons in the top of each question to edit the question, duplicate it, or delete it altogether.
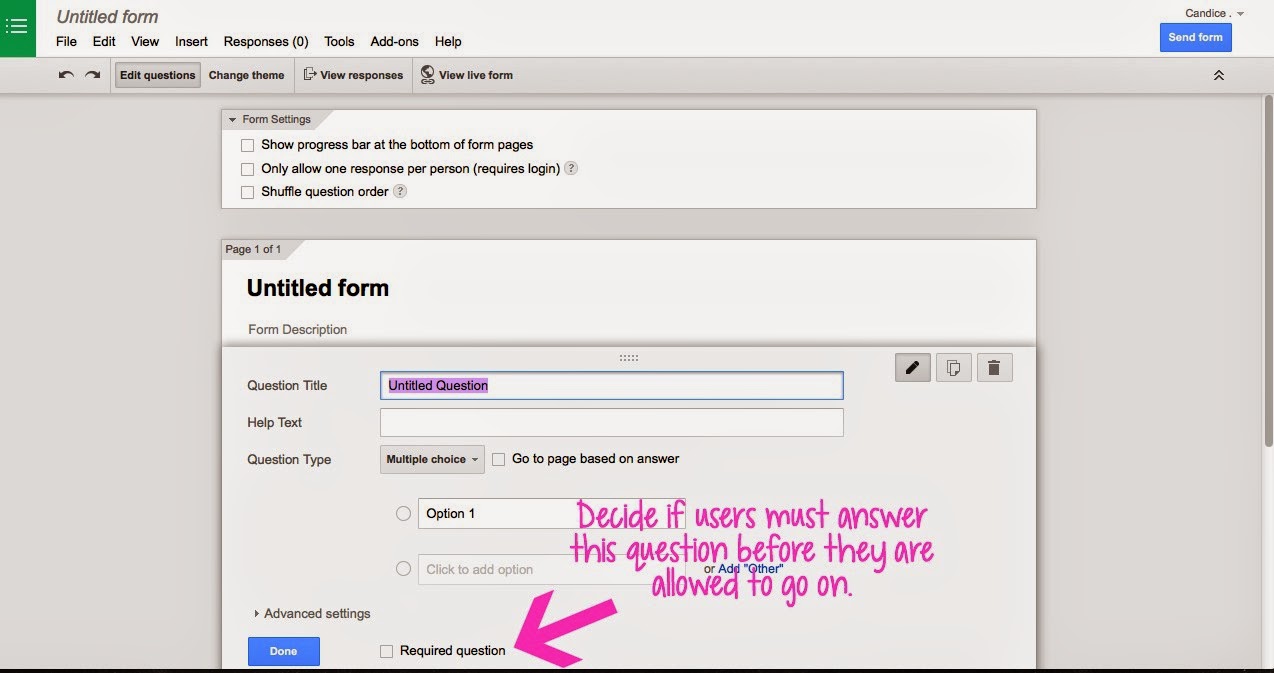
Require questions if you want. Requiring a question means that a user must answer it before they are allowed to submit the form. I use this for agreements. For instance, when parents sign their students up for my recycling club, I have a "question" that says something like, "I give the school permission to administer medical attention if needed and release the school of all liability. I understand that pick up is at 3:20 by the east doors." I make the question a "check box" type and make it required. I also make questions required when I need contact information.
Click "send form" when you're ready to publish it. When you click that button, it tells you how to share the link with others.

Other information: click the "change theme" button on the top, left of the screen to change the appearance of the form. You can view what your live form looks like at any time by clicking "view" and "live form."

View the responses. After you publish your form, Google automatically generates a spreadsheet for that form with responses. The first row in the spreadsheet is filled with your questions, and each person's answers are put into the appropriate columns.


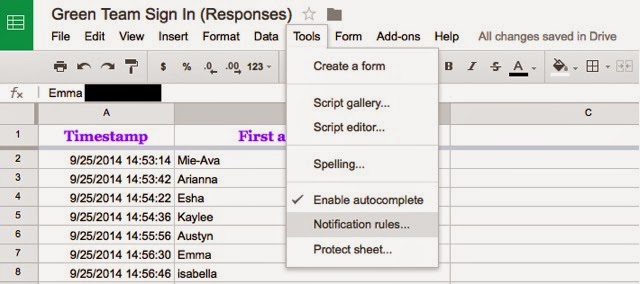
Set up notifications. This is one of the first things I do when I set up a new Google form. I go into the responses, click "tools," and then click "notification rules." From there, you can make sure that Google e-mails you when you get new responses to the document. For something where you expect a lot of responses, you can choose to just get a daily digest of the newest updates. If you are setting up a Google form that you don't plan to check immediately or every day {for instance, it's for a sign up -- not a class assignment}, I recommend setting up the notifications.
Sort information. Do this by hovering your mouse over the top of any column with information in it {for instance, in the above-picture, I could hover over column A or B}. An arrow will appear in the right corner of that box; if you click it, the spreadsheet will be sorted according to information in that column. I used this to sort students by teacher name or by grade level when I was getting ready for science fair.
Download responses. If you need a paper copy of the responses and want to make sure it prints okay, you can download a copy of the responses before printing. My top two choices for download would be as an Excel spreadsheet or a PDF, but there are 4 other download options you can utilize if you want.

Edit if you need to. You can always go back into your original Google form to edit, or you can edit it from the response page by going to "form" and then "edit form." You can edit a Google form at any time -- even after you've published it.

Ways to Use Google Forms in the Classroom:

1. Sign up for a Google account if you don't already have one. {If you do have one, just sign in.}
2. Go to www.google.com/drive
If you see a screen like this:
just click "go to Google Drive."
3. This is my dashboard:
Yours will look a bit different, depending on how much/what you have in your drive and whether or not you've updated to the newest version of Google Drive {I have not}.
Click "create" in the top, left corner:
4. Click "form" in the drop-down menu that appears after you click "create."
FYI: The arrow going up -- to the right of the "create" button -- means that you are going to upload a non-Google document to your drive. So, for instance, you could upload any Microsoft Office {Word, PowerPoint, Excel, Publisher, etc.} document to your drive. The fonts may not look the same after upload, especially if you used any non-default fonts {which may throw the spacing off a bit}, but everything else should remain intact. I typically only upload PDFs for the reasons mentioned above.
More FYIs:
- Clicking "folder" lets you create a new folder -- just like you would on your computer
- Clicking "document" lets you create a word document -- much like Microsoft Word
- A Google presentation is a lot like Microsoft PowerPoint
- A Google spreadsheet is similar to Microsoft Excel
- You may not have any other options after "form," depending on what apps you have added to your drive
5. You should see a screen like this:
This is your blank Google form, and now you get to personalize it. There are lots of things you could do, so I'm just going to show you the basics and let you play with it on your own to find the rest. :)
Title the form. This helps others know what your form's topic is, as well as helps you organize your forms in your Google cloud drive.
Add a description. Tell others what your form is about. This is totally optional but sometimes comes in handy!
Type your question in the "title" bar. You can add optional help text, which acts like notes to your readers.
Change the question type. If you look at the picture above, you can see a button that says "multiple choice." If you click on that, you'll see a drop-down menu that shows you all the kinds of questions you can ask. This can come in handy if you need a certain answer from your audience. For instance, When I needed students to tell me the name of their homeroom teacher upon registering for the science fair, I chose the "choose from a list" option. This way, all homeroom teachers would be identified by their last name only, and all names would be spelled correctly so that I could sort the answers later.
Choose what participants will see when they submit your form. Click in the text box to change the words "Your response has been recorded." For instance, for the science fair form, I included my school e-mail address and encouraged participants to e-mail me by x date if they still had not received their entry number. Below, you'll see I have "Show link to submit another response" checked. This comes in handy when lots of people are going to use the same device to access the form. For instance, I check this box in my recycling club sign in form, because all the kids use my laptop to record their attendance.
Use the gray buttons in the top of each question to edit the question, duplicate it, or delete it altogether.
Require questions if you want. Requiring a question means that a user must answer it before they are allowed to submit the form. I use this for agreements. For instance, when parents sign their students up for my recycling club, I have a "question" that says something like, "I give the school permission to administer medical attention if needed and release the school of all liability. I understand that pick up is at 3:20 by the east doors." I make the question a "check box" type and make it required. I also make questions required when I need contact information.
Click "send form" when you're ready to publish it. When you click that button, it tells you how to share the link with others.
Other information: click the "change theme" button on the top, left of the screen to change the appearance of the form. You can view what your live form looks like at any time by clicking "view" and "live form."
View the responses. After you publish your form, Google automatically generates a spreadsheet for that form with responses. The first row in the spreadsheet is filled with your questions, and each person's answers are put into the appropriate columns.
Set up notifications. This is one of the first things I do when I set up a new Google form. I go into the responses, click "tools," and then click "notification rules." From there, you can make sure that Google e-mails you when you get new responses to the document. For something where you expect a lot of responses, you can choose to just get a daily digest of the newest updates. If you are setting up a Google form that you don't plan to check immediately or every day {for instance, it's for a sign up -- not a class assignment}, I recommend setting up the notifications.
Sort information. Do this by hovering your mouse over the top of any column with information in it {for instance, in the above-picture, I could hover over column A or B}. An arrow will appear in the right corner of that box; if you click it, the spreadsheet will be sorted according to information in that column. I used this to sort students by teacher name or by grade level when I was getting ready for science fair.
Download responses. If you need a paper copy of the responses and want to make sure it prints okay, you can download a copy of the responses before printing. My top two choices for download would be as an Excel spreadsheet or a PDF, but there are 4 other download options you can utilize if you want.
Edit if you need to. You can always go back into your original Google form to edit, or you can edit it from the response page by going to "form" and then "edit form." You can edit a Google form at any time -- even after you've published it.
Ways to Use Google Forms in the Classroom:
- Beginning of the year contact information -- it would be great to give the link or let parents scan a QR code to the form during "meet the teacher." You could gather information about parent contacts, student birthdays, language(s) spoken at home, etc. without the need for index cards
- Beginning of the year, getting-to-know-you questionnaire for students
- Bellringer assignment: students must answer a particular question upon entering and record their response in the Google form
- Sign up form for parent/teacher conference times -- parents could request a couple of days and times that work for them, and you could follow up with a confirmation call
- Registering for a club or event
- Signing in to a club meeting or tutoring session. {Each entry is automatically time stamped for your convenience -- you don't have to make that a question.}
- Assessment
- Exit ticket
- Bully/abuse report -- kids can fill in the form anonymously to report bullying or abuse
- Reading log {kids fill in a Google form instead of recording their minutes on paper}
- Rubric/project/science fair entry/presentation scoring {you wouldn't share the link, but you'd have a spreadsheet of answers when you're finished}
- Peer assessment for projects/presentations
- Record management information: student infractions, binder signs, parent phone calls, office visits, etc.
- Voting form for classroom positions {president, secretary, StuCo, etc.} or even for staging a mock voting booth during election years
Great information. Thank you.
ReplyDeleteI love your explanation, it helps me a lot! Wish you lots inspiration for new posts!
ReplyDeletemobilenanny.org