Image Map

Wednesday, October 14, 2015

Seesaw: Pushing Work to Students

I used Seesaw {the free ePortfolio tool} with my K-4 students last year, and it helped us make the Science Lab almost completely paperless, so it's no wonder I continue to rave about this tool! As a Seesaw Ambassador {look for me in the southwest section!}, I get constant updates about what the team is doing to improve their {already awesome} tool, so I was inspired to write a series of blog posts on Seesaw. Check back frequently over the new couple of weeks or follow me on Twitter to make sure you don't miss any of this series! 

This post is all about how to get work to your students on Seesaw.

Files
When using the app version, you can submit picture files only. If you use the web version, you can submit picture files and PDFs. If you submit a PDF via the web version, the only way that item can be edited within the app is by adding a caption. Students cannot annotate over the top of the PDF or add a voice recording. 

Let's say you have a worksheet or template that you've used for years and don't want to recreate the wheel. There are two ways you can make that sheet digital:

1. Scan it in. Our district copy machines have the ability to scan in work and e-mail it to anyone as a PDF. If you just want to submit the PDF to your class journal {for instance, maybe you just submit your class syllabus or some class rules for posting to Seesaw}, you don't have to do anything else. :)

If you want students to be able to annotate, record their voice, etc. with your document, you need to turn it into an image. The fastest way to do this is by taking a screenshot. First, open the PDF on your computer. 

Our district computers are PCs and come with a program called "snipping tool." You can find it by clicking on the start button {Windows button in the bottom, left corner of your computer} and typing "snip" into the search bar. Choose the program with this icon:


If you're on a Mac at home, you can press command + shift + 4 to enable screenshotting a part of your screen. 

With the PDF and the screenshotting tool open on your computer, drag the screenshot tool across the part of the screen you want to save, and release the mouse. Make sure to save the image somewhere before exiting it. 

2. Take a picture of it. This won't provide as clean of a look but at least gives you another option. Put the printed PDF on a flat surface and open the camera app in your device. Take a photo of the sheet. 


Pushing Work to Students
Once you have the correct file type {app = images only, web = images and PDFs}, you can submit the work in Seesaw. There are a couple of ways to do this:

1. PDF to Seesaw: Log in to your account on the Seesaw website, click the green + in the top, right corner, select "upload file," and select the file from your computer. 


You can select a certain student, multiple students, or "everyone." I'll talk more about this below. 

2. Image to Seesaw: If on the computer, follow the same steps as you would for submitting a PDF {detailed above}. If you're on a mobile device, log in to your Seesaw account, click the camera roll icon if you already took a picture of the item or the photo icon if you still need to take a picture of the sheet and upload the photo. 


Again, you can select a certain student, multiple students, or "everyone." I'll talk more about this below. 

3. AirDrop. If you took a picture of the item on a newer iOS device {and your students have newer iOS devices, as well}, you can AirDrop the picture to their camera rolls. 

Make sure all devices have AirDrop turned on by flicking up from the bottom of the screen 

Step 1: flick up from the bottom of the screen and click "AirDrop."

Select "everyone."

Make sure "everyone" is highlighted, and then flick the pop-up back down so you can work. Personally, I turn my AirDrop off after I'm finished using it but it's up to you if you leave it on or not!
Go into your camera roll and select the picture of the item you'd like to send. Click the box with an arrow coming out of it on the bottom, left corner of your iOS device screen. You'll get a bunch of share options, and AirDrop options will be at the top. Anyone with an iOS device that also has AirDrop enabled will appear in the AirDrop box; just click the name of their device to send that photo to them wirelessly. 

After you send the picture to students, they'll receive a pop-up screen {usually accompanied by a dinging noise}. They need to accept the AirDropped file, and then it will appear in their own camera roll. This article provides more detailed instructions about how to AirDrop and how to received AirDropped files. 

Once the picture is on student devices, they can launch the Seesaw app and import the image from the camera roll. 

Submitting Work to a Particular Student v. Everyone
This year, Seesaw provided an option for the teacher to push work to everyone. To find it, log in to your teacher account and act like you are about to turn in some work. You should see this option, except with your class roster listed below "everyone:"

Submitting Work to Everyone
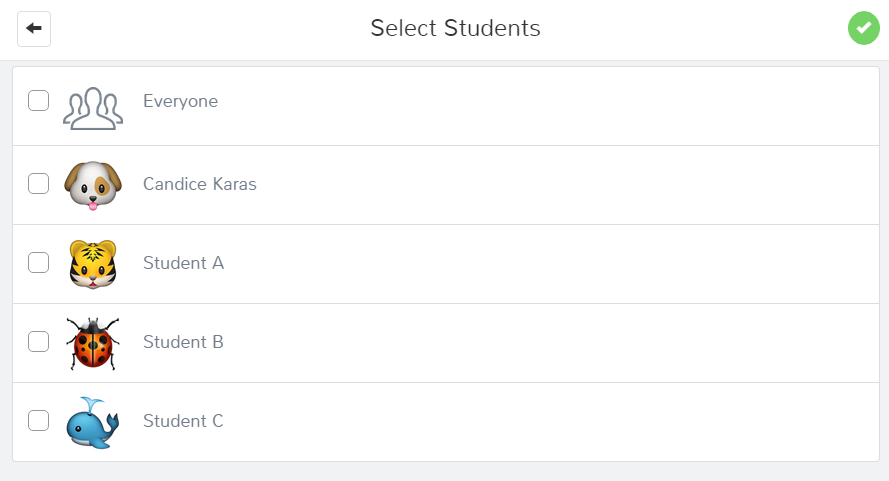

Things to note:
  • The work is submitted into each student's journal, but it will say "everyone" next to it.
  • Students can copy and edit the work before resubmitting it under their name. 
  • The original, pushed work appears in each student's journal until the teacher deletes it. {Which means that if you do this a lot, you'll have to wade through all the "pushed down" work before finding stuff the student actually completed, even if you're viewing a particular student's journal.}
Submitting Work to a Particular Student

Instead of clicking the box next to "everyone," just click on a certain student {or group of students'} name. This can be helpful when differentiating work! 

You can also add yourself as a student {i.e. Mrs. Karas} and submit work that way. If your students are in classroom sign in mode, they will still be able to see your journal and copy/edit your work before submitting under their own name. If you're in 1:1 mode, students will not be able to copy/edit your work this way, since students can't see other students' work in this mode. However, if you bring up a single student's journal during parent/teacher conferences, you won't have to wade through all the "everyone" posts in order to find actual sample work from the kid. 

How you submit work to students for copying and editing really depends on your personal preference and how you'll be using Seesaw with parents.


Tweetable

Other post in this series:
  • Features: available 10.10.15 {what students can do, what parents can do, and what teachers can do}
  • Getting Started: available 10.11.15 {signing up, creating a class, classroom sign in vs. individual sign in, creating folders, helping students sign in}
  • Student Navigation: available 10.12.15 {icon glossary, submitting work, viewing work, copying and editing, feed and calendar view, liking and commenting}
  • Teacher Navigation: available 10.13.15{finding student work in the feed, individual student journal, calendar, folders, flagged work} 
  • Pushing Work to Students: available 10.14.15 {converting printed files to digital ones, sharing PDFs vs. image files, pushing work to everyone vs. pushing work to select students, AirDropping images}
  • Interacting with Student Work on Seesaw: available 10.15.15 {student work: dissected, editing people and folders, downloading and sharing items}
  • More Options: available 10.16.15 {managing class, students, parents, folders, other, and administrative details; student avatars; premium version}

Tuesday, October 13, 2015

Seesaw: Teacher Navigation

I used Seesaw {the free ePortfolio tool} with my K-4 students last year, and it helped us make the Science Lab almost completely paperless, so it's no wonder I continue to rave about this tool! As a Seesaw Ambassador {look for me in the southwest section!}, I get constant updates about what the team is doing to improve their {already awesome} tool, so I was inspired to write a series of blog posts on Seesaw. Check back frequently over the new couple of weeks or follow me on Twitter to make sure you don't miss any of this series! 

This post is all about helping you, the teacher, navigate Seesaw.
Finding student work:
You have a few options about how to find student work when logged in from a teacher account. All of these options are available from the web version and via the app, but included screenshots are from the web version. 

Option 1: Feed view -- for viewing all students' work at once.
This is the default viewing option. Work appears in a"feed" of one piece of work under another. You can scroll through the work -- much like you would on Facebook or Instagram -- to see it all. If you ever leave feed view and need to get back to it, you can either click the book in the upper, right corner:


Or you can click on your name in the upper, left corner, click the class name, and then select "feed view" from the list:


Option 2: Student journal view -- for viewing work from one student only.
On the right side of the screen, you should see a list of all students' names. 


Select the student whose work you want to see:


Only that students' work will appear in the feed to the left. To go back to viewing all entries, just click "Everyone."

Option 3: Calendar view -- for viewing work from a specific date.
In the top, right corner {by where it says "get class code"}, there are two buttons like this:


Click the right one {that looks like a calendar} to quickly switch to calendar view. 

You can also click your name in the top, left corner, click the class's name, and click "calendar view."


Now you should see a monthly calendar. Use the arrows at the top to scroll through the months. On the web, you'll see the count of how many items were submitted on each day; the app only shows a bold calendar number to signify that work was turned in that day.

web view -- notice 10 items were submitted on September 26

Click the date of your choice to view more detail about which items were turned in that day:

Who do these teachers think they are, writing "hook 'em" and "wreck 'em" all over my test class?! It's "Go Pokes," y'all.  
Click on any of the thumbnails of student work to view it individually {this is where you be able to listen to any recordings or view any videos the student submitted}.

Option 4: Folder view -- for viewing work of a certain type. 
To view work in folders, you must already have folders set up {reviewed in the "getting started" post}. Then click on the folder icon next to "everyone" in your student list:


You'll see a screen that looks something like this, except your list will include the colors and names of all the folders you've implemented:

You can see that 10 items have been added to the blue folder.

Click a folder to view its contents. You'll know you're viewing content from a specific folder by looking at the breadcrumbs at the top your dashboard:

I'm viewing the blue folder in my test class


Option 5: Flagged work view -- for viewing work that you marked for review
Teachers can put a flag on any student submission. The flags are only seen by the teacher, so you can flag without worry of what a parent or student will think. For example, one time, I was listening after school to my kinder friends' recordings about flowers. I had shown a picture in class of a sunflower turning its head toward the sun as it grew. My kinder friend said in her recording, "Umm...Mrs. K. said sunflowers turn their head to the sun, so... I guess moonflowers turn their head to the moon." I flagged that project and made a mental note to talk to her about that later. ;) 

To view flagged work, find the folder icon next to "everyone" on the dashboard:


Then click "teacher flagged."

I haven't flagged any work in my test class yet.


Other Options
Manage your class by clicking on your name, the name of your class, and "manage class." There is a whole slew of other options there {that will be discussed in a later post}. 


Other post in this series:
  • Features: available 10.10.15 {what students can do, what parents can do, and what teachers can do}
  • Getting Started: available 10.11.15 {signing up, creating a class, classroom sign in vs. individual sign in, creating folders, helping students sign in}
  • Student Navigation: available 10.12.15 {icon glossary, submitting work, viewing work, copying and editing, feed and calendar view, liking and commenting}
  • Teacher Navigation: available 10.13.15{finding student work in the feed, individual student journal, calendar, folders, flagged work} 
  • Pushing Work to Students: available 10.14.15 {converting printed files to digital ones, sharing PDFs vs. image files, pushing work to everyone vs. pushing work to select students, AirDropping images}
  • Interacting with Student Work on Seesaw: available 10.15.15 {student work: dissected, editing people and folders, downloading and sharing items}
  • More Options: available 10.16.15 {managing class, students, parents, folders, other, and administrative details; student avatars; premium version}

Monday, October 12, 2015

Seesaw: Student Navigation

I used Seesaw {the free ePortfolio tool} with my K-4 students last year, and it helped us make the Science Lab almost completely paperless, so it's no wonder I continue to rave about this tool! As a Seesaw Ambassador {look for me in the southwest section!}, I get constant updates about what the team is doing to improve their {already awesome} tool, so I was inspired to write a series of blog posts on Seesaw. Check back frequently over the new couple of weeks or follow me on Twitter to make sure you don't miss any of this series! 

This post is all about helping students navigate Seesaw and submit work to their journal.

I made a ThingLink with Seesaw vocabulary; it might be fun to show it in class to your students when you introduce Seesaw!


In the ThingLink above, the icons on the left {there are 7} are all ones you and your students will find on the dashboard. The 3 icons on the right are ones your students will find after they upload an image or draw an image on the included whiteboard. Hover over the picture, and little circles will appear on every icon. Hover over a circle, and text will appear that will explain more about what that icon does. 

While students are able to log in to their account via a computer or Chromebook, screenshots and directions in this post will focus on iOS devices, as that is what my district uses. 

When students first log on to the app, they should see the dashboard, which gives them 6 options:

You can find more information about what each of these options does by viewing this ThingLink

Submitting Work
If the student chooses to type a note, he will see a screen that looks like lined notebook paper. After typing, click the green check mark in the top, right corner. Then he will see a screen that looks like this:


Click the microphone to record voice notes, and click the notebook icon to go back to the typing screen to edit the typed work. Click the green check mark in the top, right corner to continue. 

If this class is set to "classroom sign in mode" {discussed in this blog post}, students will need to choose their name from the roster:

Notice the circles on the left next to student names -- this means the work can be submitted to multiple journals at a time, if you want
Selecting their name puts a green check mark next to it, so you can easily see which journal(s) are selected before moving on. You can submit work to as many student journals at a time as you want. {My class had 12 iPads, so students primarily worked with a partner and then submitted the work to both their journals when they were finished.}

This works basically the same way for all other features, but let's look at one more example: drawing. When a student chooses to draw, he sees a whiteboard and an array of colors, like this:

The eraser and marker size tool are both new features this year -- yay!
The student can draw with his finger or a stylus, choosing colors as he sees fit. To increase or decrease the width of the drawing pen, click the the button with 3 lines {next to the check mark}. When finished, click the green check mark to see a screen like this:


Click the microphone to add a voice recording, the pencil to go back and edit the drawing, and the "T" to add a caption in the bottom, left corner. There is talk about two new upcoming features, but I'm not sure when/if they will be released... One is the ability to record as you're drawing, so both the drawing and the voice are recorded at the same time -- much like Educreations or Explain Everything. The other feature is the ability to move the caption wherever you'd like on the screen so it can work as a label for diagrams and such. 

When finished, click the green check mark, select the student name from the list, and click the green check mark again. It's SO easy! My kindergartners were doing this with ease after they tested it just once! 


Viewing Work
As discussed in this blog post, students who sign in with a QR code in classroom sign in mode will see every other students' work in their newsfeed. Remember that you can change this by switching to individual student sign in; in this mode, students will only be able to see their work in Seesaw and will need to log out of their account each and every time they stop using the iPad. 


Copying and Editing
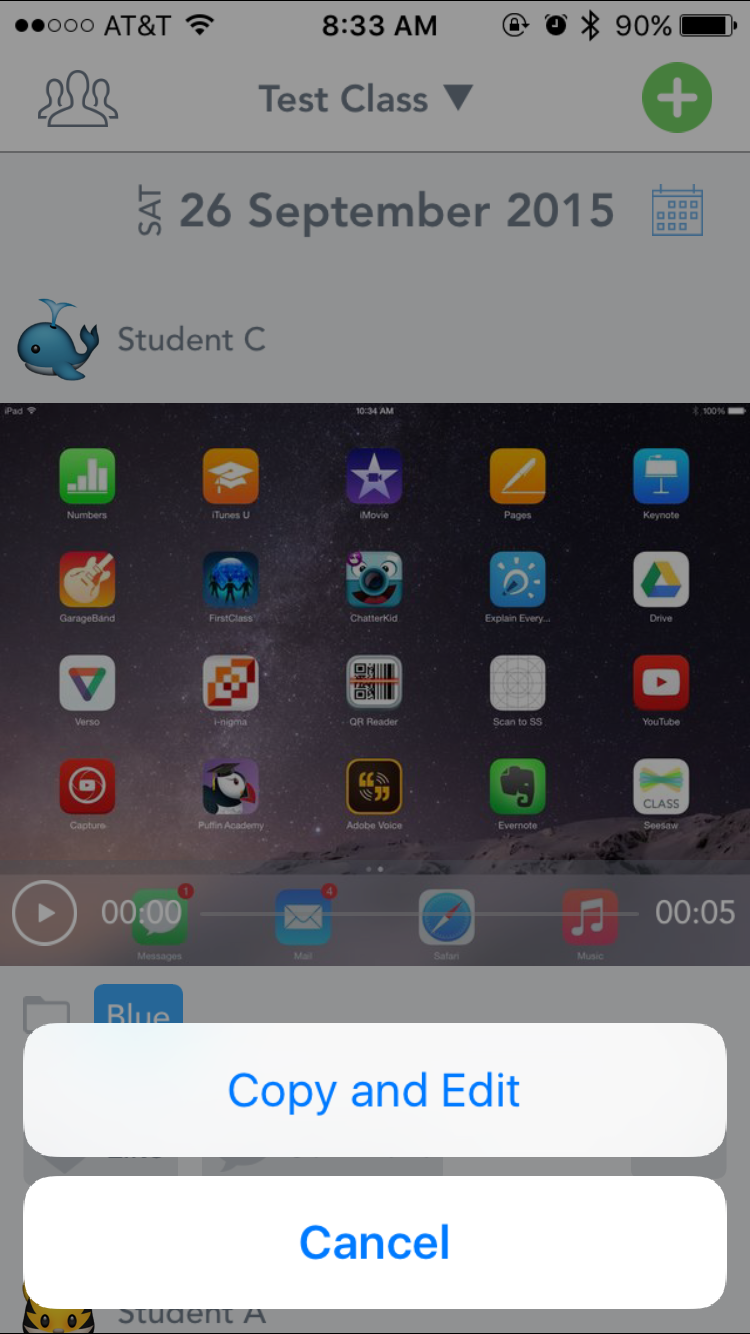
If students are in classroom sign in mode, they can view each others' work if you, the teacher, enabled access {find it by going into "manage class," looking under "students," and clicking to enable item editing}. When viewing others' work, students have the option to copy and edit something to add into their journal. They can copy and edit by clicking on the "..." next to someone else's work:


After pressing the "copy and edit" button, they'll see something like this:


This option was not available when my kids used it last year, so I haven't seen it in action with students yet! For this blog post, I copied and edited work with a voice recording attached to it. It appears that that voice recording stays attached to it, and that the new student can rotate the picture, record more voiceover, annotate over the picture, and add a text caption. When copying and editing, students can only submit to one journal at a time.

Notice the lack of circles on the left side next to the student names -- this means students can only submit to one journal at a time
If students press "link" within the app, they may see this pop-up:


Please note that you can only submit a link within the app if the link is copied to your clipboard. If you get this notice, you can click the home button of the iOS device, go into Safari, find the website you want, long-press in the URL bar, select "copy," and then double-click the home button of the iOS device to go back into Seesaw and enter the link. 


Feed View & Calendar View
More details about feed and calendar view will be discussed in the next blog post about teacher navigation, but for now, just know that students can access both of these options by clicking on the silhouette of the group of people in the top, left corner of their screen and viewing the slide-out menu that looks like this:

Students can always check the name of their teacher in this view and the name of the class they're logged into by going to their dashboard


Liking and Commenting
Students in classroom sign-in mode can see each others' work, and they are able to "like" or comment on classmates' work if you enable the feature. To enable it, go into "manage class" settings, find the "student likes and comments" section, and enable what you wish. You can enable just likes, just comments, or both, and you can require teacher approval before comments are published {which means you'll get a notification about each and every student comment}. 


Tweetable


Other post in this series:
  • Features: available 10.10.15 {what students can do, what parents can do, and what teachers can do}
  • Getting Started: available 10.11.15 {signing up, creating a class, classroom sign in vs. individual sign in, creating folders, helping students sign in}
  • Student Navigation: available 10.12.15 {icon glossary, submitting work, viewing work, copying and editing, feed and calendar view, liking and commenting}
  • Teacher Navigation: available 10.13.15{finding student work in the feed, individual student journal, calendar, folders, flagged work} 
  • Pushing Work to Students: available 10.14.15 {converting printed files to digital ones, sharing PDFs vs. image files, pushing work to everyone vs. pushing work to select students, AirDropping images}
  • Interacting with Student Work on Seesaw: available 10.15.15 {student work: dissected, editing people and folders, downloading and sharing items}
  • More Options: available 10.16.15 {managing class, students, parents, folders, other, and administrative details; student avatars; premium version}