
In case you are unfamiliar, Symbaloo is a free web tool that provides a place to save all your bookmarks. One advantage of using Symbaloo is that all your links are saved online, so as long as you have Internet access, you can view all your links! Another advantage is that Symbaloo has a free app for both Android and iOS devices. The app is slightly limited but does provide you with the most important capability: viewing all your bookmarks.
You can keep your collections of links public or private. If you choose to share with others, you can share with only select people or the entire WWW, and you can embed your Symbaloo on any website that accepts HTML (which includes EdLine, our CISD webpage host). This makes it so easy for students or parents to access your links directly from your CISD teacher page.
There are also some nice organizational features, such as color-coding links, grouping links in folders, and creating color-coded sections.
First things first: I'm the realest a tour and some vocabulary:
 | |
|
- Webmix - your collection or page of links (the entire green portion in the picture above). You can create as many webmixes as you want, and you re-size your webmixes so that they hold more links.
- Tile - box that contains a link. The empty or unused tiles just look like the background photo or color, while the used tiles (that have a link inside) typically have a picture (icon or logo from a website) and maybe some words on it. If you click on a used tile, the link opens.
- Tabs - you can create as many webmixes as you want, and they all appear in a horizontal row at the top of your page. To get to a different webmix, just click on the tab with the name of the webmix you want to view.
- Navigation buttons - because your webmixes appear in tabs at the top and you can create as many webmixes as you want, use the arrows on the left and right side of the tab row to navigate through a lot of webmixes.
- Your profile - click the person silhouette to see a drop down menu with choices such as your profile (which shows all your public webmixes), account settings, preferences, sign out button, etc.
- Search - click on the word "tiles" (in blue) to see a drop-down menu with choices for webmixes and profiles. Then type in the search box and click "enter." This is a great way to find great level or content-specific material without having to reinvent the wheel!
- Middle box - there's probably an official name for this, but I don't know what it is. :) You can change what's in the box but not delete it completely. You can make it an editable box, a Google search, the weather... there are a lot of choices. Whatever you choose to be in the middle box on one of your webmixes if what you'll see on all of your webmixes.
- Folder - available on the free, educational version (not the regular, free version) -- you can group tiles together in the same little box. You can also force tiles in a folder to play in sequence -- more about that below.
- More options - click to rename your webmix, change the background picture/color, re-size the webmix, etc.
- Remove - delete your webmix completely.
- Share - edit sharing options
- Refresh - pushes your latest update out to followers -- only shows after you've shared the webmix.
Create a webmix:
1. Sign up for a free account, if you don't already have one.
2. Symbaloo creates a webmix for you so that you have an example. You can delete these example webmixes at any time.
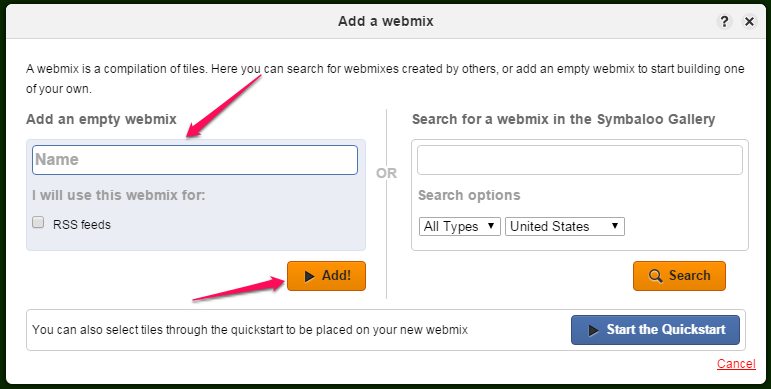
3. To create a webmix, click the + in the top, right corner.

4. Type the name of your webmix (you can change it later) and click the orange "add" button.
5. Your new webmix opens, and will probably look something like this:

6. Click on any tile to add your first link. A pop-up like the one shown below should appear on the left side of the screen:

7. Tons of tiles have already been added to other Symbaloo users' webmixes, so you can browse those tiles by clicking one of the bottom two options. (I've never used this option.) If you want to add a very specific link of your own, click the top option ("create a tile").
8. Add information as directed to the screen shown below:

- Paste the link in the text box that says "http://"
- Click where it says "add a name for the tile." The field will automatically populate with the link's name, but you can change the label to whatever you want
- Check the "show text?" box if you want the title you just typed to show up on the tile
 |
| tile with a caption |
 |
| tile without a caption |
- The colored but plain boxes control the background color of that entire tile, as shown below:


- Choose an icon or image for the tile. Symbaloo has lots of icons already uploaded to their site. Click "choose icon" to see all available icons (shown below). Hovering over any of the icons will show an enlarged view of that icon on your tile at the top of the pop-up window. Once you choose your icon, press "save."

You can also upload your own image to a tile. To do that, click "upload an image." You'll see a pop-up like the one below:

Click "choose file." Choose from any of the files on your computer. Then you'll see the pop-up like this, where the file name appears. Then click "upload."

Your image will appear with a small box inside. Whatever is inside that box is what will be displayed on your tile. (It's easy to remember because the part that won't be displayed on the tile is sort-of darkened or grayed out.)

After the selection box is covering all of the picture that you want shown, click "use selection to tile."

That original pop-up bar will still be visible on the left side of the screen; be sure to click "save" before clicking anywhere else! Then your tile icon will appear on the webmix with the photo you uploaded:

{Can't find a suitable image for your tile? Create your own! This post quickly tells how to create and edit your own images in PowerPoint. If you're a video-lover, click here to watch how to use PowerPoint to create my own images -- just fast forward to the 4-minute mark to bypass leading information about ThingLink.}
The scoop on the free, educational version:
If you're a teacher, you can get your account "upgraded" to the free, educational version by e-mailing the company, explaining your situation, and asking to switch to the educational version.
Once you're switched over, access your new account by visiting edu.symbaloo.com.
I'm sure there are more features, but the edu features I love include:
Sharing your webmixes:
View the webmix you want to share. At the top of the screen, press "share."


Ideas for use:
If you're a teacher, you can get your account "upgraded" to the free, educational version by e-mailing the company, explaining your situation, and asking to switch to the educational version.
Once you're switched over, access your new account by visiting edu.symbaloo.com.
I'm sure there are more features, but the edu features I love include:
- ability to group tiles into folders (so you can fit more links in a smaller amount of space)
- ability to "lock" the audience into viewing links in folders in a certain order (helpful if you're flipping your lesson, are showing tutorials, giving instructions, etc.)
Sharing your webmixes:
View the webmix you want to share. At the top of the screen, press "share."

Decide if you want to share publicly (with the entire WWW or, at least, anyone who finds your Symbaloo profile) or privately (just with people who have the link). Toggle this option with the blue buttons right above the orange "share my webmix" button.

After clicking "share my webmix," the right side -- which was previously grayed out -- will generate links. Just copy and paste the link to share, or click "embedded code" to get the HTML code.

Ideas for use:
- Create a webmix for yourself with all your key links. I have one for home where I link to all the sites I use to pay bills online. I have another webmix for school where I linked to Aesop, Eduphoria, Skyward, etc. (seen below):
- Create a webmix that houses lesson ideas, organized by unit or subject. (Similar to Pinterest, but with a smaller preview picture.)
- Create a webmix with links to games for your students. For example, when I taught Science Lab, I had a webmix for each grade level where I shared science games that related to what we did in the lab. Below is one such webmix I created for my kindergarten Science Lab classes:
- Create a webmix with instructional videos for your kids. I created short tutorials for my students using Shadow Puppet Edu, and then linked them in a webmix. I linked the webmix to a QR code, and posted the QR around the room so that students could watch whatever tutorials they needed whenever they needed them. Here's that webmix, if you're interested.
- Create a webmix with kid-friendly research links.
- Create a webmix for a flipped lesson, where you post links to all the parts of the lesson and have students visit them in a certain order.
- Create a webmix for parents. I just helped our dyslexia team create a webmix with parent training videos and links to commonly used websites; they did an awesome job and will get to share it with parents for years to come!
- Create a webmix of apps you want students to download on their device before bringing it to school. It can be nice to have the direct link to an app so students are sure to download the correct tool.
- Create a webmix of brain breaks. I haven't used this much since I discovered Go Noodle, but I used to use this webmix of brain breaks by Carla Stone. Another perk to this webmix: the YouTube videos open right inside of Symbaloo, so you don't have to deal with annoying sidebar ads on the YouTube site.
- Create a webmix with links to online books. Matt Gomez has two: eBooks 1 & eBooks 2.
...and how many times can I say "webmix" in one blog post?! Sheesh.
Feel free to check out more of my webmixes by clicking HERE, and leave a comment with your other webmix ideas!
