Image Map
Showing posts with label quiz. Show all posts

Sunday, July 19, 2015

Answer Garden: a Quick and Easy Polling System

Answer Garden advertises itself as the "minimal tool for maximum feedback," and I have to agree. It's super-quick and easy to use with even elementary age students. You can use it on any device with a browser, and they recently launched a free iOS app.


What is it?
AnswerGarden is a free tool that creates word clouds from multiple users simultaneously. {Reminder: a word cloud is a collection of words or phrases displayed in a cluster -- like a "cloud" shape -- where the words/phrases that are submitted the most frequently appear larger than the other words/phrases in the cluster. The more times a word or phrase is submitted, the larger it appears in the final product.}


How does it work?
You, the teacher, create an AnswerGarden on their website. Afterwards, share the link with students so they can visit your "garden" on their mobile device. {Tip: click here for 8 ways to quickly share links with students.}

Students simply type a short answer and click "submit." The answers appear in a word cloud in real time on everyone's device so it's easy to see which submission was entered the most frequently.


My favorite features
  • 100% free
  • Does not require anyone to sign up for an account or remember any additional passwords :)
  • Works on any device with a browser {perfect for the BYOD classroom because all students -- from the one on a laptop to the one on a Kindle Fire -- can participate from their device!}
  • Literally takes 60 seconds or less to set up


Classroom uses
While not made specifically for educational use, there are several ways to incorporate it into your classroom. Here are some basic ideas {but scroll to the end of this post to see more detailed examples of ways to use AnswerGarden with students}:
  • Whole group brainstorming
  • Voting 
  • Discussion 
  • Beginning-of-year activities
  • Review questions with short, simple answers

Create an AnswerGarden in 60 seconds or less
1. Go to the home page, scroll down, and click "create an answer garden" ...or click the + sign in the top, right corner.


Notice there is no account registration required! :)

2. Enter a question or prompt into the topic area.


If you don't want to do anything else, just scroll and click the "create" button at the very bottom of the page:


If you'd like to have a little bit more control, though, you have that option, too. Below are some of the preferences you can toggle:

  • Change the mode {I use the brainstorm mode if students are sharing devices and classroom mode if we're 1:1.}
    • Brainstorm: the audience can enter an unlimited number of answers, including unlimited copies of the same answer
    • Classroom: the audience can enter an unlimited number of answers, but they can enter each answer only once
    • Moderator: you have to manually approve each answer before it is added to the Answer Garden
    • Locked: the Answer Garden is closed and no new comments can be submitted
  • Change the answer length
    • Choose if your audience can submit answers 20 characters in length or 40. This includes spaces, so make sure to ask a question that can be answered in less than 40 characters! 
  • Password and Reminder E-mail
    • I utilize these options because I want the ability to delete unwanted answers, but it's definitely not a requirement. I do recommend, however, unchecking the newsletter box if you choose to have your password and link e-mailed to you.
  • Spam filter and network detection
    • AnswerGarden says the spam filter blocks common unwanted answers, including a range of inappropriate words. 


3. Share the link.  The actual URL is fairly short {for instance, the AnswerGarden I just created has a URL with 35 total characters in it, so students can just type it into their browser. {Click here to read about 8 ways to quickly share a link with students.} AnswerGarden provides other ways to share the link, though:

Scroll down on the actual AnswerGarden to see the share buttons.


Click the QR button to generate a large QR code that you can display on your Promethean for the audience to scan {I always had to turn the classroom lights off or else there wasn't enough contrast for students to scan from their seats}.


The "share" button allows you to share on a variety of social media sites or embed your AnswerGarden into another webpage. When embedding, you have two options. You can either embed the entire AnswerGarden, like this:


 or just embed a "microgarden" that only shows the answer box -- like a blind poll. That looks like this:
 

If you have a classroom website that students are used to accessing, the embed feature would be a really quick way for students to access your poll. 

Teacher tricks
  • New answers do not automatically appear in the AnswerGarden; refresh the page periodically to see new answers. 
  • Get an inappropriate answer? Walk the room. When someone posts something, the answer appears in blue on their device. Find the person with the device that has the underlined inappropriate-ness, and you've found the culprit. {Mentioning this up front is a great deterrent!} If you entered a password upon creating the AnswerGarden, you now have the ability to edit it... so you could temporarily close the AnswerGarden or moderate answers if you're in Moderator Mode. {This page gives more information about moderating and deleting unwanted answers -- just scroll down to the part where it says, "I'm a teacher."}
  • To see how many times an answer was submitted, just hover over it on the AnswerGarden with your mouse.
Ideas for use
  1. BOY getting-to-know-you project: everyone post 5 adjectives that describe themselves or their summer. 
  2. BOY getting-to-know-you game: the teacher poses a question (ex. "Do you prefer fiction or nonfiction?"), and the students type their answer. The answer that grows the biggest on the screen is the most popular. 
  3. BOY learning styles group quiz: the teacher can pose questions (ex. "Would you rather show your learning with a song or a play?" ... "Do you like numbers or words more?"), and the students type their answer. If you keep it pretty simple, you'll get an idea about what the class as a whole likes the most, and you can design your curriculum around it. 
  4. Quick, anonymous poll: quickly assess if the majority of the class understands the concept before moving on to the next part of your lesson. It's anonymous to all the students, although you can walk the room and look at student devices to see how everyone answered. 
  5. Short discussion: ask or post discussion questions to a novel or topic you're studying and let students weigh in. Just make sure students can type a short and sweet answer that's less than 41 characters!
  6. Exit ticket question {save the URL so you can review student answers later}
  7. "What other questions do you have about this topic?" 
  8. "What's one thing you're confused about in this lesson?"
  9. Whole group brainstorming: At the BOY have students submit their ideal class rules or talk about what it means to be a friend. You could also have students brainstorm things like digital citizenship tips, properties of matter, or character traits from the class novel.
  10. Ask for examples to illustrate student knowledge on a topic {Learning about the elements of literature? Ask students to submit examples similes, metaphors, onomatopoeia, etc. Studying parts of speech? Ask students to submit examples of adjectives, nouns, pronouns, etc. Learning about polygons or supply and demand? Students can submit real-life examples. Reviewing the scientific method? Students can submit examples of when they could use this concept in their life or even the question they would start with to solve a certain problem with the scientific method}.
  11. Get answers quickly to create a class graph: Let students post how many siblings they have, which type of apple they prefer to eat, or anything other data you use when creating a class graph. Once the page is refreshed, hover over the answers to see how many times each was entered. Then create a graph of the data the way you normally would.
  12. Vote. Need to decide on the class reward, fundraising idea, or class pet name? Use AnswerGarden! Just make sure students all type their answer in the same way to ensure that the most popular answer appears the largest in the word cloud.

How would you use AnswerGarden {or would you use it at all}? What other BYOD tools do you use?

Saturday, January 3, 2015

How to Use Google Forms

There are a plethora of uses for Google forms in the classroom. Two super-simple ways I use them in the classroom are for letting students register for Science Fair and for letting students sign in to the recycling club meetings. This post will focus on exactly how to set up a Google form so as to gain information from your students.

1. Sign up for a Google account if you don't already have one. {If you do have one, just sign in.}

2. Go to www.google.com/drive
If you see a screen like this:


just click "go to Google Drive."

3.  This is my dashboard:


Yours will look a bit different, depending on how much/what you have in your drive and whether or not you've updated to the newest version of Google Drive {I have not}.

Click "create" in the top, left corner:


4. Click "form" in the drop-down menu that appears after you click "create."

FYI: The arrow going up -- to the right of the "create" button -- means that you are going to upload a non-Google document to your drive. So, for instance, you could upload any Microsoft Office {Word, PowerPoint, Excel, Publisher, etc.} document to your drive. The fonts may not look the same after upload, especially if you used any non-default fonts {which may throw the spacing off a bit}, but everything else should remain intact. I typically only upload PDFs for the reasons mentioned above.


 More FYIs:
  • Clicking "folder" lets you create a new folder -- just like you would on your computer
  • Clicking "document" lets you create a word document -- much like Microsoft Word
  • A Google presentation is a lot like Microsoft PowerPoint
  • A Google spreadsheet is similar to Microsoft Excel
  • You may not have any other options after "form," depending on what apps you have added to your drive

5. You should see a screen like this:
 
This is your blank Google form, and now you get to personalize it. There are lots of things you could do, so I'm just going to show you the basics and let you play with it on your own to find the rest. :)


Title the form. This helps others know what your form's topic is, as well as helps you organize your forms in your Google cloud drive.

 
Add a description. Tell others what your form is about. This is totally optional but sometimes comes in handy!


Type your question in the "title" bar. You can add optional help text, which acts like notes to your readers. 


Change the question type. If you look at the picture above, you can see a button that says "multiple choice." If you click on that, you'll see a drop-down menu that shows you all the kinds of questions you can ask. This can come in handy if you need a certain answer from your audience. For instance, When I needed students to tell me the name of their homeroom teacher upon registering for the science fair, I chose the "choose from a list" option. This way, all homeroom teachers would be identified by their last name only, and all names would be spelled correctly so that I could sort the answers later.


Choose what participants will see when they submit your form. Click in the text box to change the words "Your response has been recorded." For instance, for the science fair form, I included my school e-mail address and encouraged participants to e-mail me by x date if they still had not received their entry number. Below, you'll see I have "Show link to submit another response" checked. This comes in handy when lots of people are going to use the same device to access the form. For instance, I check this box in my recycling club sign in form, because all the kids use my laptop to record their attendance.


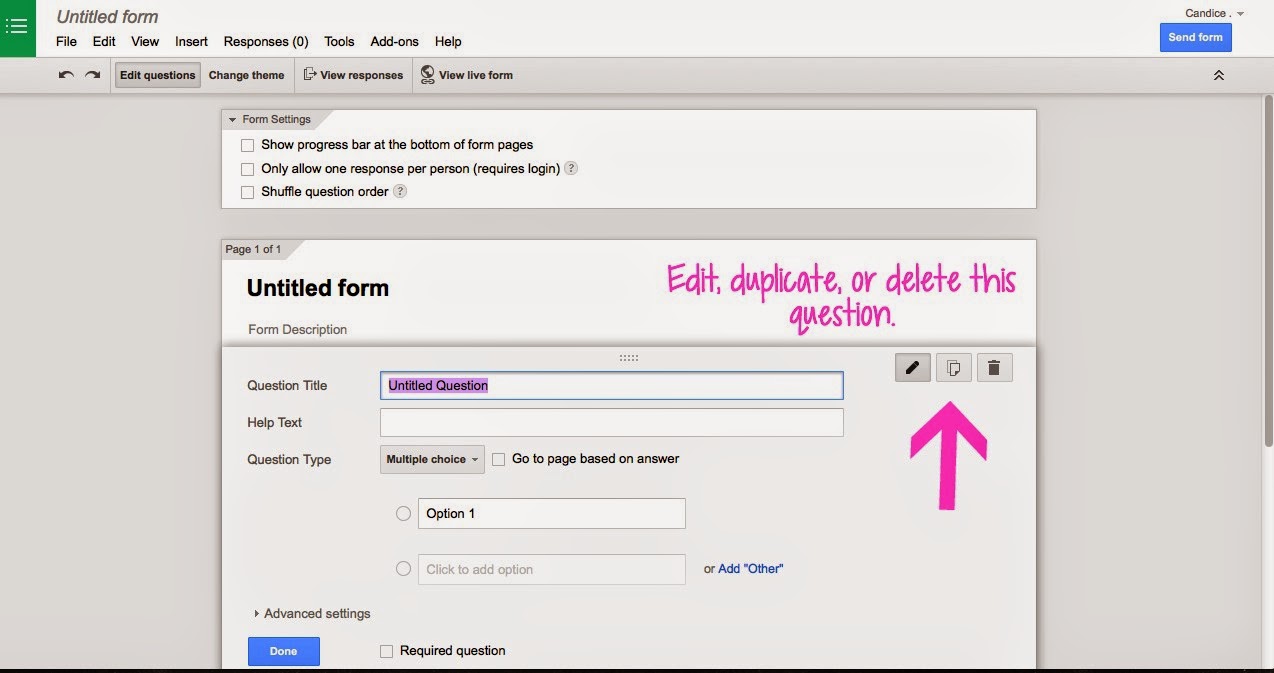
Use the gray buttons in the top of each question to edit the question, duplicate it, or delete it altogether.


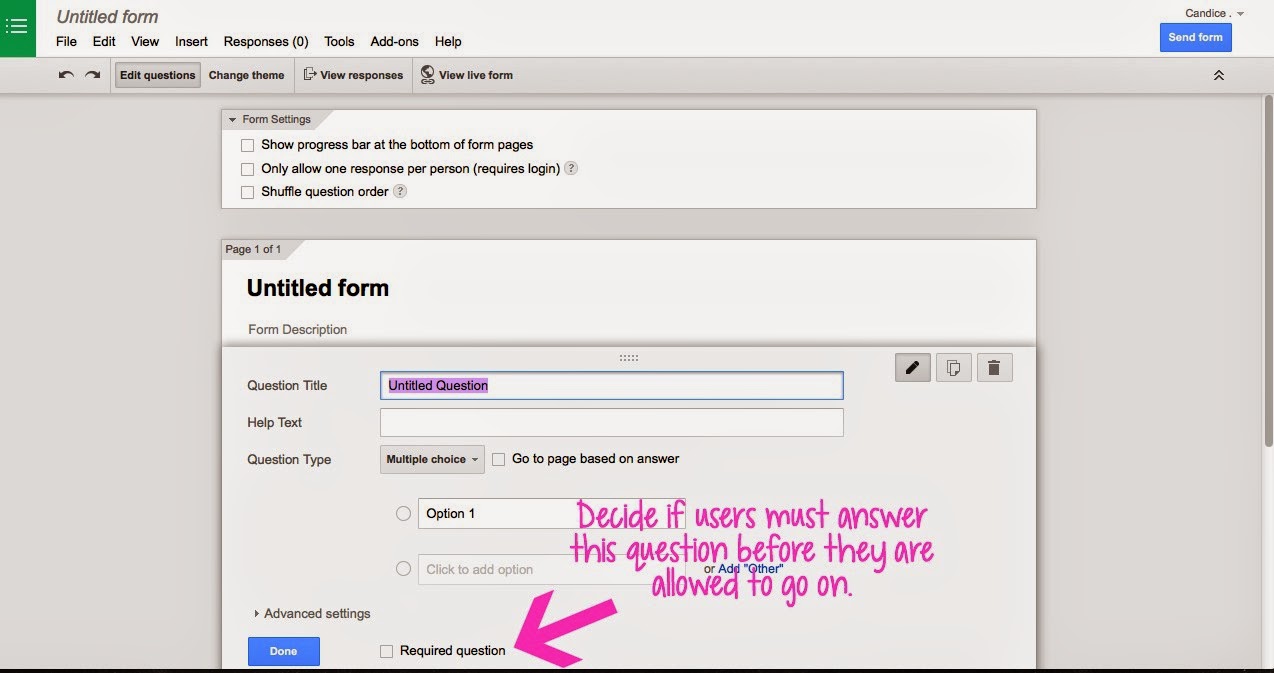
Require questions if you want. Requiring a question means that a user must answer it before they are allowed to submit the form. I use this for agreements. For instance, when parents sign their students up for my recycling club, I have a "question" that says something like, "I give the school permission to administer medical attention if needed and release the school of all liability. I understand that pick up is at 3:20 by the east doors." I make the question a "check box" type and make it required. I also make questions required when I need contact information.


Click "send form" when you're ready to publish it. When you click that button, it tells you how to share the link with others.


Other information:  click the "change theme" button on the top, left of the screen to change the appearance of the form. You can view what your live form looks like at any time by clicking "view" and "live form."


View the responses. After you publish your form, Google automatically generates a spreadsheet for that form with responses. The first row in the spreadsheet is filled with your questions, and each person's answers are put into the appropriate columns.


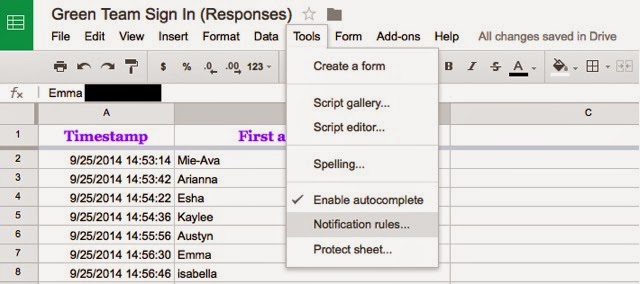
Set up notifications. This is one of the first things I do when I set up a new Google form. I go into the responses, click "tools," and then click "notification rules." From there, you can make sure that Google e-mails you when you get new responses to the document. For something where you expect a lot of responses, you can choose to just get a daily digest of the newest updates. If you are setting up a Google form that you don't plan to check immediately or every day {for instance, it's for a sign up -- not a class assignment}, I recommend setting up the notifications.


Sort information. Do this by hovering your mouse over the top of any column with information in it {for instance, in the above-picture, I could hover over column A or B}. An arrow will appear in the right corner of that box; if you click it, the spreadsheet will be sorted according to information in that column. I used this to sort students by teacher name or by grade level when I was getting ready for science fair.

Download responses. If you need a paper copy of the responses and want to make sure it prints okay, you can download a copy of the responses before printing. My top two choices for download would be as an Excel spreadsheet or a PDF, but there are 4 other download options you can utilize if you want.


Edit if you need to. You can always go back into your original Google form to edit, or you can edit it from the response page by going to "form" and then "edit form." You can edit a Google form at any time -- even after you've published it.


Ways to Use Google Forms in the Classroom:
  1. Beginning of the year contact information -- it would be great to give the link or let parents scan a QR code to the form during "meet the teacher." You could gather information about parent contacts, student birthdays, language(s) spoken at home, etc. without the need for index cards
  2. Beginning of the year, getting-to-know-you questionnaire for students
  3. Bellringer assignment: students must answer a particular question upon entering and record their response in the Google form
  4. Sign up form for parent/teacher conference times -- parents could request a couple of days and times that work for them, and you could follow up with a confirmation call
  5. Registering for a club or event
  6. Signing in to a club meeting or tutoring session. {Each entry is automatically time stamped for your convenience -- you don't have to make that a question.}
  7. Assessment
  8. Exit ticket
  9. Bully/abuse report -- kids can fill in the form anonymously to report bullying or abuse
  10. Reading log {kids fill in a Google form instead of recording their minutes on paper}
  11. Rubric/project/science fair entry/presentation scoring {you wouldn't share the link, but you'd have a spreadsheet of answers when you're finished}
  12. Peer assessment for projects/presentations
  13. Record management information: student infractions, binder signs, parent phone calls, office visits, etc. 
  14. Voting form for classroom positions {president, secretary, StuCo, etc.} or even for staging a mock voting booth during election years
What other uses can you think of for Google Forms in your class?
 

post signature

Friday, September 5, 2014

Kahoot

Kahoot is my newest favorite online quiz tool. I've now used it twice with 3rd and 4th graders, and I'm set to use it with kindergarten students on Monday.

Kahoot advertises that its site can be used for students in school or adults in a presentation. I normally am wary about wide statements like this, but I actually agree with this one. I attended a workshop over the summer that used Kahoot, and all of the adults in the session with me were super-into this game.


Before I go on, it's worth mentioning that Kahoot offers free downloads of their logo and pictures of users in action. You can find them HERE. That's where I'll get most of the pictures for today's blog post, and you could use them if you want to share Kahoot with your colleagues.

The Basics
Create a quiz, discussion, or survey. Launch the creation to generate a pin number. Participants enter the pin number via a browser on their device along with a nickname that will show on the screen when they play. You can quickly kick out any player before starting the game {which worked beautifully this week when one of my little friends wanted to be the class clown with an inappropriate nickname!} Assign a time limit of 5-120 seconds for each question.

The creation I've used so far is the quiz feature. With the quiz, you assign a correct answer (or correct answers). Participants get points for selecting the correct answer, and more points if they answer quickly. After each question, the top 5 scores (and nicknames) are displayed as a leader board. Obviously, Kahoot is very competitive in nature, but you can turn off the point system if you want.

You also have the ability to download an Excel spreadsheet of the data at the end of the game, which makes it a fun way to sneak in some assessment. ;)

How does it work for the teacher?
Go to getkahoot.com Create a free account it you don't already have one and sign in.

Home page

Once inside, select a quiz, discussion, or survey to create for your participants.

Quiz:
Multiple-choice, 2-4 answer questions. After everyone has answered, the correct answer (or answers) has a check mark next to it, and participants are awarded more points for getting the correct answer quickly. Answers are graphed so you can quickly see how many participants got the correct answer.


Discussion:
I'm a little confused about this. I was under the impression that participants would get to type in an answer to an open-ended question. But when I tested it, it was just a two-answer question with a correct answer -- just like the quiz questions. I don't understand the motive to use that portion, so I've got to be missing something... I'll update this post when I figure it out. :)

Survey:
Multiple-choice question that graphs the answers at the end. There are no points and no correct answers in a survey.

Other features:
  • Add images or YouTube videos (still in the beta stage) to your quiz
  • Share your Kahoot(s) with colleagues who also have a Kahoot account
  • Duplicate a Kahoot for easy creation of similar assessments
  • Toggle privacy settings
  • Share public Kahoots on social media or via e-mail
  • Control how much time students have to answer each question (from 5-120 seconds)
  • Determine if there is only one correct answer or a question, or if there are multiple
  • Control the pace of the game -- only move on to the next question when YOU want to. (I love this because we can talk about the correct answer before moving on!)


How does it work for the participants?
Participants should go to kahoot.it and see the flashing logo screen. When you, the teacher, launch a quiz, Kahoot generates a game pin that students must type in order to enter your quiz. Students enter the game pin and a nickname (to be displayed on the scoreboard if they have one of the top 5 scores).


Participants have to wait for you to start the quiz; everyone starts at the same time.


The first question displays on the screen and gives participants a few seconds of wait time so they can read and process the question.

Then the screen changes so that the question is smaller but still at the top of the screen. An image is in the middle -- one you uploaded or the Kahoot logo -- and the answer choices are at the bottom. Kahoot doesn't use the regular A, B, C, D choices. Instead, they use things like a red triangle, a blue hexagon, a yellow oval, etc. Those colors and shapes appear on the participants' screens, so all they have to do is click the answer.

If you've set each question at 120 seconds but all students enter their answer in 10 seconds, Kahoot automatically moves on. You can also move on from any question at any time, regardless of if everyone has answered or not.

Once everyone answers, the correct answer is shown on the board as well as on participants' devices.


 I love the immediate feedback!

After the quiz is over, you can download the data to analyze and help improve your instruction. :)

My kids were SO motivated to play -- and not be silly -- because they wanted to see their name on the top 5 leader board.

Rarely do I see all of my students engaged like that, but Kahoot managed to capture their attention for a 10-question quiz. I call that a "win." :)


I plan to use Kahoot with my kindergarteners, as well, although it's a bit more challenging. 

Kinder friends need more physical action,  so I took the shapes in Kahoot and printed an enlarged version of each on a piece of paper. I printed and laminated the shapes. My plan was to put the shapes on the floor or in a certain corner of the room and have the students physically move their bodies to stand next to the shape that has the right answer.

I was proud of myself for that idea, but I knew there was no way I could read the question, explain it, AND have them move their body to the correct answer in 120 seconds -- the max time allowed for a question. So I created my own workaround...

I created the quiz like normal, but I only gave them two answer choices. I created each question with 30 seconds of answer time. Then I took the quiz myself and screenshotted {is that a word?} each question. I then edited the questions to make them only show for 5 seconds.

Afterwards, I uploaded my screenshots to Blendspace. {You could also just put them in a PowerPoint or flipchart.} When it's was time to take the quiz, I'll read the question from the screenshot, and students can have as much time as they need to move. When they are all situated, I'll launch the question and click the answer that the majority of the class picked. The quiz will show the correct answer, and I can correct any misconceptions. Since the quiz won't go on until I click the "next" button, I'll then pull up the next screenshot and start the process all over again.

It's a bit more tedious than just playing the quiz the "regular" way, but I love the idea of incorporating a kinesthetic aspect, so I think it's worth it.

Have you ever used Kahoot? What pros/cons did you find? What other tech assessments do you use?


post signature