Image Map

Wednesday, July 17, 2013

Guided Access for iPad

Are you lucky enough to have iPads or iPod Touches in your classroom? If so, you might be familiar with the frustration of asking students to go into one particular app...and then walking by later and seeing that they are not, in fact, doing what you'd asked them to do.


Feel free to reassure me that your little darlings sometimes do this, too. :)

Apple released a feature called "Guided Access" for their iOS devices with the release of iOS 6, so this has been out for awhile. However, I realize that not everyone knows about these "tricks," so I thought I'd share this little gem with you all.

Of course, all the newest devices have it automatically, but if yours doesn't, you might try updating your software to see if it makes a difference!

What is Guided Access?

Guided Access is a brilliant feature, IMHO! It allows you, the adult, to restrict access to only one particular app. On top of that, it allows you to disable any part of the screen you feel is irrelevant to the app's functionality.

So, for instance, lets say you wanted your students to look through and respond to e-mails {maybe they have a pen pal as part of their writing assignment or something}. You could enable the Guided Access to ensure that students only stay inside the e-mail app.

Furthermore, let's say you didn't want those students to be able to delete any e-mails. You could disable the trash can icon inside the mail app so that students would never be able to click it or delete anything.

Didn't I tell you this was brilliant?!

How to Enable Guided Access

First, go into your Settings app. Click on "General."

I had to scribble out our WiFi name, since our family's last name. ;)
Inside the "General" section, scroll down until you see the word "Accessibility." I think all iOS devices -- regardless of age or updates -- have this portion. {I could be wrong, though. It's happened before. ;) }


Now is the test: do you have it or do you not? Inside the "Accessibility" portion, scroll down until you find a section labeled "Learning." If you can't find the learning section, that means you either need to update your iOS version or upgrade your device {sorry!}. Check with an Apple Genius to figure out your options.

If you do see it, though, go ahead and click on the "Learning" tab.

You can see that mine is already enabled because it says "On."
Once inside, make sure that your Guided Access toggle is switched to "On." You can set a passcode that will be used every time from right here, or you can save that part for later. Toggle the "enable screen sleep" switch if you wish.


You're ready to rock 'n roll! Get started:
  1. Go into any app of your choice and triple-click the home button. {I was unable to take any screenshots of this because Guided Access does not allow screenshots.} 
  2. Use your finger to circle any parts of the app you don't want the student to have access to. 
  3. Click "Start" in the top right corner. It may prompt you to enter a 4-digit passcode if you haven't already set one. Pick something challenging enough that the student won't guess it, but not so challenging that you'll forget! ;)
  4. If the student clicks the home button in an attempt to exit, a pop-up will flash at the top of the screen that says, "Guided Acces is enabled. Triple-click the home button to exit." Your student will, of course, see it, but can only take guesses to the code. 
  5. When you're ready to exit, triple-click the home button again and enter your passcode. Click "End" in the top left corner.
Done! 

This is a fantastic feature to use in classrooms with your little friends who are just toooo tempted by other apps to stay on task. ;)

Hope it helps!

Monday, July 8, 2013

Sharing Large Files

Have you ever tried to send a really big file to someone, only to have your e-mail client refuse to send it because of its size?

That's happened to me a few times, and it can be really frustrating.

Most "storage in the cloud" websites give you an option to share a link or e-mail a large file for free. There is, however, another program that is only a large-file-sharing service {i.e. The good news is, you don't have to sign up for a storage in the cloud option if you're still hesitant to do so}: Droplr.

Logo from the Droplr website

Droplr is a free service that requires no sign-up or registration before using. All you do is go to the Droplr homepage, click the big green button that says, "select a file to share now,"


and select the file you'd like to share from your computer.

After your file is uploaded to the Droplr website, you'll see a screen like this:

I uploaded a test document, and it will expire in 7 days, so don't waste your time typing in the link :)

Droplr shows you the link, and you can e-mail/embed the link or share it on your favorite social media sites. 

If you don't have a Droplr account, that's totally okay, but you will get a message that your file will be deleted from the Droplr servers in 7 days {if you have an account, they will keep your file forever}.

While I have never used Droplr to send a file to anyone, it was used to send a file to me pretty recently. I ordered a couple of PDF books from a small education agency online. The PDFs were much too large to e-mail, so the agency sent them to me through Droplr. The agency's representative simply included the link to the document inside an e-mail, explaining what to do. All I had to do was click the link and then click "download." It was super fast and easy.

Ways to Use Droplr:
  • Need to share a large lesson plan file with another teacher? Upload it to Droplr first. 
  • Need to share lots of large pictures with a parent or the yearbook volunteer? Upload to Droplr.
Since I would probably only use Droplr to send large documents or photos, those are the only ideas I have. :) But Droplr would be a great option for you if you still haven't signed up for a storage in the cloud service and need to send something large.

Symbaloo

Symbaloo is a really cool bookmarking website that allows you to organize tons and tons of bookmarks -- for FREE -- and access them anywhere that you have an Internet connection.

How Does it Work?

Go to www.symbaloo.com and register for a free account with your e-mail address. 

From there, you can start organizing your bookmarks onto different pages {Symbaloo calls them "webmixes"}. For further organization, you can organize each bookmark on the "webmix" in whichever order you wish.

Symbaloo allows you to organize your bookmarks into different pages {they call them "webmixes"}, and then you can organize each bookmark on the "webmix" in whichever order you wish.

You can also customize things like the background, the icon tiles, etc. Let me show you what I'm talking about. Here's a screenshot of my work webmix:

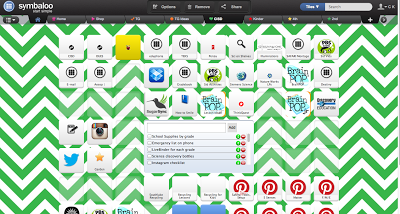
My work webmix -- click to enlarge
The default background is plain black, but I'm addicted to chevron print right now, so I uploaded that green chevron pattern myself. 

The squares you see are the "tiles" in my webmix.  You can click on a blank square to add a bookmark of your choosing, and then you can move that tile anywhere on your webmix. You can see that I have my tiles organized in a way that makes sense to me; this makes it easy for me to find what I need quickly.

You can see that some of my tiles are running off the bottom of the page; this is because you aren't limited to just the tile boxes on the screen. You can actually lengthen or widen your webmix to add an unlimited number of tiles if you want to.

You have the option to share your webmix, and I assume that your webmixes are private unless you share them {but don't quote me on that!}. I haven't shared any webmixes yet, but I am currently working on one for each grade level that I teach. I'll let you know how the sharing goes. :)

You can also install a little button right onto your browser's toolbar if you want to add links to your Symbaloo from another website. You can download those browser buttons right from the Symbaloo page, and they look like this:


They're similar to that "Pin It" button that Pinterest offers, in that I can add links to my webmixes, no matter where I am on the web. The button on the left takes me straight to my Symbaloo home page, and the button on the right allows me to add links from any webpage.


There's An App For That

Another convenience: you can have mobile device access, too.

Search the Apple App Store for "Symbaloo," and you'll see something that looks like this:


After it's downloaded, you just log in with the same information you use to log in on a computer. Instead of a tab layout like the desktop version has, the mobile version has a more condensed look:

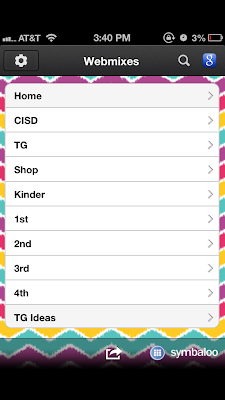
Don't judge the fact that I have a webmix devoted entirely to shopping! :)
The web app comes with 3 included backgrounds {a plain/dark color, a dock by a lake, and some green leaves}, or you can upload your own background like I did. {This background is courtesy of the Cuptakes app.}

Click on the name of a webmix to see your links:

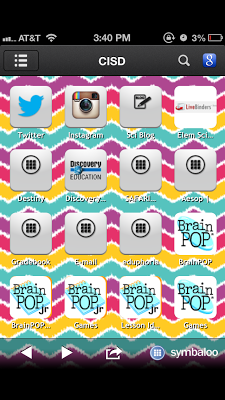
Here's my work webmix. You can see that the cool web organization is lost on the iOS app.
The web version isn't as visually appealing as the desktop version is, but I won't complain because it's still crazy-useful and completely FREE! 

I did notice that there is an education version of Symbaloo, but I didn't spend much time looking at it after I realized that it is not free. I think there are plenty of ways you can incorporate this free version into your school-life, though. 

Here are my ideas for using Symbaloo in your classroom:
  • Put all professional links on one webmix: gradebook, video streaming sites that are only for teacher-use, Pinterest boards that are relevant for lesson planning, etc. This would allow you to lesson plan from anywhere {yippee! Just what you wanted to hear, right? ;) }.
  • After meetings at work, admin can upload relevant documents to his/her Dropbox or Copy account, and then place a linked tile to the document on a webmix. 
  • Set up a webmix to share with your students: place links to educational games or videos that they could view at home to extend their learning.
  • If you have a flipped classroom, group tiles for each day or week on a webmix. You could link the video presentation, documents {using Dropbox or another "storage in the cloud" option}, extension research websites, and other references. 
  • If your students are doing a research project, you could place links to the research sites you want them to use on a webmix. 
  • If your students tend to need a lot of homework help, you could place links to helpful YouTube videos, how-to websites, and homework helper websites. 
  • If you teach special education, you could place links to information websites about various disabilities and refer parents to it when their child is placed on an IEP or 504. 
  • If you are the school counselor, you could place links to information websites with poison control numbers, child abuse hotlines, abuse information, etc. 
  • If you are an admin member or a webmaster, you could place links to each teacher's web page on a webmix. It pretty much does the same as a drop-down menu on any school website, but it's a little more visually appealing. :)
  • If your students blog or maintain websites of their own, you could place links to each of their pages in a webmix so that you don't have to search for them every time you want to read their writings or grade their work. 
  • If you tend to use a lot of Promethean board games, computer games, or video/picture websites in your lesson plans, use Symbaloo to keep track of all of it. You could make a webmix for each new week,  month, or unit that you teach. Organize all necessary links in order so that you just have to come back and click a couple of things before you find what you need next year.
I'm sure there are more ways to use Symbaloo in your classroom, but I think that list is a pretty good starting point.

::June 2014 Update: On Tuesday, Symbaloo announced 2 new features: "quick add" and "marking." To summarize, "quick add" means you can quickly add just a link to your webmix, and save the rest of the customization options for later. The "marking" feature lets you color the background of certain tiles in your webmix so that you can better organize everything on one page. {LOVE that!} Here's the article from the Symbaloo blog that tells you how to take advantage of the two new features.

Swagbucks

Let's see if Swagbucks is for you:
  1. Do you frequently conduct Google {or Yahoo!, or...} searches?
  2. Do you like free stuff?
If you said "yes" to those two questions, you definitely need to learn about Swagbucks!

What is Swagbucks?

Swagbucks is a company that allows you to earn rewards every time you conduct an Internet search through them. Their "rewards" are known as "swagbucks," and when you earn enough of them, you can actually cash in your 'bucks for some cool, free stuff.

In all actuality, Swagbucks allows you do earn rewards for other things besides just Internet searches {answering the daily poll, answering a survey, and watching a specific video, for instance, are all just 3 more ways to earn points}, but the web surfing is something that I can {and do} do at work.

How Does it Work?

Basically, you just sign up for a free account at Swagbucks. Whenever you want to conduct a web search, go to http://search.swagbucks.com and type in your search term(s). While I won't earn reward points for every Internet search {they are rewarded randomly}, I like to at least give myself a shot of earning free things by using the SB search engine.

Rewards:

The rewards can be pretty cool, depending on how many points you've earned. I think the rewards that interest me the most are the gift cards, but there are rewards in virtually every category: books, movies, clothing, jewelry, electronics, school supplies... you get the picture. You do have to earn a fairly substantial amount of points to earn a nice reward, but isn't that to be expected?

I frequently cash in my swagbucks for an Amazon gift card. As I'm sure you know, Amazon has a variety of school supplies, games, and books that can be useful in the classroom. 

A $5 Amazon gift card currently costs 450 SB

So many of our students have their own Kindle or Nook -- why not give away a gift card as a classroom prize and let the student order a new book?

Other neat stuff you could earn for your classroom treasure box or class store:

Modeling Dough currently costs 279 SB

A Spongebob puzzle currently costs 429 SB

A $10 gift card to Fandango currently costs 1,175 SB

 You can also use Swagbucks to purchase supplies for your classroom or for individual students:
A set of 4 skinny dry-erase markers currently costs 349 SB.


A 26- or 39-week subscription to the Wall Street Journal currently costs 3,400 SB. This would be a good way to incorporate some more nonfiction reading.

I've noticed that Swagbucks runs sales on select items at random times. I've seen gift cards on sale before, but they're basically the only thing I keep my eye on at this point, so I'm not sure about the other items.

In any case, Swagbucks is an easy way to earn some things for your classroom without spending your own money.

Google Drive

Google Drive {previously referred to as Google Docs} is another "storage in the cloud" option. If you already have a Google account and don't really want to sign up for anything else, Google Drive might be the best option for you.

Via

Honestly, I don't know a whole lot about Google Drive because I don't use it that often. But here is what I do know...

Features:


  • 5 GB of storage for free when you sign up
  • Ability to share a file {that person can download the file or place it in his/her Google Drive}
  • Ability to create and store various types of files: document {similar to Microsoft Word}, presentation {similar to Microsoft PowerPoint}, spreadsheet {similar to Microsoft Excel}, form, or drawing. These different creation options are called "apps."
  • Ability to add more  "apps." {For instance, I love that you can add photo editing and brainstorming maps!}
  • Ability to purchase more storage, if needed {25 or 100 GB, starting at $2.49/month}

Ideas for Use:

As far as I know, there is no way to earn extra, free space on Google Drive. I also find it cumbersome to create new folders. Because of its limited features and the fact that I find Copy and Dropbox much more user-friendly and convenient, I obviously don't use Google Drive very often.

However, I do use Google Drive for some things:
  • Google Drive is great when you need to collect responses from others! I know for a fact that our school used it during our mock presidential election of 2012; our librarian created a form {poll} that allowed the students to "vote" for the presidential candidate of their choosing. I've also used Google Drive to create sign-ups for things like classroom volunteers or science camps.
  • I used Google Drive for awhile in college after I bought a new laptop and didn't want to shell out the money to pay for Microsoft Office right away. The formatting is a little different, but the ability to create documents, presentations, and spreadsheets without paying for any special software is pretty useful. 
You can also use it in some of the ways I detailed in THIS blog post about Dropbox. 


Ready to Get Started?

Click HERE to sign up for a Google account. If you already have a Google account and just want to get started adding things to your Google Drive, click HERE.

Copy

Copy is a "storage in the cloud" option I'm quickly falling in love with!

Copy is almost exactly like Dropbox {read my post about DB by clicking HERE}, but you get more free space as soon as you sign up. Like I said before, if I wasn't already so invested in Dropbox, Copy would probably be my favorite "storage in the cloud" option right now.

Logo via the Copy website
Features:

  • 15 GB of storage for free when you sign up
  • Earn 5 GB of extra, free storage for yourself and whomever you invite if they use your referral link. {Supposedly, this offer runs for a limited time only, in an effort to celebrate Copy's big release. So jump on this while you can!}
  • Free iOS apps for your mobile devices
  • Ability to share folders or documents with others
  • Ability to customize how others see your documents {can specify if you want those people to be able to edit your files or just view them}
  • If you install Copy on your computer and work from within its folder, Copy will save and sync your files instantaneously so you never have to worry about uploading the latest file
  • Ability to pay for more storage {250 or 500 GB} if you ever need it {Prices start at $9.99 a month.} 
  • When you share a folder with someone else, you split the "cost" of the storage you're using. For instance, if you are sharing a folder that is 12 MB of total space with 3 other people {4 people total}, you each are only "charged" for 3 MB of space. Miraculously, Copy thinks that is the only fair way to do it! Otherwise, they say, it's like going out to dinner with your friends and everyone having to pay for the entire bill. I love this generosity!

Ideas for Use:

For ideas on how to use Copy to make your life easier, check out the ideas I wrote in my Dropbox post.


Ready to Get Started?

Click HERE to sign up for Copy {That is a referral link, and if you use it, we BOTH get an extra 5 GB of free space!} and get started!

Confused?

I'm working on a series of video tutorials that will show you how to use Copy. When I finish the videos, I'll make sure to post the link below so that you can access them.

If you are prompted for a password, put in our school's mascot (plural form).

Sunday, July 7, 2013

Dropbox

Dropbox is one of the "storage in the cloud" sites I wrote about in this post. While there are lots of "cloud" options, I really like Dropbox.

Logo from the Dropbox website

Features:
  • 2 GB of storage for free when you sign up
  • Earn 250 MG of extra, free storage for yourself and whomever you invite if they sign up using your referral link
  • Free iOS apps for your mobile devices
  • Ability to share folders with other Dropbox users {all members of the folder can view/contribute to the folder}
  • Ability to share links to a single document with non-Dropbox users {they can view and/or download your document}
  • If you install Dropbox on your computer and work from within its folder, Dropbox will save and sync your files instantaneously so you never have to worry about uploading the latest file
  • Ability to pay for more storage {100, 200, or 500 GB} if you ever need it {Prices start at $9.99 a month.}

Ideas for Using Dropbox...

...for yourself: 
  • Reduce paper stacks and clutter by scanning documents and putting them in your Dropbox.
  • Stop e-mailing files to yourself. Stop storing your files on a jump drive that you could misplace at any moment. Stop leaving your files at work and being unable to view/work on them at home. If you upload to Dropbox, your files are on the 'net 24/7 and you can access them from any device that can connect to the Internet or access a data network. {Do this by signing up and then downloading the Dropbox program to your computer.}
  • Upload a shopping list to your Dropbox. Access it from your phone while in the store. Never worry about leaving your list at home again. 
  • Work from home: access all your lesson plans, components, assessments, templates, etc. from your home computer.
  • Upload holiday or vacation photos and share the link with your family -- much more secure and safe than Facebook or a photo-sharing website.  
  • Sync your pictures from your smartphone, iPod Touch, or tablet. Dropbox remembers which pictures it's already uploaded so you only get the latest pictures you've taken... and all your pictures are backed up any time you open the free Dropbox app on your device.
  • Create a folder for each student. Use a copy machine in the workroom to scan and e-mail copies of work, assessments, etc. Send the paper copy home with the student and keep the digital copy for yourself. No paper to organize or keep track of because it's all digital!
...with colleagues:
  • Create "shared" folders with your teammates. Everyone with an invitation can put files into the folder, and all will have access to edit/delete/print/move, etc. {similar to the I:// drive at school}. This is great for sharing lesson plans, lesson plan components, pictures, templates, parent letters, assessments, etc.
  • Send a large file -- that's too big to e-mail -- to your teammate by giving them the documents' link in your Dropbox folder.
...with parents:
  • Create a class newsletter and store it in your Dropbox account. Share the link with parents. They can view the archive of newsletters any time they want. {Similarly, you could set up a folder for all parent communications, and they could view digital versions of notifications sent home in Wednesday folders.}
  • Create folders with class pictures and share the link to the folder with parents. {You could also give parents the ability to add pictures,}
  • Create a folder for each student and share that folder with each student's parents. Let that serve as your virtual file or portfolio on that student for the duration of the year. You can upload pictures/scans of great student work or work to make up when a student is sick. Parents can download their student's work and/or upload communication, such as transportation change notes. At the end of the year, pass the folder on to the parent, and he/she can keep it indefinitely while you free up space in your online storage.
...with students: 
  • Create a folder for each student and either give the students your login information or ask each student to create their own Dropbox account and "share" the folder with them. Use the folder either as a virtual inbox -- students can turn in work here -- or as a virtual portfolio -- students can showcase their progress throughout the year. The best part? Students can keep their Dropbox account and folder after the year is over and take it with them all the way to high school or beyond!
  • Upload documents to your Dropbox and insert a QR code to the file. Instead of printing the document for everyone, print copies of the QR code, have students scan it with an iPad, and allow students to complete paperless work. 
Ready to Get Started?

Click HERE to sign up for Dropbox {That is a referral link, and if you use it, we BOTH get an extra 250 MB of free space!} and get started!

Confused?

I'm working on a series of video tutorials that will show you how to use Dropbox. Below are the videos I've finished so far:


CISD employees: if you are prompted for a password, put in our school's mascot (plural form).  

Thursday, July 4, 2013

Free Apps

Here's a word problem for you:

If Candice is super-cheap and never pays for apps, how does she acquire all kinds of apps on her iOS devices that cost anywhere from $0.99-$10.00 each?

Ready to check your answer?

Here it is: a little gem called Apps Gone Free. 


This app is free in The App Store.

I rarely enable push notifications on my device, but trust me: you'll want them enabled for this app.

Apps Gone Free scours The App Store daily, looking for temporarily free apps. When I first started using this app, I read somewhere that Apps Gone Free prides itself on featuring apps that are rarely or never free. {So you won't see the same apps featured every day, but you also won't see EVERY temporarily free app in The App Store.}

This thing has saved me a ton of money. I find educational apps, productivity apps, and everything in between.

There are lots of "free app finder" apps available, but right now, this is my favorite one. Try it if you'd like to get some free stuff for your Apple device!

Wednesday, July 3, 2013

Storage in the Cloud

"Storage in the cloud" is a hot phrase. But what exactly does it mean, and what are the benefits of using it?

Nope, not this kind of cloud.

"Storage in the cloud" is a fancy way of saying that you are storing information on the Internet. Think of it like a flash drive that is with you at virtually every moment, and you never have to keep up with it. Or think of it like the H:// or I:// drives at school, except you can access it from anywhere with an Internet connection -- not just from school.

Pros: 
  1. You can access your information from any computer or device that has an Internet connection. So you pretty much have your files available wherever you go. That means you don't have to worry about leaving a document on your H:// drive and then not being able to access it at home.
  2. You can never lose your information. It's stored forever on the 'net.
  3. You don't have to keep up with a flash drive anymore. Hello, convenience.
There are lots of options for storage in the cloud systems these days. My top three favorites are as follows:
Click on the above names to take you to my posts on each system for more information. ...Or just pick the name you like the best and dive in! {There are other options like Box and SugarSync, but I'm not a fan, so I won't be writing a post about them. Feel free to explore them if you'd like some other options, though!}

My Recommendation:

Personally, my favorites are Dropbox and Copy. Actually, let me clarify: Copy is "the new guy" on the block, and he is VERY similar to Dropbox, except he offers way more free space right off the bat. If I wasn't already so invested in Dropbox, I think Copy would be my main squeeze. But since I started my love affair with Dropbox several years ago and have SO MANY FILES already on there, I'm trying to give equal love to DB and Copy. :) 

Since Copy is so new, you might have trouble accessing it at school. {CISD employees: I've already requested that Copy be removed from the "block" list... nothin' yet.} If that happens to you, Dropbox is a fantastic choice!

If you already have a Google account, don't want to sign up for anything else, and/or would like the ability to create presentations, polls, or spreadsheets, Google Drive might be ideal for you.