Image Map
Showing posts with label assessment. Show all posts

Wednesday, December 13, 2017

Favorite Tech Tools of 2017

As I reflect on 2017, I wanted to share the top 30 technology tools I've used, trained on, or recommended to teachers this year. 


  1. Answer Garden: quickly gather data in the form of a word cloud
  2. Canva: create images, posters, and presentations
  3. Classroom Screen: all your must-have tools are located in one place online
  4. Go Noodle: free brain breaks all in one spot
  5. Google Chrome and its extensions: log in to save all your bookmarks and preferences (click here to see a list of my favorite extensions)
  6. Google Custom Search: create a custom internet search with pre-approved websites
  7. Google Drive and all its components: I cannot say enough good things about Docs, Slides, Sheets, and Forms...the possibilities are endless!
  8. Google Earth Voyages: fantastic for virtual field trips or to just add a little extra "oomph" to your lesson
  9. Google Hangouts: Conduct meetings even when you're not in the same room! I love the "share my screen" feature, which allows me to let teachers see what my screen looks like as I walk them through a project
  10. Google Voice: gives you an extra phone number that connects to your existing mobile number. Great for making parent phone calls or texts without revealing your personal phone number. 
  11. Instant Classroom: upload your class roster and generate seating charts, groups, and more. 
  12. Kerem Erkan QR Code Generator: there is no shortage of QR code generators online, but this one is my favorite because you can create codes to plain text, maps, text messages, and more. 
  13. Online Stopwatch: counts up or down, includes fun animations (if you want to use them), and gives your students a visual as to how much time is left 
  14. Padlet: virtual corkboard that can be used for exit tickets, question parking lots, backchannel tool, and more. The addition of a column layout was HUGE this year
  15. Pic Collagecreate posters, collages, and other projects by layering images and text
  16. Plickers: a digital assessment tool that only requires one device (the teacher's!)
  17. Poll Everywhere: use the "clickable image" feature to assess very young students or those that struggle with reading 
  18. Popplet: create online brainstorm webs that include pictures, drawings, and text
  19. Quizizz: a fun game that provides practice for students and assessment data for teachers
  20. Reflector Teacher: mirror your mobile device on your computer screen, record movements on your mobile device, and all students to project as well
  21. Remind: communicate with a large group via text or email without revealing your personal information. I regularly recommend this just for the scheduling feature
  22. SafeShare.tv: crop YouTube videos while filtering ads and video recommendations
  23. Screencast-o-Matic: create videos of your computer screen
  24. Seesaw: ePortfolio tool geared toward young learners. The Activities feature has been a game-changer this year
  25. Shadow Puppet Edu: create slideshows with music or narration 
  26. Sign Up Genius: I used this when I taught Science Lab to gather volunteers for stations during Science Night. Since then, I've seen it used for potluck lunches, field trip volunteers, and mystery reading guest sign-ups. 
  27. Socrative: a digital assignment tool where any amount of planning will work
  28. Symbaloo: Out of all the ways to share links with students, this one is probably the easiest and most universal. 
  29. TweetDeck: schedule your tweets in advance and keep up with Twitter chats more easily
  30. Wifi Mouse: an iOS app that works over Wifi to connect to your computer and act as a mouse, letting you control your computer screen from anywhere in the room

Are there any tools you'd add to my list? 

Thursday, April 28, 2016

Let's Recap

Have you heard about Recap? It's a relatively new tool that has some great features! In a nutshell, Recap is a completely free assessment resource {available on the web or through an iPad app} that lets students respond to the teachers' questions or prompts via video.

Website | iPad App

With recap, teachers can...
  • create questions that are typed or voice-recorded 
  • choose how students will sign in: 7-digit alphabetical PIN or e-mail address/password
  • add up to 10 questions in a single assignment {and, as of the newest update on April 12, teachers can now give more than one assignment to students at a time}
  • give an assignment to the whole class or only certain students
  • set a max response time to make grading faster and students' answers more precise
  • set a due date for assignments
  • add a poll at the end of an assignment that asks students how well they think they understood the material
  • view individual student information or the entire class's responses as a whole
  • grab the link to an individual video to share with others (e.g. parents, admin, your co-teacher, and/or social media)
  • leave written feedback/commentary on student videos 

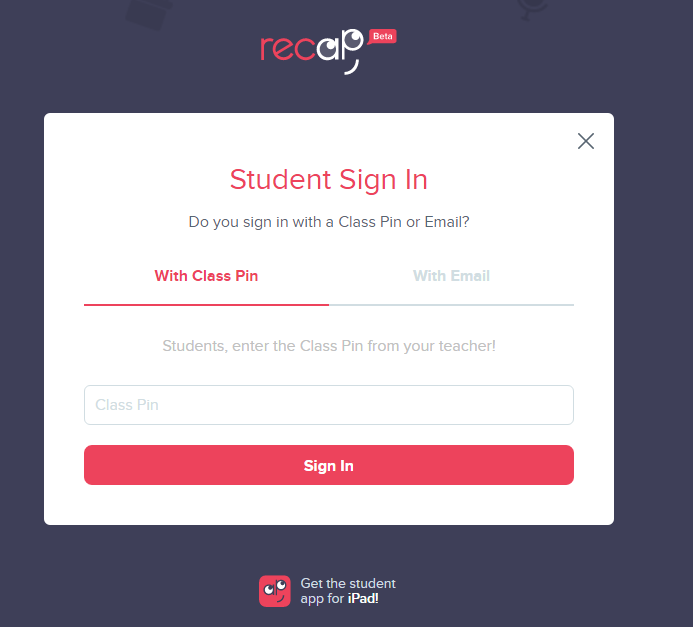
The view is super-simple from the students' side. Learners indicate that they are a student on the login screen:


Students can sign in with a class PIN or an e-mail address {whichever option the teacher enabled when he/she set up the class}:


If signing in with a PIN, the child must then select his/her name from the class list before seeing any assignments:


The student dashboard allows learners to see previously submitted assignments as well as those that have not yet been completed. The dashboard is also where students can view feedback from their teacher on submitted assignments. {Note that students cannot see other students' assignments or answers.} Here's an example of what the dashboard might look like for your students:

Don't you love that confused look on my face in the screenshot? haha! 

This video -- filmed by EdTechTeacher's Greg Kuloweic -- shows you Recap in action from both the teacher and the student side {but keep in mind that a couple of features have been added since this video was released}:


I already use Seesaw...should I still consider Recap?
While there are similarities between Seesaw and Recap, it's important to recognize that these are two completely different resources. Recap is strictly for assessing students via video (and follow-up poll if the teacher enables it), while Seesaw is more of an ePortfolio tool that happens to have a video feature, too. If you are a Seesaw user, you may still consider incorporating Recap for the opportunity to differentiate questions and/or allow students to turn in video responses confidentially. 

To integrate Recap with Seesaw on iPads, first make sure the Recap app is on all student devices. Then push a note in Seesaw to the entire class with the login information (e.g. 7-digit PIN if students are without e-mail addresses), as shown below.

Seesaw user tip: create a folder just for login information

While students cannot copy the PIN from the Seesaw note directly into the Recap app, this at least provides a consistent place for students to find login information independently. 


Resources:

Tuesday, December 15, 2015

Winter Tech Tools

During the craziness of this last week of school before winter break, consider trying one of these winter-themed tech tools to get in the holiday spirit:

1. Virtual Fireplace -- here or here
This heatless fireplace is the perfect way to make your classroom calm and cozy.

Photo source


2. Winter Magnetic Poetry (by Kasey Bell of Shake Up Learning)
Kasey created a free winter poetry activity for you in Google Slides. To use, just go to her web page and click "Get Your FREE Copy of the Winter Magnetic Poetry Template." Then click the blue "make a copy" button of the webpage that pops up. A copy of the item will automatically be added to your Google Drive. From there, your students can drag and drop the words on the snowy background to create whatever poem or story they choose. 


3. Quizizz snow-themed quiz template 
The company released this template last week -- just in time for winter class quizzes! Click here to see it live.


4. Winter Around the World Project
While it's too late to collaborate on the project this year (entries were due on December 7), your class could always take a look at this year's entries and think of ways to contribute next year!  


5. Advent Calendars - Polar Express and Christmas Around the World
No matter the age or subject you teach, try incorporating one of those advent calendars into the first five minutes of your day. One is based on the Polar Express book, while the other tests your knowledge on how Christmas is celebrated around the world.


6. Holiday Card Project (Special thanks to Heather for this idea!)
Jen, of Projects By Jen, hosts a holiday card project each year. While this year's is over, you (and students) could always browse the archivessign up for Jen's Remind group to get reminders to upcoming projects, and start preparing for next year's gingerbread-themed holiday card project.  


7. Mystery Skype (Special thanks to Heather for this idea!)
If you sign up for the Holiday Card Project with Jen, you can choose to be included in the "Ho-Ho-Holiday Mystery Skype" with several other classes. If you'd just like to find classes on your own to Skype with, browse the Skype for Education website. You could ask other classes to share their holiday customs, or try to guess where in the world a class is, just based on holiday traditions or geographical clues.


8. Interactive Websites
There are tons of holiday, snow, and winter-themed websites! Any of the links below will take you to a list of themed activities:

Tuesday, October 6, 2015

My Favorite Evergreen Apps

iPads are wonderful tools, but in order to use them to their full potential, it's important to look at evergreen apps. Evergreen apps are "non-subject apps useful throughout the year for speaking, writing, listening, drawing, annotating, curating, collaborating, sharing, and more." (Daccord, 2013.) I find evergreen apps more convenient than content-specific apps, as students (and I) can use them for a variety of projects, regardless of the subject or grade level.

Here are my favorite evergreen apps:

1. The "does everything" app:  Seesaw (free) or Explain Everything ($3.99)


If you teach elementary school, Seesaw is the app for you. While I've seen high school teachers use Seesaw, Explain Everything might be a better bet for the secondary crowd. (Secondary peeps: if you prefer a free app, Educreations is good -- it just doesn't have all the features Explain Everything does.)

Both have a whiteboard feature (among many other components!) that allows students to draw on the screen with their finger or a stylus and a recording option where students can record their voice over a project. This link will show you a series of blog post I wrote on my technology blog about Seesaw.

2. The tutorial app: Shadow Puppet Edu (free)


Users can string several photos or videos into one slideshow, and then record their voice over the entire presentation, adding text, music, and drawings where needed. The Shadow Puppet website has great examples from classroom teachers on how to use the app.

3. The poster app: Tackk (free)


Tackk (available in both an app and on the web) allows users to create online posters with a variety of media inside. Tackk is much like Smore, except Tackk allows users to create an unlimited number of posters per account, and teachers can easily create lesson plan template for students. Click here to learn more about Tackk.

4. The interactive images app: ThingLink (free)


ThingLink (available in an app and on the web) allows users to upload a photo and then apply "tags" -- in the form of plain text, links, or other embedded content -- across the photo. Click here to learn more about ThingLink.

5. The mind map app: Popplet Lite (free)


Popplet is a brainstorming app that allows users to create bubble maps. You can save bubble maps as PDFs or image files, and then import into another app such as Canvas or Seesaw to share. Click here too see a popplet my students made when discussing science toolsClick here to view public popplets for more ideas.

6. The assessment app: Socrative (free)


Socrative (available in an app and on the web) is my favorite paperless assessment tool. Teachers can ask questions on the fly, give students a pre-planned quiz, or engage students with a "space race" competitive assessment before receiving data quickly in the format of their choice.

7. The brainstorming app: Padlet (free)


Padlet (available on the web and in a brand new app) lets users create a central hub for collaboration. It's great for discussion questions, mind maps, virtual "parking lots," and much more.

8. The collection app: Google Forms (free)


Technically, users can only create Google forms from a computer. But since finished forms are accessible from a mobile device, I'm throwing this one in the mix. Google forms are so versatile! Once you create a form from the computer, send students the link or attach it to a QR code for students to scan at their convenience. This blog post tells you how to create a Google form and suggests ways for using it in the classroom.

9. The collaborative drawing app: Whiteboard Lite (free)


On the surface, this just appears as a plain whiteboard app, but there's an awesome feature that will help students write/draw collaboratively from different devices: users on the same WiFi connection can draw on the same whiteboard simultaneously, and the other person's drawings appear in real time on your device.

10. The note-taking app: Paperport Notes (free)


This is a nice alternative to the widely-hailed but expensive (for an app) Notability. Paperport Notes lets users add blank or lined pages, camera images, files from cloud services, web snippets, and clipboard contents to digital notebooks. Users can then type, draw, or highlight with their finger or stylus, and/or record a voice over each page.


Tweet This:

References

Sunday, July 19, 2015

Answer Garden: a Quick and Easy Polling System

Answer Garden advertises itself as the "minimal tool for maximum feedback," and I have to agree. It's super-quick and easy to use with even elementary age students. You can use it on any device with a browser, and they recently launched a free iOS app.


What is it?
AnswerGarden is a free tool that creates word clouds from multiple users simultaneously. {Reminder: a word cloud is a collection of words or phrases displayed in a cluster -- like a "cloud" shape -- where the words/phrases that are submitted the most frequently appear larger than the other words/phrases in the cluster. The more times a word or phrase is submitted, the larger it appears in the final product.}


How does it work?
You, the teacher, create an AnswerGarden on their website. Afterwards, share the link with students so they can visit your "garden" on their mobile device. {Tip: click here for 8 ways to quickly share links with students.}

Students simply type a short answer and click "submit." The answers appear in a word cloud in real time on everyone's device so it's easy to see which submission was entered the most frequently.


My favorite features
  • 100% free
  • Does not require anyone to sign up for an account or remember any additional passwords :)
  • Works on any device with a browser {perfect for the BYOD classroom because all students -- from the one on a laptop to the one on a Kindle Fire -- can participate from their device!}
  • Literally takes 60 seconds or less to set up


Classroom uses
While not made specifically for educational use, there are several ways to incorporate it into your classroom. Here are some basic ideas {but scroll to the end of this post to see more detailed examples of ways to use AnswerGarden with students}:
  • Whole group brainstorming
  • Voting 
  • Discussion 
  • Beginning-of-year activities
  • Review questions with short, simple answers

Create an AnswerGarden in 60 seconds or less
1. Go to the home page, scroll down, and click "create an answer garden" ...or click the + sign in the top, right corner.


Notice there is no account registration required! :)

2. Enter a question or prompt into the topic area.


If you don't want to do anything else, just scroll and click the "create" button at the very bottom of the page:


If you'd like to have a little bit more control, though, you have that option, too. Below are some of the preferences you can toggle:

  • Change the mode {I use the brainstorm mode if students are sharing devices and classroom mode if we're 1:1.}
    • Brainstorm: the audience can enter an unlimited number of answers, including unlimited copies of the same answer
    • Classroom: the audience can enter an unlimited number of answers, but they can enter each answer only once
    • Moderator: you have to manually approve each answer before it is added to the Answer Garden
    • Locked: the Answer Garden is closed and no new comments can be submitted
  • Change the answer length
    • Choose if your audience can submit answers 20 characters in length or 40. This includes spaces, so make sure to ask a question that can be answered in less than 40 characters! 
  • Password and Reminder E-mail
    • I utilize these options because I want the ability to delete unwanted answers, but it's definitely not a requirement. I do recommend, however, unchecking the newsletter box if you choose to have your password and link e-mailed to you.
  • Spam filter and network detection
    • AnswerGarden says the spam filter blocks common unwanted answers, including a range of inappropriate words. 


3. Share the link.  The actual URL is fairly short {for instance, the AnswerGarden I just created has a URL with 35 total characters in it, so students can just type it into their browser. {Click here to read about 8 ways to quickly share a link with students.} AnswerGarden provides other ways to share the link, though:

Scroll down on the actual AnswerGarden to see the share buttons.


Click the QR button to generate a large QR code that you can display on your Promethean for the audience to scan {I always had to turn the classroom lights off or else there wasn't enough contrast for students to scan from their seats}.


The "share" button allows you to share on a variety of social media sites or embed your AnswerGarden into another webpage. When embedding, you have two options. You can either embed the entire AnswerGarden, like this:


 or just embed a "microgarden" that only shows the answer box -- like a blind poll. That looks like this:
 

If you have a classroom website that students are used to accessing, the embed feature would be a really quick way for students to access your poll. 

Teacher tricks
  • New answers do not automatically appear in the AnswerGarden; refresh the page periodically to see new answers. 
  • Get an inappropriate answer? Walk the room. When someone posts something, the answer appears in blue on their device. Find the person with the device that has the underlined inappropriate-ness, and you've found the culprit. {Mentioning this up front is a great deterrent!} If you entered a password upon creating the AnswerGarden, you now have the ability to edit it... so you could temporarily close the AnswerGarden or moderate answers if you're in Moderator Mode. {This page gives more information about moderating and deleting unwanted answers -- just scroll down to the part where it says, "I'm a teacher."}
  • To see how many times an answer was submitted, just hover over it on the AnswerGarden with your mouse.
Ideas for use
  1. BOY getting-to-know-you project: everyone post 5 adjectives that describe themselves or their summer. 
  2. BOY getting-to-know-you game: the teacher poses a question (ex. "Do you prefer fiction or nonfiction?"), and the students type their answer. The answer that grows the biggest on the screen is the most popular. 
  3. BOY learning styles group quiz: the teacher can pose questions (ex. "Would you rather show your learning with a song or a play?" ... "Do you like numbers or words more?"), and the students type their answer. If you keep it pretty simple, you'll get an idea about what the class as a whole likes the most, and you can design your curriculum around it. 
  4. Quick, anonymous poll: quickly assess if the majority of the class understands the concept before moving on to the next part of your lesson. It's anonymous to all the students, although you can walk the room and look at student devices to see how everyone answered. 
  5. Short discussion: ask or post discussion questions to a novel or topic you're studying and let students weigh in. Just make sure students can type a short and sweet answer that's less than 41 characters!
  6. Exit ticket question {save the URL so you can review student answers later}
  7. "What other questions do you have about this topic?" 
  8. "What's one thing you're confused about in this lesson?"
  9. Whole group brainstorming: At the BOY have students submit their ideal class rules or talk about what it means to be a friend. You could also have students brainstorm things like digital citizenship tips, properties of matter, or character traits from the class novel.
  10. Ask for examples to illustrate student knowledge on a topic {Learning about the elements of literature? Ask students to submit examples similes, metaphors, onomatopoeia, etc. Studying parts of speech? Ask students to submit examples of adjectives, nouns, pronouns, etc. Learning about polygons or supply and demand? Students can submit real-life examples. Reviewing the scientific method? Students can submit examples of when they could use this concept in their life or even the question they would start with to solve a certain problem with the scientific method}.
  11. Get answers quickly to create a class graph: Let students post how many siblings they have, which type of apple they prefer to eat, or anything other data you use when creating a class graph. Once the page is refreshed, hover over the answers to see how many times each was entered. Then create a graph of the data the way you normally would.
  12. Vote. Need to decide on the class reward, fundraising idea, or class pet name? Use AnswerGarden! Just make sure students all type their answer in the same way to ensure that the most popular answer appears the largest in the word cloud.

How would you use AnswerGarden {or would you use it at all}? What other BYOD tools do you use?

Saturday, May 2, 2015

Message Students & Parents Without Revealing Personal Information

I wrote about this service back in 2013, but they've debuted some new features since then, so I thought I'd update. :)

The service makes it super-easy to get the word out to your classes in that it:
  • provides a PDF with step-by-step directions that you can print or post on your class website
  • allows your classes to sign up to receive updates either by text message OR by e-mail 
  • provides a widget code for you to cut-and-paste into your website so that everyone can see updates {regardless of if they've signed up to receive the updates on their personal device or not}

Other key features about Remind:
  • free
  • download the app for on-the-go updates
  • pre-schedule messages or send them in real time
  • ability to attach files to messages
  • set up as many different sections or groups as you want {so you could have a section for your tutoring group, Spanish club, church's youth group, homeroom class, and daughter's basketball team if you want!}
  • view subscribers in each group and the date in which they joined
  • ability to make personal notes about each subscriber {I find this most helpful when I have parent subscribers because I can make a note of which child "belongs to" them!}
  • view all your past sent messages and choose to send them again or tweet the message
  • no deletion available {helps protect teachers and students!}
  • chat feature {more information below}
  • stamp feature {more information below}
-----

Chat feature: available starting in April 2015, but Remind is rolling it out a group at a time. For instance, app users on the wait list will receive it first, and then they'll roll it out to web users. Get your name on the wait list by logging in to the app and clicking on "chat." Learn more here.
  • Unless otherwise enabled, only the teacher can initiate chats
  • Can set "office hours" so you're only contacted during times of your choosing
  • Transcript of all chat history is available
  • Allows you to chat one-on-one with anyone in your group instead of sending a mass message
-----

Stamp feature: available on April 20, 2015:
  • allows recipients of your message to provide instant feedback without the sender getting a barrage of messages
  • Stamp options include these symbols: ★ ✓ ✘ ?
  •  = I like it, I appreciate this, and/or this message is a favorite of mine
  • ✓ = yes
  • ✘ = no
  • = I don't understand, I have a question, and/or I need more information
  • Subscribers see an overall count of the results, while the sender sees how each subscriber answered
  • Great way to check for understanding in class! 
  • Remind's list of 10 suggestions for using stamps {some include using it as a quiz or polling option -- great idea!}

Have you ever used Remind? If so, have you used or will you use the chat and stamp features? If you haven't used Remind, would you consider it? Why/why not?

Sunday, February 15, 2015

Seesaw: An ePortfolio and Paperless Class Option

Seesaw, who advertises themselves as "the learning journal," is my newest favorite tech tool. It's available both on a browser and on iOS-compatible devices {download the app for free here} or on Android devices. In a nutshell, it's an easy way for students without e-mail addresses to turn in work to you and/or create an ePortfolio. 
More Information
You, the teacher, must create an account on the Seesaw app. Afterwards, add a journal for each student -- it's very quick! Seesaw generates a QR code that students scan in order to join your class. From there, students can upload or take a photo from within the app, annotate over the top of it, and record his/her actions and voice. In that respect it's a lot like Educreations, but Seesaw allows each kid to have his/her own special journal. 
Pros:
  • Totally free.
  • Compatible with iOS and Android. Both apps are free, of course.
  • Free web access.
  • Multiple sign-in options. Kids can sign in with a (Seesaw-generated) QR code or an e-mail address -- choose what works best for your students.
  • Unlimited space. Teachers can create an unlimited number of spaces, have an unlimited number of students, and students get unlimited amount of space for work uploads.
  • No e-mail address, username, or password required. Each class has a QR code that students simply have to scan in order to access the class. This eliminates the need for logging out and back in before every assignment, which can eat up a lot of time!
  • Plays well with others. Seesaw is compatible with lots of commonly-used creation apps so that you can import work from there into the Seesaw journal. It can also help you bypass the need for an account in those other apps. For instance, users typically need an account in order to export work from Shadow Puppet Edu. However, if they export to Seesaw, no account is needed!
  • Co-teaching? No problem. Add a co-teacher to your account by simply e-mailing the Seesaw team. 
  • Moderate as needed. Ability for the teacher to approve/deny each journal entry, along with reassigning work to students if they accidentally upload to the wrong journal.
  • School-wide account option. E-mail the Seesaw team to activate this option. Once done, you can upload student accounts in bulk, and a student's work can go with them from year to year.
  • Activate alerts. Get notified via e-mail and/or on your device each time a student uploads work, if you want. {Parents also have this capability with their own child's work.}
  • Easy parent communication. Teachers have the option to invite parents to view their child's work {parents only see their child's work}. Parents can view everything that is uploaded to their child's account and comment on individual assignments {if you activate that feature}. If their child is enrolled in more than one class that uses Seesaw, the parent should see all work merged into one stream.
  • Optional upgrade for parents. A basic parent account is free, but they can upgrade for $10/year to access additional features. 
  • Quickly find student work. The teacher can access a calendar view; click on a day to access all work added to the journal that day. The teacher can also click on a specific student's journal in order to see work only he or she completed. Finally, the teacher can flag work for follow-up, and then later choose to view only the flagged items.

Cons:
  • No way to push information to students. I spoke with the support team, and they said they've heard this from a few teachers and might be adding this feature in the future. But for now, you cannot upload anything to a class journal for students to grab and work on, for instance. If your iPads have AirDrop, though, there's an easy work-around. 
  • No way to edit. This is a feature the team is supposedly working on, but for now, once something is uploaded, the teacher has to delete it -- as students cannot delete -- and the student will have to edit and re-upload, as there are no "do-overs." 
  • School accounts seem needed. Journals do not carry over from year to year unless you have a school account. I'm not sure what happens to the student's work after the school year is over, but it's something to look into. 
  • No way to grade. It would be super if this app gave you the ability to grade things or annotate on work, but right now, it's just a storage hub for student work.
  • No PDF support. But you can take photos/screenshots of PDFs, so this is only a minor annoyance.
Personally, I think this would be awesome to take into parent conferences. If the parent already has an account, there are no surprises! But if not, all of the student's work is on your iPad, so you can just let his/her work samples do the talking. 
You can use Seesaw even if you only have 1 iPad in your class. Just have students take a picture of their paper work and upload it to their own account instead of turning in the paper version. And because Seesaw is compatible with so many other commonly-used creation apps, you aren't limited to just annotation and videos for student uploads. Here's a list of apps with which Seesaw plays well. Plus, the Seesaw website even has lots of activity ideas already posted for each subject area so you can dive in ASAP.

Thursday, January 29, 2015

How to Go Paperless with Elementary School Assessments

I love systems like Socrative and Kahoot, but they aren't as conducive for younger students who can't read as well or as quickly as some of my older students.

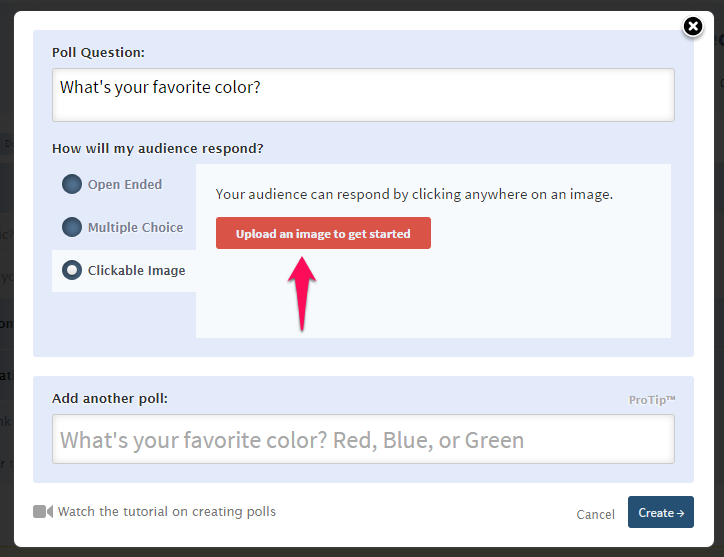
Luckily, Poll Everywhere has a cool, unique feature that is SO helpful in assessing the little ones. It's called the "clickable image" feature. (Poll Everywhere has lots of options and is free to use, so I definitely recommend signing up for an account!)

When you start a new poll, Poll Everywhere lets you choose how you want that poll to look. Just select the "clickable image" button to utilize this feature.


After that, you can upload your image and get started:


For this example, I just uploaded a picture from Google of 5 lessons from Dr. Seuss. Of course, you can use any picture you want (or make a collage). After the image is uploaded, click on it to set parameters for the answers. So in the picture below, you can see the translucent white box around "1. Today you are you, that is truer than true. There is no one alive who is youer than you" -- that means that portion is a potential answer for voters. Set as many parameters as you want and adjust the size of each. If someone taking this poll clicks anywhere within the translucent box shown below, their answer will be counted for life lesson number one.


After you set answer parameters, move on to the poll display page. It might look a little something like the picture below (notice I changed the question so it fits the image now!):


If you look at the row of icons on the right side of my picture, you'll see 7 options of things you can do with your poll at this point. Here is what each icon means:

  • Paintbrush: change the color scheme of the poll
  • 2nd button from the top: activate the poll and "push" it to student devices
  • Eye with a slash: toggle whether or not the question parameters are seen
  • Green pin: toggle whether or not the green pins are shown when people click answers (as students touch the screen to answer, a green pin will appear on their screen where they clicked)
  • Stop sign: stop the poll
  • File cabinet: clear the answers from this poll
  • 4 arrows: display the poll in full screen
There are even more customization options in the blue boxes to the right of all the icons -- I'll let you explore those for yourself.  

In the picture above, you can see a URL displayed right under the question; students can use that URL to quickly participate in the poll from any device with a browser, so this is perfect for the BYOD classroom. If anyone visits this URL before the poll has been activated, they'll just see a picture of a pie. Not sure why that's the chosen icon, but it definitely makes it easy for students to recognize when they're at the correct page. :) 


For a weather poll for my kindergarten students, I displayed this while they were working:


I didn't make this collage myself (I found it on a free flipchart I got from Promethean Planet), but it's easy to do so with a photo-editing tool or in PowerPoint.

You can string several questions together so that students can take a multi-question quiz; this is what I did for the kindergarten weather poll. I believe Poll Everywhere gives teachers the option for students to have an account so you know who is answering in which way, but there was something that kept me from activating that option... I can't remember if it's because it costs money to do that, or if it's because my students are too young to have e-mail accounts or register for something like this. Or both. ;) In any case, walking the room while students are answering is a quick fix to being able to see which answers below to which students. They can only vote once, so that green pin will stay on the screen until you clear it or move on to the next question.

Here's an example of what students see on their screen:


Below is a collage I quickly made in PowerPoint to use as a warm-up for my 4th graders when we did a matter investigation involving water content of fruit:


I wanted them to be able to see the fruit as they chose the answer, so the clickable image worked well for my 4th graders in this instance.

The possibilities are really endless with this clickable image option! How would you use this in your class (or would you)?

post signature

Saturday, January 3, 2015

How to Use Google Forms

There are a plethora of uses for Google forms in the classroom. Two super-simple ways I use them in the classroom are for letting students register for Science Fair and for letting students sign in to the recycling club meetings. This post will focus on exactly how to set up a Google form so as to gain information from your students.

1. Sign up for a Google account if you don't already have one. {If you do have one, just sign in.}

2. Go to www.google.com/drive
If you see a screen like this:


just click "go to Google Drive."

3.  This is my dashboard:


Yours will look a bit different, depending on how much/what you have in your drive and whether or not you've updated to the newest version of Google Drive {I have not}.

Click "create" in the top, left corner:


4. Click "form" in the drop-down menu that appears after you click "create."

FYI: The arrow going up -- to the right of the "create" button -- means that you are going to upload a non-Google document to your drive. So, for instance, you could upload any Microsoft Office {Word, PowerPoint, Excel, Publisher, etc.} document to your drive. The fonts may not look the same after upload, especially if you used any non-default fonts {which may throw the spacing off a bit}, but everything else should remain intact. I typically only upload PDFs for the reasons mentioned above.


 More FYIs:
  • Clicking "folder" lets you create a new folder -- just like you would on your computer
  • Clicking "document" lets you create a word document -- much like Microsoft Word
  • A Google presentation is a lot like Microsoft PowerPoint
  • A Google spreadsheet is similar to Microsoft Excel
  • You may not have any other options after "form," depending on what apps you have added to your drive

5. You should see a screen like this:
 
This is your blank Google form, and now you get to personalize it. There are lots of things you could do, so I'm just going to show you the basics and let you play with it on your own to find the rest. :)


Title the form. This helps others know what your form's topic is, as well as helps you organize your forms in your Google cloud drive.

 
Add a description. Tell others what your form is about. This is totally optional but sometimes comes in handy!


Type your question in the "title" bar. You can add optional help text, which acts like notes to your readers. 


Change the question type. If you look at the picture above, you can see a button that says "multiple choice." If you click on that, you'll see a drop-down menu that shows you all the kinds of questions you can ask. This can come in handy if you need a certain answer from your audience. For instance, When I needed students to tell me the name of their homeroom teacher upon registering for the science fair, I chose the "choose from a list" option. This way, all homeroom teachers would be identified by their last name only, and all names would be spelled correctly so that I could sort the answers later.


Choose what participants will see when they submit your form. Click in the text box to change the words "Your response has been recorded." For instance, for the science fair form, I included my school e-mail address and encouraged participants to e-mail me by x date if they still had not received their entry number. Below, you'll see I have "Show link to submit another response" checked. This comes in handy when lots of people are going to use the same device to access the form. For instance, I check this box in my recycling club sign in form, because all the kids use my laptop to record their attendance.


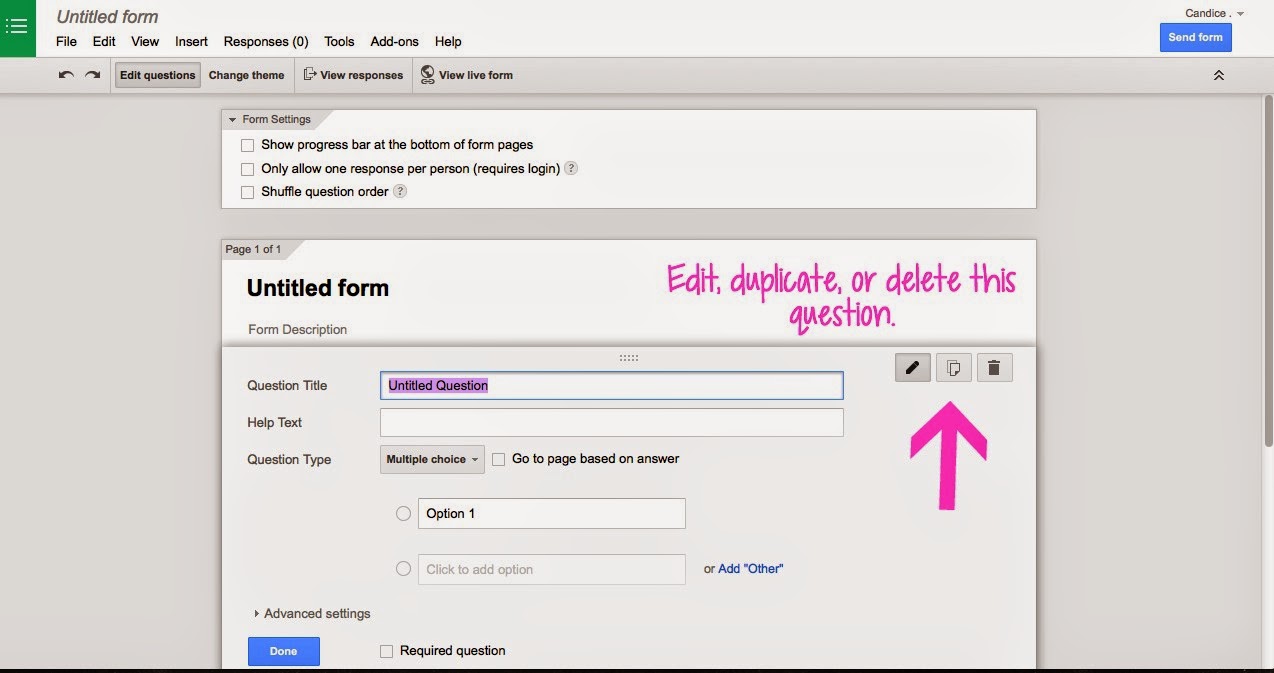
Use the gray buttons in the top of each question to edit the question, duplicate it, or delete it altogether.


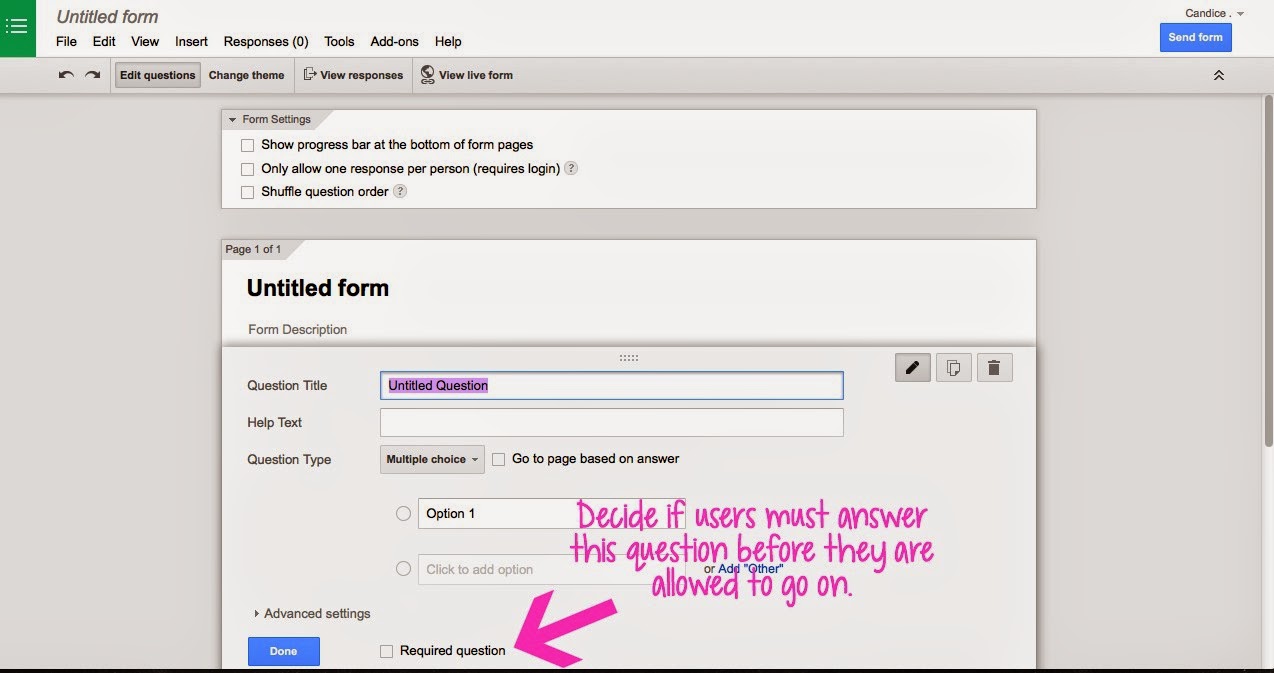
Require questions if you want. Requiring a question means that a user must answer it before they are allowed to submit the form. I use this for agreements. For instance, when parents sign their students up for my recycling club, I have a "question" that says something like, "I give the school permission to administer medical attention if needed and release the school of all liability. I understand that pick up is at 3:20 by the east doors." I make the question a "check box" type and make it required. I also make questions required when I need contact information.


Click "send form" when you're ready to publish it. When you click that button, it tells you how to share the link with others.


Other information:  click the "change theme" button on the top, left of the screen to change the appearance of the form. You can view what your live form looks like at any time by clicking "view" and "live form."


View the responses. After you publish your form, Google automatically generates a spreadsheet for that form with responses. The first row in the spreadsheet is filled with your questions, and each person's answers are put into the appropriate columns.


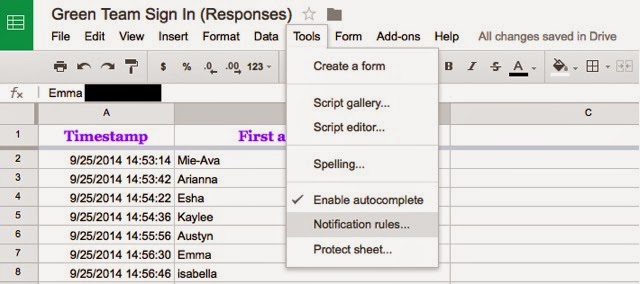
Set up notifications. This is one of the first things I do when I set up a new Google form. I go into the responses, click "tools," and then click "notification rules." From there, you can make sure that Google e-mails you when you get new responses to the document. For something where you expect a lot of responses, you can choose to just get a daily digest of the newest updates. If you are setting up a Google form that you don't plan to check immediately or every day {for instance, it's for a sign up -- not a class assignment}, I recommend setting up the notifications.


Sort information. Do this by hovering your mouse over the top of any column with information in it {for instance, in the above-picture, I could hover over column A or B}. An arrow will appear in the right corner of that box; if you click it, the spreadsheet will be sorted according to information in that column. I used this to sort students by teacher name or by grade level when I was getting ready for science fair.

Download responses. If you need a paper copy of the responses and want to make sure it prints okay, you can download a copy of the responses before printing. My top two choices for download would be as an Excel spreadsheet or a PDF, but there are 4 other download options you can utilize if you want.


Edit if you need to. You can always go back into your original Google form to edit, or you can edit it from the response page by going to "form" and then "edit form." You can edit a Google form at any time -- even after you've published it.


Ways to Use Google Forms in the Classroom:
  1. Beginning of the year contact information -- it would be great to give the link or let parents scan a QR code to the form during "meet the teacher." You could gather information about parent contacts, student birthdays, language(s) spoken at home, etc. without the need for index cards
  2. Beginning of the year, getting-to-know-you questionnaire for students
  3. Bellringer assignment: students must answer a particular question upon entering and record their response in the Google form
  4. Sign up form for parent/teacher conference times -- parents could request a couple of days and times that work for them, and you could follow up with a confirmation call
  5. Registering for a club or event
  6. Signing in to a club meeting or tutoring session. {Each entry is automatically time stamped for your convenience -- you don't have to make that a question.}
  7. Assessment
  8. Exit ticket
  9. Bully/abuse report -- kids can fill in the form anonymously to report bullying or abuse
  10. Reading log {kids fill in a Google form instead of recording their minutes on paper}
  11. Rubric/project/science fair entry/presentation scoring {you wouldn't share the link, but you'd have a spreadsheet of answers when you're finished}
  12. Peer assessment for projects/presentations
  13. Record management information: student infractions, binder signs, parent phone calls, office visits, etc. 
  14. Voting form for classroom positions {president, secretary, StuCo, etc.} or even for staging a mock voting booth during election years
What other uses can you think of for Google Forms in your class?
 

post signature