Image Map

Wednesday, December 13, 2017

Favorite Tech Tools of 2017

As I reflect on 2017, I wanted to share the top 30 technology tools I've used, trained on, or recommended to teachers this year. 


  1. Answer Garden: quickly gather data in the form of a word cloud
  2. Canva: create images, posters, and presentations
  3. Classroom Screen: all your must-have tools are located in one place online
  4. Go Noodle: free brain breaks all in one spot
  5. Google Chrome and its extensions: log in to save all your bookmarks and preferences (click here to see a list of my favorite extensions)
  6. Google Custom Search: create a custom internet search with pre-approved websites
  7. Google Drive and all its components: I cannot say enough good things about Docs, Slides, Sheets, and Forms...the possibilities are endless!
  8. Google Earth Voyages: fantastic for virtual field trips or to just add a little extra "oomph" to your lesson
  9. Google Hangouts: Conduct meetings even when you're not in the same room! I love the "share my screen" feature, which allows me to let teachers see what my screen looks like as I walk them through a project
  10. Google Voice: gives you an extra phone number that connects to your existing mobile number. Great for making parent phone calls or texts without revealing your personal phone number. 
  11. Instant Classroom: upload your class roster and generate seating charts, groups, and more. 
  12. Kerem Erkan QR Code Generator: there is no shortage of QR code generators online, but this one is my favorite because you can create codes to plain text, maps, text messages, and more. 
  13. Online Stopwatch: counts up or down, includes fun animations (if you want to use them), and gives your students a visual as to how much time is left 
  14. Padlet: virtual corkboard that can be used for exit tickets, question parking lots, backchannel tool, and more. The addition of a column layout was HUGE this year
  15. Pic Collagecreate posters, collages, and other projects by layering images and text
  16. Plickers: a digital assessment tool that only requires one device (the teacher's!)
  17. Poll Everywhere: use the "clickable image" feature to assess very young students or those that struggle with reading 
  18. Popplet: create online brainstorm webs that include pictures, drawings, and text
  19. Quizizz: a fun game that provides practice for students and assessment data for teachers
  20. Reflector Teacher: mirror your mobile device on your computer screen, record movements on your mobile device, and all students to project as well
  21. Remind: communicate with a large group via text or email without revealing your personal information. I regularly recommend this just for the scheduling feature
  22. SafeShare.tv: crop YouTube videos while filtering ads and video recommendations
  23. Screencast-o-Matic: create videos of your computer screen
  24. Seesaw: ePortfolio tool geared toward young learners. The Activities feature has been a game-changer this year
  25. Shadow Puppet Edu: create slideshows with music or narration 
  26. Sign Up Genius: I used this when I taught Science Lab to gather volunteers for stations during Science Night. Since then, I've seen it used for potluck lunches, field trip volunteers, and mystery reading guest sign-ups. 
  27. Socrative: a digital assignment tool where any amount of planning will work
  28. Symbaloo: Out of all the ways to share links with students, this one is probably the easiest and most universal. 
  29. TweetDeck: schedule your tweets in advance and keep up with Twitter chats more easily
  30. Wifi Mouse: an iOS app that works over Wifi to connect to your computer and act as a mouse, letting you control your computer screen from anywhere in the room

Are there any tools you'd add to my list? 

Tuesday, May 23, 2017

Duplicate vs. Extended Mode

When you plug your laptop into a Promethean {or other} display, the laptop should automatically switch to Duplicate Mode, which allows you to see the exact same screen on your laptop as you do on the Promethean board.

Most teachers like to operate on Duplicate Mode. If that's you and you ever happen to plug your laptop into the Promethean and only see a blank screen or your laptop's background image, try pressing the FN + F8 keys on your laptop simultaneously and choosing the "Duplicate Mode" option. 

However, there are times when I think Extended Mode is pretty handy! 

What is Extended Mode?
Think of those fancy-pants technology gurus who have more than one computer monitor, like the one setup shown below:


The reason this display is so handy is because it gives you more screen space. For instance, I can work on this blog post on the monitor on the left and search for a suitable image for the post on the monitor on the right. It doesn't sound like a big deal, but I promise: it's borderline life-changing if you do a lot of computer work!  

Extended Mode basically turns your Promethean {or other display} into a second computer monitor. Yes, it's a tiny bit clunky to operate, since one of your screens is laptop-size and the other is ginormous...but it's still pretty rad. 

Times When Using Extended Mode is Handy
1. When a kid asks you a question during whole-group instruction that you need to Google. There's no shame in Googling -- I did it all the time as a classroom teacher! But I also know that whatever comes up in the search results may not necessarily be appropriate for my kids to view. I'd use Extended Mode to quickly switch the display so I could Google without showing the results on the Promethean. 

2. When you want to monitor student iPad work. When I was in the classroom, I used AirServer to allow students to display their iPad screen on the Promethean board to show peers their work. I also used that trick when students were working independently or with a partner on their iPads -- by asking students to display their device on the Promethean -- to help make sure everyone stayed on task. Switching to Extended Mode allowed me to display instructions on the Promethean board for everyone to see and then monitor iPad usage on my laptop screen. {Full disclosure: the more iPad screens you display at once, the smaller they become. I "only" had 12 iPads. So yes, the screens were small when all displayed on my laptop at once, but I could easily tell if someone was off-task by playing the "one of these things is not like the other..." game!}

3. When you need to use your laptop for another purpose while simultaneously displaying something for the entire class. I'd never advocate for, say, inputting grades or looking at student attendance in a place where students can see over your shoulder. However, during my last gig as classroom teacher, I had a little friend who preferred to work in his own spot and hated to write. Since I was in Science Lab, I had some leeway in being able to use technology to let him record Science Lab findings. If we ever encountered an issue where he needed to use an actual computer {as opposed to an iPad}, I just put my laptop on Extended Mode, opened a recording program for him, and let him type away. I really feel like this helped avoid several potential meltdowns while still keeping him engaged and learning. Obviously, you can also use this trick if you need to access other information, as well -- what about an online stopwatch on your laptop while directions are displayed on the Promethean?

4. When you need to get attention quickly. If your kids are too busy looking at what's on the screen to pay attention to your words, you can use Extended View to quickly eliminate the distraction, make your announcement, and then switch back over to whatever you were viewing before. 


Tuesday, May 16, 2017

Sites to Practice Typing

My mom was (and still is) a super-fast typist. She's an accountant, and I remember being amazed that she could type numbers into her computer programs without even looking at the keyboard. My dad was a teacher at the time, and she would type his exams sometimes; I remember thinking that the keyboard was going to go up in flames due to how fast she was! 

As I watched my mom type, I began to see the computer as more than just a gaming system -- it was a way to be more efficient and professional. Even at a young age, I could see that typed work always looked more "put together" than hand-written work. Further, my mom could type faster than anyone could write, so I started to see the computer as a tool to save time. 

The more I thought about it, the more I decided I needed to learn to type fast like Mom...so I started practicing. Rest assured that I spent plenty of time playing outside as a kid, but the summer between 2nd and 3rd grade was when I took random books off the shelf, placed them in my lap, and just typed what was inside.

I'll go ahead and put this here, since I know you're thinking it....
As I've gotten older, I've learned to embrace my nerdiness.

I have no idea what possessed me to type books (why didn't I make up my own things to type?), but it ended up being great practice since I got to type all kinds of symbols, too. 

In 3rd grade, my teacher assigned everyone the task of researching an animal of our choice. (To this day, I still do not know why I chose the Palomino horse...) I used my newfound typing skills to finish and submit my paper super-early (those of you that know me can see that my personality has pretty much remained consistent since elementary school!). I don't recall the sequence of events that led to the next step -- I just remember that, somehow, I ended up typing all of my classmates' animal research papers on the little computer in the corner of our classroom that all the other kids only used to play Oregon Trail. 

My typing skills have only gotten better and faster since then, and they have served me well throughout the years. I fully understand that today's children are growing up with different devices and different needs, but I still think typing is a valuable skill -- and one that our kids should be practicing at least every once in a while. 


If you subscribe to the same school of thought, here are some free resources you can use to let your students practice typing:
A lot of these games require Flash, which means that you won't be able to play them on an iPad unless you pay for a fancy app that allows Flash websites. However, if you do want to practice typing on an iPad, you may want to invest in an iPad keyboard. Personally, I prefer iPad keyboard cases that allow you to type while the device is both vertical and horizontal. Here are favorites:

Friday, May 12, 2017

Safe Search Sites for Kids

As a teacher, I want my students to ask questions and then work to find the answers themselves. I will always be there to guide and support my students to find the answers they need, but I think the process of searching, filtering sources, and deciding which information is best is more valuable than the actual answer.

That said, I would never direct students to just search in Google for their answer. I am of the belief that kids are only young once and that they are exposed to enough "adult content" at an early age via various forms of media; I want to let my students "be little" for as long as possible! And I'm always surprised when I search for something seemingly innocent and receive some...not so innocent results. 😳

The happy medium I've found is to guide students to search on "kid friendly" search engines. Our district subscribes to a number of these...if you work in my district, check with your campus librarian to see exactly which databases are available to you. 


However, if you're looking for something free that can be used at any time, here are some kid-friendly search engines I like:
Be aware that none of these safe-searches are going to catch 100% of the icky stuff, so I still recommend being present and aware of what children are looking for online. 

Once you have these links, there are several ways you can get them onto student devices. Click here to read about 8 ways to quickly share links with students. 

Tuesday, February 21, 2017

#TCEA17 Favorite Finds

Now that I'm back from TCEA 2017 and have had a little time to process what I've learned, it's time to share my favorite finds. {If you attended the conference, I'd love to know about your "favorite finds!"}


Here are my favorite finds from #TCEA17:

1. Create Cartoons/Avatars in Google Drawings or Microsoft PowerPoint -- Kristy Edgar is a middle school teacher who creates cartoon videos to spice up her American History lessons (here's an example called "American Revolution, ep. 2: Allies are Friends"). She creates characters using basic, 2D geometric shapes and then uploads her final products to her YouTube channel. Not only could this be a fun addition to your instruction, but it could also be nice for students to make their own characters to review geometric shapes and show their learning in a creative, "techy" way. Click here for her full presentation.

2. Symbaloo Lesson Plans -- This hidden feature of Symbaloo allows teachers to find structured, media-rich lesson plans in the marketplace or create their own. The resulting plan looks similar to a board game with text instructions, web pages, search bars, web articles, videos, math formulas, and/or embedded content sprinkled inside. Teachers can even customize the board so it forces learners to go on a specific path based on their answers. (Click here to see an example lesson plan about the solar system.)

Teachers need a free Symbaloo account (or upgrade to the Edu version for free) in order to create or assign lessons, but students don't have to log in at all, which makes this tool perfect for everyone -- including young learners without an e-mail address. When students start a Symbaloo assignment, it prompts them to enter their name and the assignment number. Then the teacher can easily track data -- including results, when assignments were started, how long they took to complete and/or how far each student was able to progress in the assignment, questions answers correctly vs. incorrectly, and more.

Click here for the Symbaloo Lesson Plan Manual, or click here for a quick YouTube video overview.

3. Photos for Class -- Part of practicing good digital citizenship is making sure we use only images we have permission to use online and in presentations. Teachers and students can always conduct advanced Google Image searches to filter pictures based on rights...or we can use websites that make the process a little easier. For instance, Tony Vincent tweeted about PhotosForClass.com, which allows users to search for copyright-friendly photos that are already watermarked with a citation when downloaded:

To access over 500 TCEA session handouts, click here. You can also follow along on Twitter by searching for #TCEA17 to read everyone's tweets. 

Monday, September 12, 2016

iOS Keyboard Shortcuts

Do you find yourself typing the same long word or phrase into your iPhone or iPad over and over (ex: your e-mail address)? If so, it might be time to create some keyboard shortcuts! Click here to watch a 6-second video that illustrates how iOS keyboard shortcuts can save you time or watch the clip below:
Pretty handy, huh? 
You can create keyboard shortcuts for anything you want, but it's obviously most helpful to create shortcuts for things you type fairly often. 

On personal devices, that might mean you create shortcuts for various e-mail addresses you have, a long word or phrase you use often, your full name {to be used as a signature or when filling out forms}, etc. 

On student devices, it might look a little different. For instance, if you use utilize Read Naturally, you may have noticed that the latest update doesn't save the 8-digit access code students have to use to get in the program. If you're okay with students seeing {and potentially memorizing} that number and you want to save a little time during the login process, you may consider creating a keyboard shortcut for that 8-digit access code. Or if, for instance, your very young learners {who tend to take several minutes to type one word} all have the same password, maybe you want to create a keyboard shortcut for that password. 

{Note: I don't recommend using keyboard shortcuts for passwords for anyone other than very young learners. Even then, it is purely in the interest of time so that you regain as many instructional minutes as possible!}

If you're interested in setting up your own shortcuts on iOS devices, follow the directions in the screenshots below:


The previously-existing shortcuts on that device will be listed on this screen in alphabetical order. You can see that, on my school iPad, I have 3 keyboard shortcuts already entered. If I wanted to edit any of them, I could just tap the entry I want to edit on this screen. 


After you click "save" in the upper right corner, you'll be free to use your iOS keyboard shortcut.

To test it, go into the "Notes" app and type the shortcut you specified earlier. The phrase should automatically pop up, as it did in my example video. 

Happy typing! 

Note: iOS keyboard shortcuts work in almost any app and in almost any web form, but please be aware that there are a select few applications the shortcuts are not compatible with.

Wednesday, September 7, 2016

Google Voice: an Extra {Free} Phone Number

I've written before about Google Voice, but updates from Google and a new school year means I probably need to write a new post! 


What is Google Voice?
In a nutshell, Google Voice allows you to call and/or text anyone from an extra, specially-designated phone number from Google...all the while, concealing your actual phone number from the recipient.

Here are some more handy features of Google Voice:
  • Call/text anyone through a browser on your computer
  • Call/text anyone through a mobile device connected to the Internet {without revealing your "real" phone number}
  • Call contacts that are already entered into your regular cell phone's address book {no need to enter information twice!}
  • Automatically transcribes voicemails and puts them in your Google Voice inbox
  • Listen to voicemails as they're being left
  • Screen calls if the need arises
  • Option to set "do not disturb" time {think of it like setting office hours}
  • Block specific callers
  • Ability to change the number 1 time {for a $10 fee} if the number gets into the wrong hands

Why would I use Google Voice?
You may be wondering why you even need an extra phone number. Think about those moments when you need to call a student's parent(s). Sometimes that parent's phone number is in a different area code, and you may not have the ability to make long-distance phone calls from your district desk phone. ...Or sometimes you have a lot of parent phone calls you need to make {like at the beginning of the school year when you make contact with each guardian to introduce yourself and say how excited you are about teaching their student this year}, but you don't necessarily want to be at school until 6 or 7 pm making phone calls. 

Google Voice gives you the ability to contact parents via call or text message right from your own cell phone, so you can contact anyone you want from the comfort of your own home -- without the risk of revealing your personal information to parents. {I know some teachers have no problem giving their personal cell phone number to parents, but I am a pretty private person, so revealing my cell number is outside my personal comfort zone.}


I'm interested. How do I start?
I created a fairly in-depth Google Doc with directions that can take you through all things Google Voice related. {It even has a Table of Contents where you can click the subject you're interested in learning about and jump directly to that section!} Click here to view the document.

Thursday, April 28, 2016

Let's Recap

Have you heard about Recap? It's a relatively new tool that has some great features! In a nutshell, Recap is a completely free assessment resource {available on the web or through an iPad app} that lets students respond to the teachers' questions or prompts via video.

Website | iPad App

With recap, teachers can...
  • create questions that are typed or voice-recorded 
  • choose how students will sign in: 7-digit alphabetical PIN or e-mail address/password
  • add up to 10 questions in a single assignment {and, as of the newest update on April 12, teachers can now give more than one assignment to students at a time}
  • give an assignment to the whole class or only certain students
  • set a max response time to make grading faster and students' answers more precise
  • set a due date for assignments
  • add a poll at the end of an assignment that asks students how well they think they understood the material
  • view individual student information or the entire class's responses as a whole
  • grab the link to an individual video to share with others (e.g. parents, admin, your co-teacher, and/or social media)
  • leave written feedback/commentary on student videos 

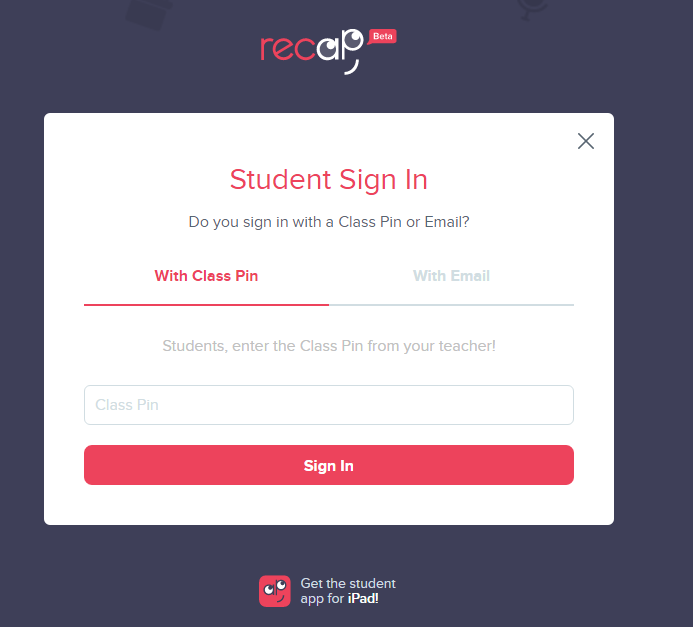
The view is super-simple from the students' side. Learners indicate that they are a student on the login screen:


Students can sign in with a class PIN or an e-mail address {whichever option the teacher enabled when he/she set up the class}:


If signing in with a PIN, the child must then select his/her name from the class list before seeing any assignments:


The student dashboard allows learners to see previously submitted assignments as well as those that have not yet been completed. The dashboard is also where students can view feedback from their teacher on submitted assignments. {Note that students cannot see other students' assignments or answers.} Here's an example of what the dashboard might look like for your students:

Don't you love that confused look on my face in the screenshot? haha! 

This video -- filmed by EdTechTeacher's Greg Kuloweic -- shows you Recap in action from both the teacher and the student side {but keep in mind that a couple of features have been added since this video was released}:


I already use Seesaw...should I still consider Recap?

While there are similarities between Seesaw and Recap, it's important to recognize that these are two completely different resources. Recap is strictly for assessing students via video (and follow-up poll if the teacher enables it), while Seesaw is more of an ePortfolio tool that happens to have a video feature, too. If you are a Seesaw user, you may still consider incorporating Recap for the opportunity to differentiate questions and/or allow students to turn in video responses confidentially. 

To integrate Recap with Seesaw on iPads, first make sure the Recap app is on all student devices. Then push a note in Seesaw to the entire class with the login information (e.g. 7-digit PIN if students are without e-mail addresses), as shown below.

Seesaw user tip: create a folder just for login information

While students cannot copy the PIN from the Seesaw note directly into the Recap app, this at least provides a consistent place for students to find login information independently. 


Resources:

Tuesday, March 22, 2016

How to Create a Custom Google Search for Students

It's scary to even consider asking a child to conduct a normal Google search because you never know what will pop up! And although it's important to teach students how to use the library's search engines, sometimes those databases don't have everything your students need. So what's a teacher to do? 

Answer: create a Google Custom Search.


What Is a Google Custom Search?
Users who are logged in to their Google account can go to this webpage and create a search engine that looks like a regular Google search, but it really only allows visitors to search websites of your choice. 

So, for instance, you could set up a Custom Search that allows students to only access kid-friendly websites. Once you give them that search link, you can rest assured that only appropriate content will appear.

How to Create a Custom Google Search:
1. Log in to your Google account. {If you don't already have a Google account, go to this webpage and create one. You don't even have to use a Gmail address -- you could use an e-mail that you already have and link that to your new Google account, if you want!} 


3. Click "Add" on the top, left of the page (under "Edit search engines"). 


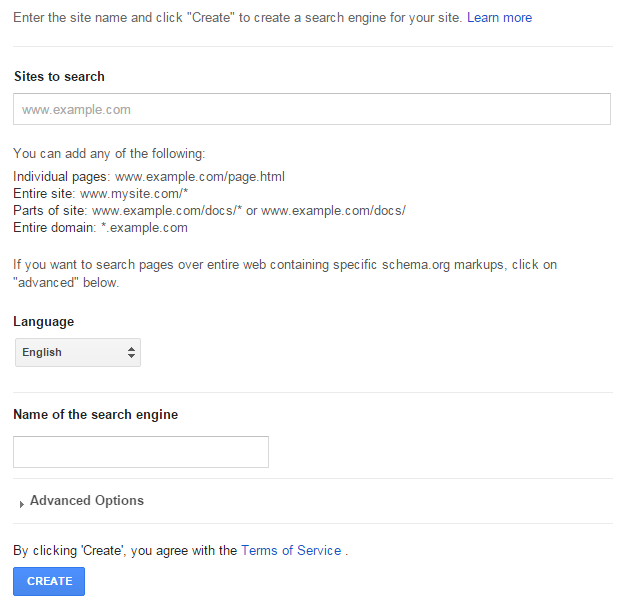
4. The only portion you really have to fill out is the "sites to search" box. As you click in the blank box under "sites to search," a new text box will automatically appear underneath the first one, which allows you to add as many kid-friendly sites as you want to this Custom Search. The name of your search engine is automatically populated, but you can change it if you want. Add advanced options if you wish, although it's not necessary. When finished, click the blue "create" button at the bottom of the page.


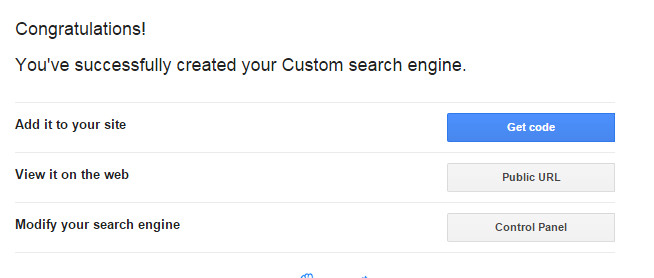
5. After you click "create," you'll see a page that looks like this:


Click "Public URL." A new window will open on your browser, and it should have the name of your Custom Search at the top. Keep in mind that although it looks like a regular Google search, it's the custom one you just created. :) Mine looks like this {click the picture to view the page in your browser...or click here}:


When students search, they should type their words into the text box underneath the title {notice how it says "Google Custom Search" in that box}. 

The search results will only come from the website(s) you specified when you created the Custom Search. So, for instance, if you conduct a search in my Kid-Friendly Custom Google Web Search, you'll only get results from these websites:

As the creator, I can edit or delete this Custom Search at any time. 

Teachers can AirDrop this to newer student iPads and have students save the website to the home screen for quick access all year long. {Read about 8 ways to quickly share links with students if you have older iPads without AirDrop or teach in a BYOD class.} 

Monday, February 1, 2016

3D Map Tours with Apple Maps

With today's academic and scheduling demands, actual field trips aren't always possible. Luckily for today's teacher, virtual field trip opportunities are abundant! A quick and easy "go to" tool is typically Google Earth, as you can zoom in, "stand" on the roads, and turn in a complete circle to see everything around you. 

Until recently, I didn't know that the default Apple Maps app has virtual field trip opportunities, as well -- in the form of "tours." 


Although there is not a tour for every city [yet, anyway!], the tours that are offered provide plenty of classroom fun.

How to access city tours in Apple Maps:

1. Launch the default Maps app, whose icon looks like this:


2. Navigate the map to a large city of your choice by sliding your finger across the screen. {In honor of being in Austin, Texas this week for the TCEA conference, the examples in this post are all about Austin!} 


Any city that has a little black and white bubble next to it that says "3D" has a tour available. For instance, when I look at Texas, I see the "3D" bubble next to Austin, Houston, and San Antonio. If you tap a bubble that says "3D," you should see the name of the city on the right and a blue box that says "Tour" on the left, as shown below:


As soon as you click "Tour," the map zooms in to the city, and you start an up-close flyover. Captions at the bottom show you what you're looking at. The tours I saw took you through the city and showed off local landmarks. Here are a few screenshots from my Austin, Texas tour {click any of the pictures to enlarge them}:


Pros
  • Free.
  • The app comes pre-downloaded onto iPhones and iPads, so you're ready to tour right out of the box. 
  • If you mirror your device to your laptop, you can then display the tour on your Promethean board for all students to see.
  • The tours take just a minute or two, so students get a good look at the city without taking up lots of precious instructional time.

Cons
  • The flyover goes fairly quickly, so it's easy to miss things if you're not watching carefully every second!
  • The only way I could figure out to pause the tour is just to tap the screen {which can be annoying for long periods of time}. I couldn't find a way to rewind or fast-forward at all. 
  • Tours aren't available for every city.

Assuming a 3D tour is available for the particular location you need, I could see this feature being used during reading {to help students understand the setting of the book}, social studies {to make geography come to life}, and science {to show land forms and examples of scientific concepts}. 


If you're interested in more virtual field trip opportunities, consider visiting this Pinterest board:

       Follow Candice's board Virtual Field Trips on Pinterest.    

Thursday, January 28, 2016

Epic Reading

Have you heard of Epic? In a nutshell, it's like Netflix for [children's] books, and it's free if you're an educator!


Here's a little more detail:

Features
  • Access on the web and via mobile app {iOS / Android}
  • 100% free for teachers and school librarians{Parents get 1 month free then pay $5/month}
  • Access over 10,000 books for kids age 12 and under
  • Register up to 36 students under your name
  • Track reading progress of each student, including which books students read and how long they read
  • Students can read the book independently or have it read to them
  • Students can read an unlimited number of books each month
  • Students earn badges to encourage more reading
  • No ads or in-app purchases
  • Pinch your fingers on any book to zoom in

Tour

The first time I logged in to the app, I was immediately directed toward a "Guest" profile {after I logged in as a teacher}, which I suppose is technically a student. Exploring this student profile, here's what I found:

Hold your device in portrait mode to see one page of the book at a time:


Holding the device in landscape mode allows the reader to see a two-page spread:


Regardless of the view, readers can always see how many pages they have left in the book by viewing the count in the bottom, center of the screen.

Need to leave the app but haven't finished the book yet? No problem. Just stick a virtual bookmark in your spot:


You can even bookmark multiple pages, as seen on the top of the screen below with the multiple red dots:


If the child swipes through the book too quickly, he/she gets a notification saying s/he needs to read a little longer. I was worried at first about what this would do for really fast readers, but I swiped through in probably less than a minute when I received the screen on the bottom left... Waiting just an extra minute or so allowed me to move on to the screen on the bottom right and press "finish book!"


When the student marks the book as "officially" complete, there's a time stamp of how long it took for the student to read it cover to cover {this information also appears in each child's reading log so the teacher can view it at a later time}.


After finishing the book, the student earn points toward his/her current level and sees suggestions for his/her next read:


Reading also earns the student rewards, such as new avatars {seen below}. The student can choose to add the book to his/her favorites, share the book with others, or rate the book on a 5-star system.


Students also see the total time it took to read the book cover to cover {this information is also displayed on each child's reading log for teachers to review at a later time}.


Finishing books allows the reader to "level up" and work toward earning more badges.


Use the "switch profile" option to switch to another student profile or the teacher's {the teacher profile can only be accessed if the teacher enters his/her password again}. View a student profile to get more information on the child's reading habits and time in Epic. Here's a student profile page:


From the app, the teacher can click on each individual student to quickly see how much total time each student has spent reading {and narrow that reading log down to a specific week, month, or year}, as well as which books s/he read along the way:


...or the teacher can view all information from the teacher dashboard on the web:


Clicking on a student's profile from the web gives more details about the time spent reading and the number of pages finished:


Finally, Epic provides free teacher resources, which include postcards, ready-made parent flyers, and an introduction video as well as a robust FAQ section that will answer all remaining Epic questions.

Do you use Epic with your students? If so, tell me what details I missed sharing! What do you like or dislike about the tool?