Image Map

Saturday, October 5, 2013

Instagram: a Tutorial

:: June 2014 update:: I elongated this post by giving details about each screen in the Instagram app for iOS devices. I also recorded a more detailed tutorial video. 

I made a little video about how to use Instagram on an iOS device, if you're interested. It's not as "fancy" as the videos on my Screencast channel, but it should get the job done. :) {I don't have any other devices except Apple devices on which to show you a tutorial. If you're on an Android or other device, go to YouTube and start searching! I'm sure there's a tutorial out there!} 

Click the outlined square in the bottom right of the video to make it full screen.


If you'd rather read through a tutorial instead of watching a video, please see the instructions below...

1. Download the free Instagram app from the App Store. It's important to know that while you can view, like, and comment on photos from the Instagram website, you cannot currently upload any photos from the website. You must use the app on a mobile device.


2. Open the app.


3. If you already have an Instagram account, stop reading this and skip to step 4. Register with Facebook or with an e-mail address. If you register with Facebook, it means that you'll log in using your Facebook username and password, and then Instagram will import all of your Facebook info to your Instagram account. So whatever your current Facebook profile picture is -- that will be your Instagram picture, and so on. Of course, you can always change this later. 

I don't ever register with Facebook. First of all, I'm not a Facebook fan, so if I ever want to delete my FB account completely, I'd have all these other accounts hooked up to it that I'd probably lose access to. Second, Facebook is terrible about privacy. They frequently change their privacy settings without telling anyone, and that annoys me. I don't trust Facebook, plain and simple. Third, I am adamant about keeping my professional accounts completely separate from my personal accounts. I don't have a professional Facebook account, so I'd have to connect my professional Instagram account with my personal Facebook account, and that's not okay with me. 

People do register accounts through Facebook frequently, though, because it makes it very easy to remember usernames and passwords. 

It's totally a personal decision. No judgement from me. :) 

If you choose to register with Facebook, you'll just type in your FB username and password and essentially log in to FB through this Instagram app. 

If you choose to register with an e-mail account, you'll just fill in the 3 areas below:


I guess there are technically 4 areas to fill in above if you count the profile picture, but since it's not mandatory, I don't think it counts. :) Click the arrow in the top right when you're ready to move on. If you just registered, skip to step 5. 

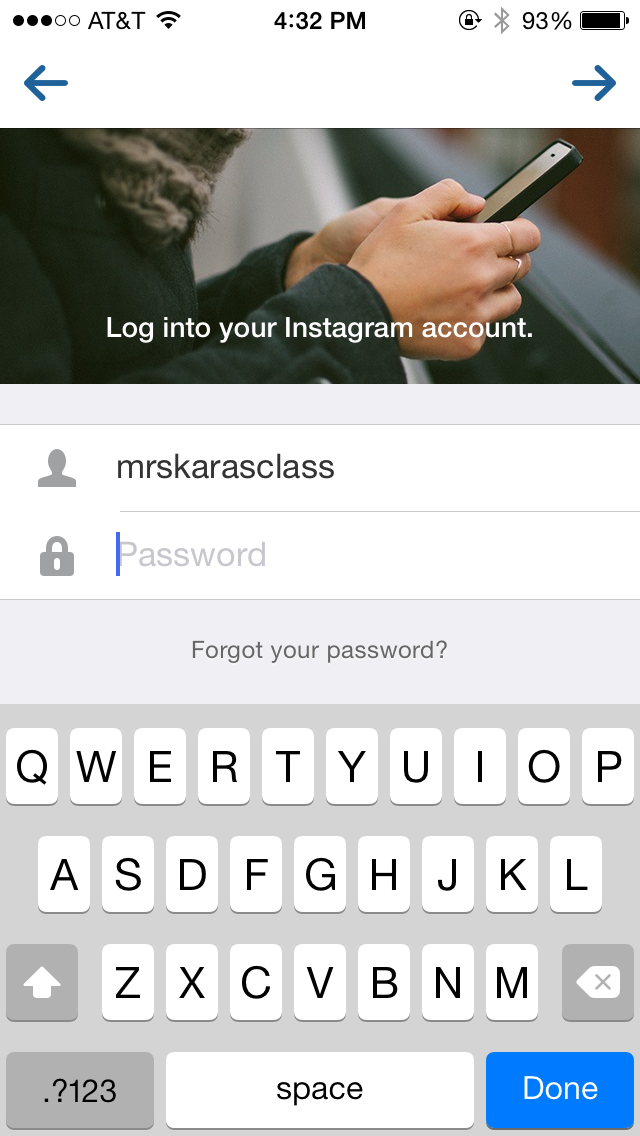
4. If you need to log in, click the "log in" button at the bottom of the launch screen, type in your username and password, and click the arrow in the top right. 
:: July 2015 update - my IG username is now @ckarasedu ::

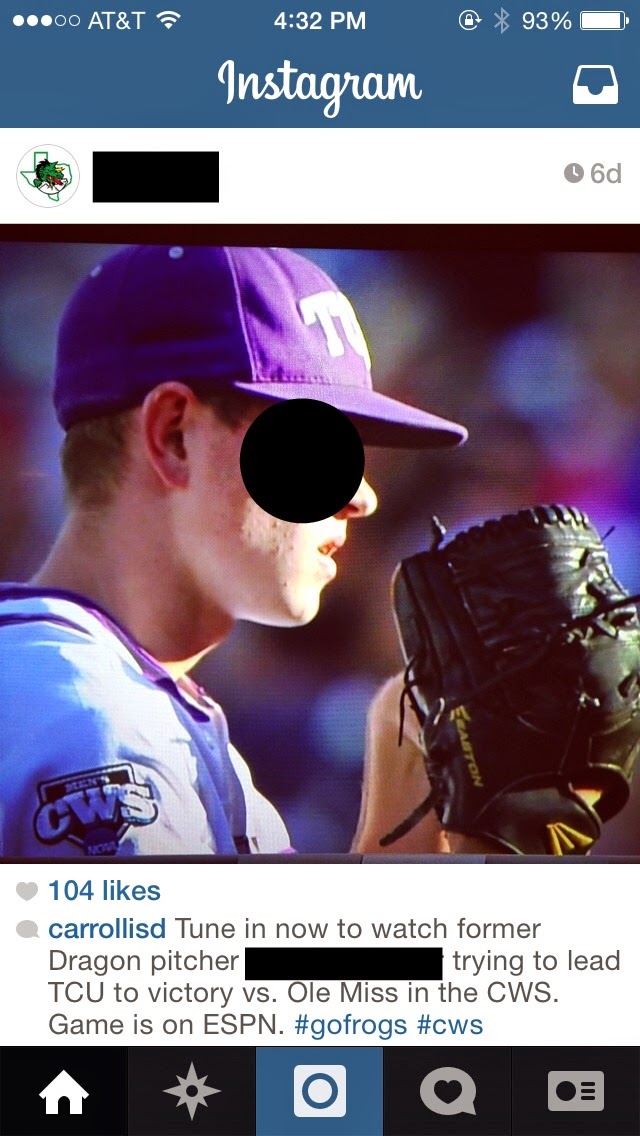
5. Immediately upon logging in to your account, you'll see your home page, which is filled with your feed. "Feed" is short for "newsfeed" in the social media world, which is a timeline or list of all the latest updates from everyone you're friends with or following.

On each picture, you can see the username and profile picture of the person who posted it {below: I blocked the username and their subject's face, just to feel a little more comfortable posting this online...} when they posted it {below: 6 days ago}, how many "likes" that photo has {below: 104}, a caption the poster wrote with the photo -- if any {below: starts with, "Tune in now..."}, and any comments other users have written about that photo {below: not shown. It would be below the poster's caption}. A "like" is a way for someone to acknowledge that they enjoyed seeing a photo without actually having to write a comment. {It's like a Facebook "like."}

Side note: when comment on a photo and talking directly to someone, you want to write @ and then their username to make sure they get a notification about the comment and can know to write you back. :)

6. In the upper, right corner of the screen is a box that looks like an inbox. Those are Instagram Direct Messages. It works much like a private Facebook or Twitter message {DM} in that you only share with a select person or group of people. You can send both photos and videos this way. This is a fairly new Instagram concept -- introduced within the last year, if I remember correctly. I'm not a fan of it as an educator, but since it's a feature, you need to know about it. I personally wouldn't use it with students, but that's just me... 

7. Still on the home screen: the star button between the home button and the blue button is your search feature. When you press that button, you automatically see a grid of all the current most popular photos on Instagram. This is mainly for businesses and teenagers obsessed with collecting a lot of false friends. ;) I don't use this page because I don't know any of those people, so I don't really care... But you can also use this page to search for a username or hashtag

8. The blue button is your "take and/or upload a photo or video to your account" button. Clicking on it takes you to a screen similar to this. The black square that you see in the middle of the picture below is what your camera sees. I had this close-up to a table when I took the screenshot because I didn't want you to see a picture of my messy living room, which is my current view. :) 

Use the big, blue button to take a picture from within the Instagram app. You can also use it to take videos within the app if you click the video button on the bottom right. 

You can also upload any pictures or videos already on your device by clicking the square on the left of the big, blue button. In the picture below, the square has a picture of the last screenshot you saw, which is the last photo I took. But clicking that square would allow you to browse the rest of your photos/videos and all your albums.

Instagram videos are limited to 15 seconds, so if you upload a video that's longer, Instagram will prompt you to crop it. If you take a video within the app, Instagram will cut the video off at 15 seconds so you don't have to {and can't} do any cropping. 

There's a white-inked row sitting on top of the big, blue button. Let's review: Press the grid button to put a grid on the screen while you're taking a photo -- in case you want to follow the photography rule of thirds or something. The middle button is to switch the camera to the front {a la "Let me take a #selfie"... ugh}, and the right button helps you adjust the flash.


9.  Next, add filters and/or edit the photo if you wish. This is where Instagram gets the reputation for "artsy" or "vintage" photos because everyone wants to add some type of fancy filter to their photos to make them look more professional. Adding filters or any other edits is totally optional. 


10. Click "next" and see the following screen. Add a caption if you wish. You can "tag" people on your photo by clicking the "tag people" option. This lets you notify another Instagram user that they're in your picture. For instance, if your teammate also has a professional Instagram account and you post a picture of her on your account, you can "tag" her. She'll get a notification that she's in one of your pictures.

The photo map adds a pin to a map about where you were when you uploaded the photo. I'm a privacy weirdo, so I personally find this feature really creepy. But I guess it could add a fun element if you were on a field trip with your students or something...? Anyway, to enable this, just click the toggle next to the word "map."

The list of 4 social media sites you see listed below the "photo map" option are share options. There are a couple other social media sites you can share your Instagram photos on, but these are the main ones. To do so, you'll have to connect the other social media account to your Instagram {more about that later}, and then click the account you wish to share on. For instance, I always click the "Twitter" button so that my Instagram photo is also posted on my Twitter account. It's just a way to crosspost without having to log in to a bunch of other sites.

Notice that the "direct" button is grayed out. That means you're not using the Instagram Direct option. Click it to turn it blue to directly message someone or a group of other Instagram users.


11. Click the "share" button. The screen will go back to your home page or newsfeed. Once the photo or video is posted, you'll see your post as the first thing on your newsfeed {until one of your friends posts something else}.


12. The button that looks like a text speech bubble with a heart in the middle is where you find your notifications. The default notification screen is set to "news," and it shows you any activity that has occurred between you and friends. For instance, you'll see if someone "likes" your post or comments on one of them, if someone tags you in a photo, or if someone comments directly to you by writing the @ symbol in front of your username. There's also another tab that says "followers," and that's your opportunity to see activity that your friends have had. For instance, if I were following @abc123 {I'm making that up... don't search for it}  and they liked someone else's picture, I could see the picture that was "liked," so long as @abc123 doesn't have a private profile. It's a little creepy, too, in my opinion, but I guess you could use it to find mutual friends. 

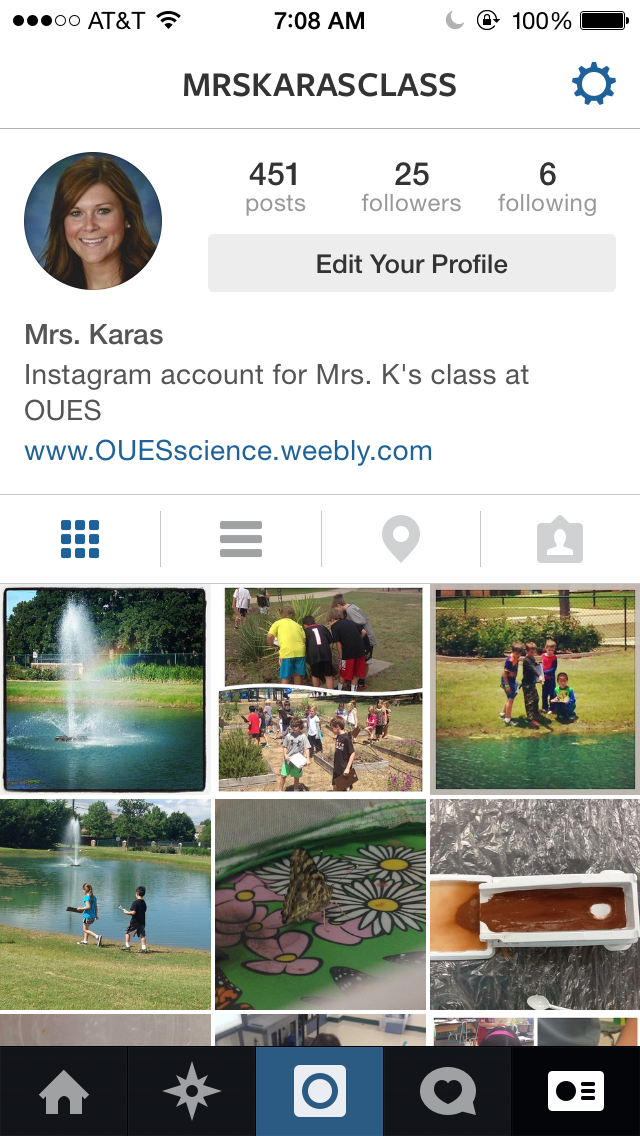
13. Click the business card icon on the bottom right of your home screen to see your profile.
:: July 2015 update -- my IG username is now @ckarasedu ::

On your profile page, you can see your profile picture, the "about me" section you typed about yourself, a website that is affiliated with you {if you chose to fill that portion in}, and all your posts. Your posts appear in a grid by default, but you can press the 3 horizontal lines to see all your posts in a larger format like your newsfeed. The water drop button shows you photos that you've added a location to, and the last button the right above your post grid shows you any photos other Instagram users have tagged you in. 
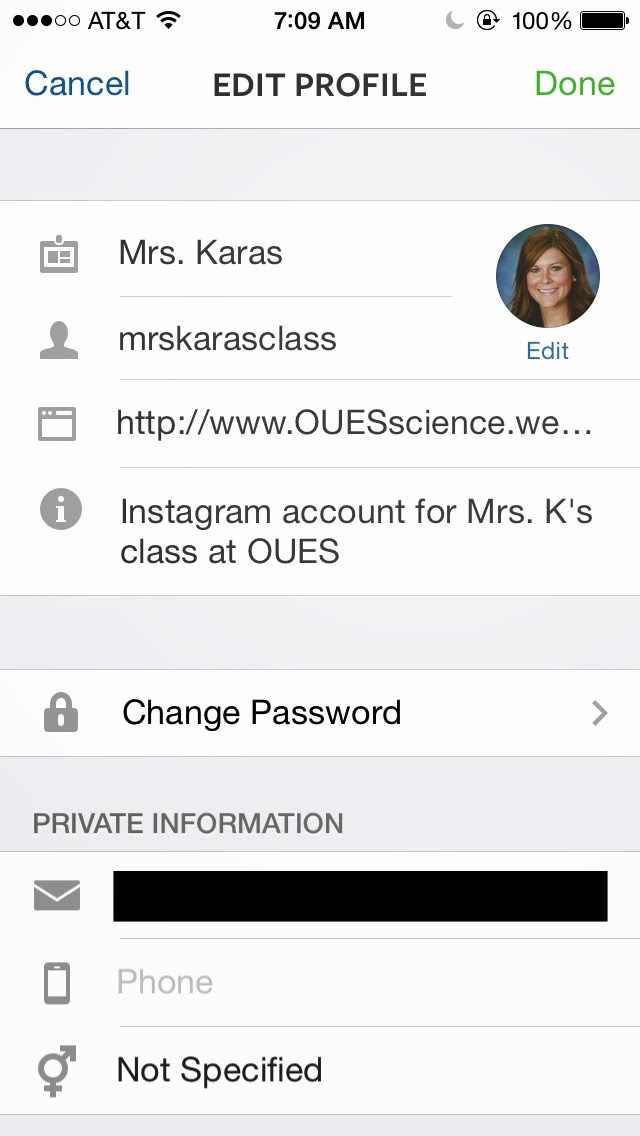
14. At the top of your profile page, click "edit profile" to see some more options. Here, you can edit your profile picture, your displayed name, your username, a website associated with you {optional}, a short bio, and your password.

:: July 2015 update -- my IG username is now @ckarasedu ::


Scroll down to see more options:


The "posts are private" toggle allows you to make your profile private. This way, users have to send you a request and you have to accept it in order for them to see any of your posts. This is ideal for teachers who have younger students or who teach a smaller number of students. I don't feel like it's an option for me, though, because I teach over 400 kids a week. I'm still learning all of their parents' names -- I can't memorize their usernames, too! I'm afraid I'd accidentally reject someone and deny them access to see what their kid is doing in my class, so I keep my profile public.

CISD's policy is that you can post photos of your students on a professional social media account as long as all the students' parents or guardians have signed the photo release. If you get a student whose parents haven't signed the release -- which is rare, I'm told -- you can crop that student out of all photos, black out the face before posting, blur the face before posting, or just make sure he/she isn't in the frame when you take a photo. The way I understand it, as long as the releases are signed, though, you are free to post on your classroom website, blog, and/or social media as long as it's a professional page that you can affiliate with CISD.

15. Go back to your profile page and click the gear button in the upper right corner. You'll see a page like this:


The "find people to follow" tab lets you look at people that have similar interests, similar hashtags, and/or people that your friends follow -- on the chance that you'd see a mutual friend.

The "posts you've liked" tab lets you review all the pictures you've pressed the "like" button on. It does not give you the option to view all the photos on which you've commented, though.

Below are support options.

16. Scroll further, and see options like this:


"Share settings" let you connect your Instagram account to other social media sites. For instance, my class Instagram is connected to my class Twitter. That way, when I post something on Instagram, I have the option to let Twitter post the exact same thing without me having to log in to Twitter manually post it.

Push notifications deal with Apple's notification center. It's handy if you want to respond to likes or comments very quickly, but it's bad because it will drain your battery life more quickly.

The most important feature on the picture above is the "log out" option, though. This is where I can switch back and forth between my personal and private accounts, which makes having a class Instagram super-easy.

Hope that helps! I know it seems like a lot of information, but Instagram is really easy once you get started. 


For ideas on getting started with Instagram, please click here.

For ideas on how to use Instagram in your classroom, please click here.

Sunday, September 29, 2013

Flip Snack

Have you ever published a book? When I was in 4th grade, I created an entire book (from cover to illustrations to text), and my beloved teacher had it bound professionally so it looked as though I had been "published." She made two copies: one for me and one for my school's library so that my peers could actually check the book out and read it. I was in awe.

When I had the pleasure of watching my niece give her dad a very similar book as a gift last Christmas, it solidified my belief that being a "published author" is a definite motivator to get kids to write more {and love doing it}.

While publishing students' stories in a hard- or softcover format may not be a financial option, publishing an eBook with student work is completely do-able.

Via
Enter FlipSnack (a part of SnackTools). This website gives you the option to upload PDF documents and convert them into an eBook of sorts.

FlipSnack was originally intended to help website users/bloggers "create stylish digital flipbooks out of your PDF documents. You can use it to share or embed into your website or blog all kinds of documents, from books to newspapers and magazines."

You can use FlipSnack to post assignments to a classroom websites, examples on your blogs, and/or eBooks that feature student work. While I think the first two are really cool, it's the last option that excites me the most. I posted assignments and examples to my website when I taught 8th-9th grade English. But making eBooks out of student work? That never occurred to me. {Plus, how fun would it be for students to see it?!}

Cool features of FlipSnack:

  1. It's free.
  2. Publish your eBook on several different websites {personal websites and social media sites}. There's an embed code so that viewers can actually see the eBook on your website instead of having to follow an external link to see anything.
  3. It uses Flash when posted on regular websites, but is also optimized for iPhone and iPad.
  4. There are several customization options so that you can personalize the book(s) in a variety of ways. 
  5. The end result looks professional.
  6. Many, many people can view your eBook for free. The way I understand it, people with a free membership can have a max of 25,000 views per FlipSnack book per day on sites external to FlipSnack (VIP members get 50,000 views). Even after all the day's views have been exceeded, the embedded codes won't work until the next day, but users can still click the link and view the eBook on FlipSnack's page. I don't ever expect to reach that 25,000 view maximum, anyway, so I don't see this as a problem. 
  7. You can enable the ability to download the file(s) inside your book.
  8. Besides all the customization options inside the eBook, you can decide which type of book you'd like to make: hard cover, soft cover (looks like a magazine), or wire bound (looks like a notebook)
  9. Display your collection of eBooks in a widget on your website. My favorite has to be the "bookshelf." How cool would it be to convert your students' stories into FlipSnack books and then display them on a "virtual bookshelf" on your classroom website?! It would look something like this:

Source

The website only allows users to upload PDF documents, but converting files to PDF is pretty easy, so I don't consider that a disadvantage of the website.

Details about $$ involved:

  • There is a free version, but there are a few limitations. The free version puts a watermark on all eBooks. There's also an upload limitation: you can only upload 3 PDF files to each book, and each PDF has a limit of 15 pages each.
  • You can have the watermark removed from individual eBooks by purchasing points. It costs 10 points in order to do this, and the price of the points varies, based on how many you purchase at a time. {A purchase of 10 points will run you $19, a purchase of 25 points will run you $39...you get the picture. There's a slight discount when you buy points in bulk.}
  • If you don't want to mess with the limitations at all, you can always purchase a VIP membership for $14/month. This membership actually gives you premium access to all of SnackTools's apps, so you're getting quite a bit for your money.
Here's an example of a FlipSnack book that I'm partial to:

Click the picture to see the book for yourself

I wasn't able to embed that particular book because I didn't write it. An embedded book looks like this, though:


Just click "click to read" to enlarge it. Use the arrows on the left and right of the screen to flip the virtual pages.

Sunday, September 22, 2013

Vocaroo

Vocaroo is an incredibly easy and versatile voice-recording system that can be a huge asset to your classroom.
Via

Features:
  • Very easy-to-use interface
  • Completely free
  • No e-mail address or account registration necessary to use it
  • Ability to e-mail your recordings, post them on social media, or download the file to your computer 
  • Instead of recording, users have the option to upload a segment of audio
  • Ability to access recordings from iOS devices {although there is not an app for it...yet}
  • No limit on the number of minutes you can record using Vocaroo

Cons
  • Since you don't have to have an account for this website, you can't save any "works in progress" and edit them later
  • No app, and iOS devices don't support in-browser audio recording, which means you can't record anything from an iPhone, iPod Touch, or iPad

Tips

As with all audio recording websites, you do need access to a microphone in order to use this tool. If your computer doesn't have a built in microphone, you could always purchase a headset with a microphone like this one to help you:


{FYI: a headset microphone like the one pictured above might actually be the best option to record, no matter what kind of microphone situation you have on your computer. Because of the close distance between the microphone and your mouth, the headset microphone blocks out a lot more background noise than a built-in microphone does. I have the luxury of a quiet house, since I don't have kids yet and my husband works a lot, but for those of you whose homes are a little more hectic, you may have a harder time getting a clear recording without a headset microphone.}


How Do I Record?

The homepage of Vocaroo is incredibly simple:

...Seriously. That's it. So if you're normally a little intimidated by technology, rest assured that you can do this. :)

Click the giant red button in the center of the screen labeled "click to record," and just start talking. It is honestly that easy.

There is no time limit on the length of a recording through Vocaroo, so you can ramble away for as long as you need to. ;)

After you hit the "record" button, you'll see this screen, which means that it's recording:

After you've finished, hit "click to stop" to stop the recording. You'll then see this screen:

You have the option to listen to your podcast to make sure it sounds okay, and you can re-record if you don't like how it sounds. If you're satisfied with your recording, however, you can click the "click here to save" button, which is located in that last green box at the bottom of the page.

After you click to save your recording, you're met with this screen:

Ignore that link...I didn't say anything on this podcast; I was just taking a screenshot. ;)
Notice the options you have at this point. You can....
  • embed your recording on a website {which is what I did on our class blog last year to explain some of the features of the website}.
  • e-mail a link to the recording, right from Vocaroo {you don't have to download anything to your computer or attach anything to your e-mail in order to do this...it just sends a link to somewhere in the interwebz so that your recipient can listen. It's pretty painless. :) }.
  • share on any number of social networking sites, including Facebook and Twitter
  • link the recording to a QR code...and you already know how much you can do with a QR code
  • download the file in a handful of formats.
See how simple all of this is? If you do have any questions, you could always read Vocaroo's FAQ section.


How Can I Use This In My Class?
{A lot of these options work best if you attach the link to your recording to a QR code.}

Back to School
  1. Record yourself saying "hello" or "welcome" at back-to-school time. Embed the recording on your website or "meet the teacher" page.
  2. Verbally explain the features of your website and/or how to navigate it; embed this recording on your website.  
  3. Create a welcome message for students and parents, and place it on your door during Open House night. {This would also work well if you had to be absent during Open House night.}
  4. Record a welcome message and place it on your BTS newsletter or postcard. Hearing your voice and how excited you are to have them in your class might be especially helpful for little ones.
  5. Create an "I'll be with you ASAP" recording and place it on your door during parent-teacher conferences. Parents who arrive early and see a closed door could scan the recording to hear that you are there, but that you're speaking with another parent at the moment and will be with them shortly. 

Make a Substitute's Life Easier
  1. Record a message to remind students about behavior expectations and when you'll back, and let the substitute play it at the beginning of class.
  2. Record the directions for an assignment. Put it in a QR code and put the code directly on the assignment page. If you had a substitute, students could just scan the QR code at the top of the handout and get your directions. 
  3. Record directions to centers or stations, put the info into a QR code, and put the QR code at the center.

Make Your Life Easier
  1. Record directions to centers or stations, put the info into a QR code, and put the QR code at the center. Instead of asking you over and over what they're supposed to be doing, students could just scan the QR code to re-listen to the directions. If you're a fan of file folder games or compact centers, it would easy to place a QR code of directions for that activity on the back of every folder or Ziploc baggie. If this works like I think it would, you would only have to explain things once. Imagine how much time you'd save and how much else you could get done! 
  2. Record instructions or examples to an assignment or project and place it at the top of the worksheet/handout/rubric. Students could re-listen to these if they get stuck during an assignment. 
  3. Save audio files of things you use regularly so that you can access them later without having to re-record. 
  4. Record yourself reading a book, page by page. Embed the recordings onto a QR code and place the QR code on each page for the student to scan. This would be great for conquering the "listen to reading" portion of Daily 5 without having to physically read to every single student. 
  5. Record your instructions for a substitute. Put the files in a special folder that a substitute can access. Then all she/he has to do is play the recordings for the class. It's like you're "teaching" even when you're not physically there.

Modify
  1. Modify work for ESL or LD kiddos by reading things to them, repeating directions, or telling them to skip every other problem... etc.
  2. As a modification, read an assessment and the possible answers and place it in the top corner of SpEd kids' papers. They could go into the hallway and listen to the test being read to them...they could even pause to comprehend and answer questions.
  
Help Students and Parents
  1.  Record project or homework explanations so kids can listen to instructions at home. Embed this recording next to an uploaded copy of the presentation template or written instructions on your blog. 
  2. Language teachers: record yourself naming items around the classroom in the new language. Put the recording on a QR code and put the QR codes around the room. If students forget how to say "door" in Spanish, they can just go scan it to get a refresher. :)
  3. Record instructions, the agenda, etc. for students who are absent. When they return, students can scan the QR code to see what they missed.
  4. Place vocabulary word pronunciations and/or definitions right next to the word in books available in your library.
  5. Place thinking/discussion questions on back covers of books or at the end of chapters so that students can have a starting point for group discussions in Book Club.  
  6. English teachers and librarians: record book reviews.
  7. Put the mp3 file on your iTunes and then upload it to your class iPods/iPads. If students are absent, they can hear instructions/the agenda/whatever fits your class best from the day they were gone. You can provide headphones so that students can catch up quietly during their free time.
  
Student Use:
  1. Let your students record book reviews for other students. Attach the review to a QR code and post it in your library! 
  2. Allow students to dictate their stories/essays. 
  3. Allow students to perform reports/presentations into Vocaroo. Embed on the class blog to share with parents. 
  4. Allow students with speech issues record themselves speaking/reading. They can listen to it and make self-corrections. 
  5. Ask students to talk about a project they completed, a poster, or an assignment that they're particularly proud of. Students who are afraid to speak in front of others might be able to give their oral presentation via podcast, and just stand in front of the room, holding their poster or prop, while the recording plays.
  6. Ask students in a group to explain their role in the group activity. 
  7. Ask students to be in charge of classroom announcements or an audio newsletter. Let kids talk about upcoming events and what's been going on in class lately; embed this recording on your class blog or post the link on your newsletter.
  8. Let students draw a poster to define a vocabulary word. Then they can record the actual definition using Vocaroo, put the recording in a QR code, and post the QR code on the definition poster. 
  9. Let students create book summaries, embed them into QR codes, and stick them on the inside cover of books in your library. 

Vocaroo lets you embed the recording widget directly onto your blog, so you can try it for yourself without ever leaving this page: