Image Map

Thursday, April 28, 2016

Let's Recap

Have you heard about Recap? It's a relatively new tool that has some great features! In a nutshell, Recap is a completely free assessment resource {available on the web or through an iPad app} that lets students respond to the teachers' questions or prompts via video.

Website | iPad App

With recap, teachers can...
  • create questions that are typed or voice-recorded 
  • choose how students will sign in: 7-digit alphabetical PIN or e-mail address/password
  • add up to 10 questions in a single assignment {and, as of the newest update on April 12, teachers can now give more than one assignment to students at a time}
  • give an assignment to the whole class or only certain students
  • set a max response time to make grading faster and students' answers more precise
  • set a due date for assignments
  • add a poll at the end of an assignment that asks students how well they think they understood the material
  • view individual student information or the entire class's responses as a whole
  • grab the link to an individual video to share with others (e.g. parents, admin, your co-teacher, and/or social media)
  • leave written feedback/commentary on student videos 

The view is super-simple from the students' side. Learners indicate that they are a student on the login screen:


Students can sign in with a class PIN or an e-mail address {whichever option the teacher enabled when he/she set up the class}:
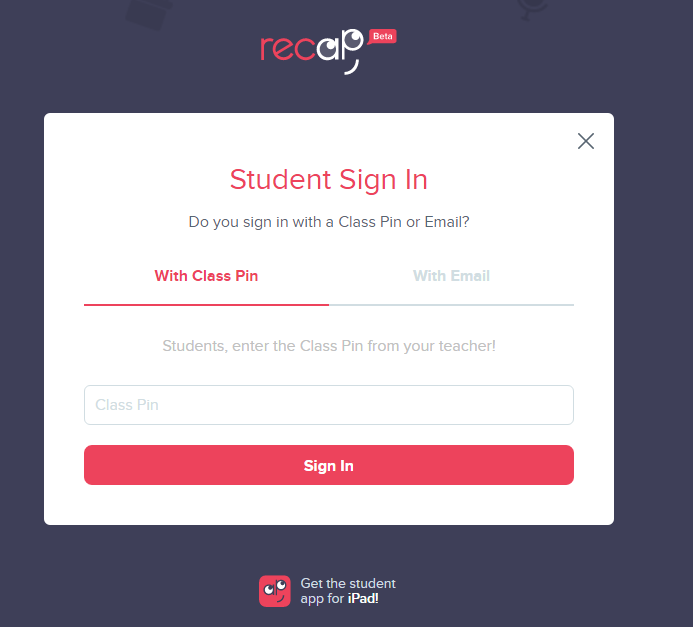


If signing in with a PIN, the child must then select his/her name from the class list before seeing any assignments:


The student dashboard allows learners to see previously submitted assignments as well as those that have not yet been completed. The dashboard is also where students can view feedback from their teacher on submitted assignments. {Note that students cannot see other students' assignments or answers.} Here's an example of what the dashboard might look like for your students:

Don't you love that confused look on my face in the screenshot? haha! 

This video -- filmed by EdTechTeacher's Greg Kuloweic -- shows you Recap in action from both the teacher and the student side {but keep in mind that a couple of features have been added since this video was released}:


I already use Seesaw...should I still consider Recap?

While there are similarities between Seesaw and Recap, it's important to recognize that these are two completely different resources. Recap is strictly for assessing students via video (and follow-up poll if the teacher enables it), while Seesaw is more of an ePortfolio tool that happens to have a video feature, too. If you are a Seesaw user, you may still consider incorporating Recap for the opportunity to differentiate questions and/or allow students to turn in video responses confidentially. 

To integrate Recap with Seesaw on iPads, first make sure the Recap app is on all student devices. Then push a note in Seesaw to the entire class with the login information (e.g. 7-digit PIN if students are without e-mail addresses), as shown below.

Seesaw user tip: create a folder just for login information

While students cannot copy the PIN from the Seesaw note directly into the Recap app, this at least provides a consistent place for students to find login information independently. 


Resources:

Tuesday, March 22, 2016

How to Create a Custom Google Search for Students

It's scary to even consider asking a child to conduct a normal Google search because you never know what will pop up! And although it's important to teach students how to use the library's search engines, sometimes those databases don't have everything your students need. So what's a teacher to do? 

Answer: create a Google Custom Search.


What Is a Google Custom Search?
Users who are logged in to their Google account can go to this webpage and create a search engine that looks like a regular Google search, but it really only allows visitors to search websites of your choice. 

So, for instance, you could set up a Custom Search that allows students to only access kid-friendly websites. Once you give them that search link, you can rest assured that only appropriate content will appear.

How to Create a Custom Google Search:
1. Log in to your Google account. {If you don't already have a Google account, go to this webpage and create one. You don't even have to use a Gmail address -- you could use an e-mail that you already have and link that to your new Google account, if you want!} 


3. Click "Add" on the top, left of the page (under "Edit search engines"). 


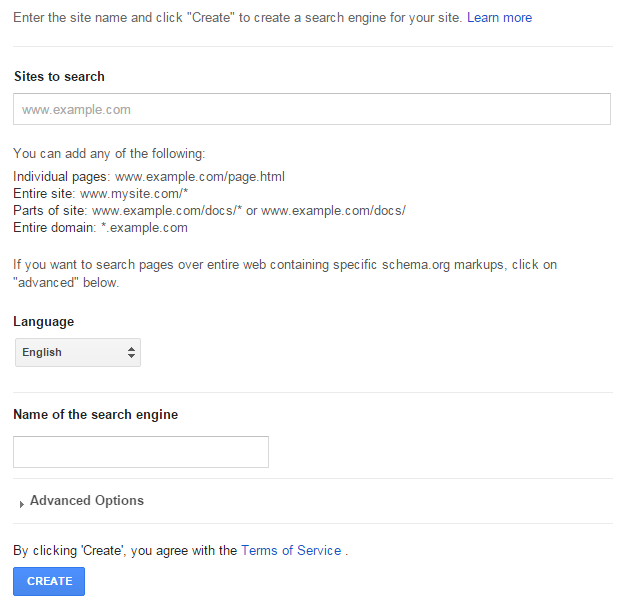
4. The only portion you really have to fill out is the "sites to search" box. As you click in the blank box under "sites to search," a new text box will automatically appear underneath the first one, which allows you to add as many kid-friendly sites as you want to this Custom Search. The name of your search engine is automatically populated, but you can change it if you want. Add advanced options if you wish, although it's not necessary. When finished, click the blue "create" button at the bottom of the page.


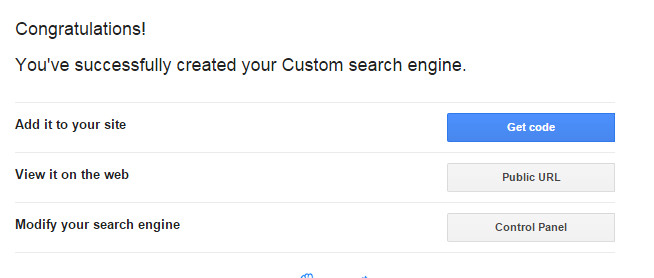
5. After you click "create," you'll see a page that looks like this:


Click "Public URL." A new window will open on your browser, and it should have the name of your Custom Search at the top. Keep in mind that although it looks like a regular Google search, it's the custom one you just created. :) Mine looks like this {click the picture to view the page in your browser...or click here}:


When students search, they should type their words into the text box underneath the title {notice how it says "Google Custom Search" in that box}. 

The search results will only come from the website(s) you specified when you created the Custom Search. So, for instance, if you conduct a search in my Kid-Friendly Custom Google Web Search, you'll only get results from these websites:

As the creator, I can edit or delete this Custom Search at any time. 

Teachers can AirDrop this to newer student iPads and have students save the website to the home screen for quick access all year long. {Read about 8 ways to quickly share links with students if you have older iPads without AirDrop or teach in a BYOD class.} 

Monday, February 1, 2016

3D Map Tours with Apple Maps

With today's academic and scheduling demands, actual field trips aren't always possible. Luckily for today's teacher, virtual field trip opportunities are abundant! A quick and easy "go to" tool is typically Google Earth, as you can zoom in, "stand" on the roads, and turn in a complete circle to see everything around you. 

Until recently, I didn't know that the default Apple Maps app has virtual field trip opportunities, as well -- in the form of "tours." 


Although there is not a tour for every city [yet, anyway!], the tours that are offered provide plenty of classroom fun.

How to access city tours in Apple Maps:

1. Launch the default Maps app, whose icon looks like this:


2. Navigate the map to a large city of your choice by sliding your finger across the screen. {In honor of being in Austin, Texas this week for the TCEA conference, the examples in this post are all about Austin!} 


Any city that has a little black and white bubble next to it that says "3D" has a tour available. For instance, when I look at Texas, I see the "3D" bubble next to Austin, Houston, and San Antonio. If you tap a bubble that says "3D," you should see the name of the city on the right and a blue box that says "Tour" on the left, as shown below:


As soon as you click "Tour," the map zooms in to the city, and you start an up-close flyover. Captions at the bottom show you what you're looking at. The tours I saw took you through the city and showed off local landmarks. Here are a few screenshots from my Austin, Texas tour {click any of the pictures to enlarge them}:


Pros
  • Free.
  • The app comes pre-downloaded onto iPhones and iPads, so you're ready to tour right out of the box. 
  • If you mirror your device to your laptop, you can then display the tour on your Promethean board for all students to see.
  • The tours take just a minute or two, so students get a good look at the city without taking up lots of precious instructional time.

Cons
  • The flyover goes fairly quickly, so it's easy to miss things if you're not watching carefully every second!
  • The only way I could figure out to pause the tour is just to tap the screen {which can be annoying for long periods of time}. I couldn't find a way to rewind or fast-forward at all. 
  • Tours aren't available for every city.

Assuming a 3D tour is available for the particular location you need, I could see this feature being used during reading {to help students understand the setting of the book}, social studies {to make geography come to life}, and science {to show land forms and examples of scientific concepts}. 


If you're interested in more virtual field trip opportunities, consider visiting this Pinterest board:

       Follow Candice's board Virtual Field Trips on Pinterest.