Image Map

Sunday, February 15, 2015

Seesaw: An ePortfolio and Paperless Class Option

Seesaw, who advertises themselves as "the learning journal," is my newest favorite tech tool. It's available both on a browser and on iOS-compatible devices {download the app for free here} or on Android devices. In a nutshell, it's an easy way for students without e-mail addresses to turn in work to you and/or create an ePortfolio. 
More Information
You, the teacher, must create an account on the Seesaw app. Afterwards, add a journal for each student -- it's very quick! Seesaw generates a QR code that students scan in order to join your class. From there, students can upload or take a photo from within the app, annotate over the top of it, and record his/her actions and voice. In that respect it's a lot like Educreations, but Seesaw allows each kid to have his/her own special journal. 
Pros:
  • Totally free.
  • Compatible with iOS and Android. Both apps are free, of course.
  • Free web access.
  • Multiple sign-in options. Kids can sign in with a (Seesaw-generated) QR code or an e-mail address -- choose what works best for your students.
  • Unlimited space. Teachers can create an unlimited number of spaces, have an unlimited number of students, and students get unlimited amount of space for work uploads.
  • No e-mail address, username, or password required. Each class has a QR code that students simply have to scan in order to access the class. This eliminates the need for logging out and back in before every assignment, which can eat up a lot of time!
  • Plays well with others. Seesaw is compatible with lots of commonly-used creation apps so that you can import work from there into the Seesaw journal. It can also help you bypass the need for an account in those other apps. For instance, users typically need an account in order to export work from Shadow Puppet Edu. However, if they export to Seesaw, no account is needed!
  • Co-teaching? No problem. Add a co-teacher to your account by simply e-mailing the Seesaw team. 
  • Moderate as needed. Ability for the teacher to approve/deny each journal entry, along with reassigning work to students if they accidentally upload to the wrong journal.
  • School-wide account option. E-mail the Seesaw team to activate this option. Once done, you can upload student accounts in bulk, and a student's work can go with them from year to year.
  • Activate alerts. Get notified via e-mail and/or on your device each time a student uploads work, if you want. {Parents also have this capability with their own child's work.}
  • Easy parent communication. Teachers have the option to invite parents to view their child's work {parents only see their child's work}. Parents can view everything that is uploaded to their child's account and comment on individual assignments {if you activate that feature}. If their child is enrolled in more than one class that uses Seesaw, the parent should see all work merged into one stream.
  • Optional upgrade for parents. A basic parent account is free, but they can upgrade for $10/year to access additional features. 
  • Quickly find student work. The teacher can access a calendar view; click on a day to access all work added to the journal that day. The teacher can also click on a specific student's journal in order to see work only he or she completed. Finally, the teacher can flag work for follow-up, and then later choose to view only the flagged items.

Cons:
  • No way to push information to students. I spoke with the support team, and they said they've heard this from a few teachers and might be adding this feature in the future. But for now, you cannot upload anything to a class journal for students to grab and work on, for instance. If your iPads have AirDrop, though, there's an easy work-around. 
  • No way to edit. This is a feature the team is supposedly working on, but for now, once something is uploaded, the teacher has to delete it -- as students cannot delete -- and the student will have to edit and re-upload, as there are no "do-overs." 
  • School accounts seem needed. Journals do not carry over from year to year unless you have a school account. I'm not sure what happens to the student's work after the school year is over, but it's something to look into. 
  • No way to grade. It would be super if this app gave you the ability to grade things or annotate on work, but right now, it's just a storage hub for student work.
  • No PDF support. But you can take photos/screenshots of PDFs, so this is only a minor annoyance.
Personally, I think this would be awesome to take into parent conferences. If the parent already has an account, there are no surprises! But if not, all of the student's work is on your iPad, so you can just let his/her work samples do the talking. 
You can use Seesaw even if you only have 1 iPad in your class. Just have students take a picture of their paper work and upload it to their own account instead of turning in the paper version. And because Seesaw is compatible with so many other commonly-used creation apps, you aren't limited to just annotation and videos for student uploads. Here's a list of apps with which Seesaw plays well. Plus, the Seesaw website even has lots of activity ideas already posted for each subject area so you can dive in ASAP.

Sunday, February 8, 2015

Schedule Meetings Easily with Doodle

Doodle is a tool meant to help ease the pain of scheduling a meeting or other event with multiple people. So if you're like me and struggle to find a common time for your team to meet and plan, Doodle is going to come in handy for you!

A basic account at Doodle is free, although there are upgrade options.


How It Works:

1. Create a free account. 

2. After logging in, click "schedule an event" at the top of the page. 


3. The only information that is absolutely necessary to provide is the title of the event + your name and e-mail address -- and the latter two fields are pre-populated for you based on your login information. You are encouraged to type a location and brief description, though, so that your attendees are less likely to be confused. 

4. Click "next" at the bottom of the page to go to the scheduling section. Click the calendar to highlight the potential meeting times:


5. Add in potential meeting times to each date selected:


6. From there, either choose a basic poll to complete the set-up, OR toggle the settings options. 


Here are the settings options:


If you pay for the premium Doodle service, you could also choose from any of these 3 additional options:


7. Once the set-up of your event is completed, it's time to invite participants! You can connect to Google or your iCloud for easy retrieval of the e-mail addresses, and you can invite up to 250 people to one event. Choose to add a personal message that will appear in the e-mail, if you want. For instance, the very first time I sent a Doodle link, I included a message about what Doodle is and how it might work for our team. 


8. Toggle the share settings:


You can decide if you want to limit your event RSVPs to only those that you send the e-mail invitation to, or if you're okay with RSVPs from anyone who has the link {so your original recipients can forward your invitation}. 


A link to your event is then sent to each recipients' e-mail inbox. You can access your open events {polls} by clicking "my polls" at the top of your account page or by finding the "my polls" section on your dashboard.


After you send the invitation, you'll get two e-mails from Doodle: one with the participation link and the another with the administration link. The administration link allows you to go directly to your event page to edit it, but you can also just log in to your Doodle account to edit your polls. Click the "participation link" to check off the times that you are available and give all participants an example. 

Your invitees, on the other hand, will receive an e-mail similar to this:
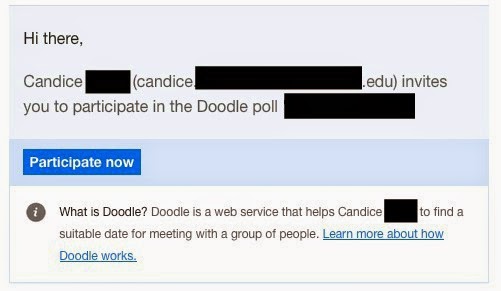
This is the e-mail my team received when we were trying to meet for our annual December meeting/Christmas celebration.

Here's a test poll I created for this post so you can see what invitees see when they go to the poll page:


Invitees can see when the poll was created, who created it, who was invited, other invitees' schedule votes, and any comments left on the poll. They can also print the invitation if they want {or you can print it and put it in the mailbox of a colleague who maybe isn't as comfortable answering online}. 

Recipients only have to enter their name, check the box(es) under the dates/times that work for them and click "save." 

As guests participate in the poll, the administrator receives e-mail updates about their votes and any comments that are made. I'm not sure how long a poll stays open; I only know the one I created around the second week of December is no longer in my account. It could expire after a certain amount of time, or it could expire after the date of the event! 

If you need to edit your poll at any time, you can do so by visiting the administration link sent to your e-mail, or by going to your participation link and clicking the "administration" tab at the top. 


See below to view your administration options for each open poll:


I've only used Doodle a couple of times, but my experience with it has been nothing but great. It's a neat tool to help large groups of people with busy schedules find a common meeting time! 

post signature

Thursday, January 29, 2015

How to Go Paperless with Elementary School Assessments

I love systems like Socrative and Kahoot, but they aren't as conducive for younger students who can't read as well or as quickly as some of my older students.

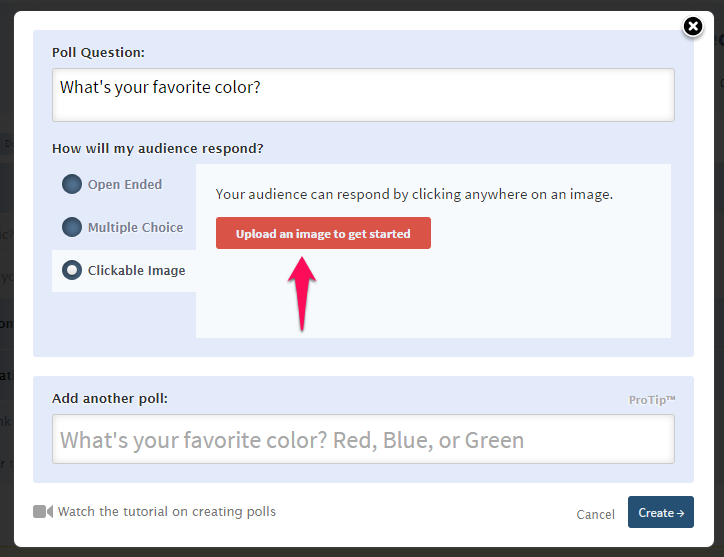
Luckily, Poll Everywhere has a cool, unique feature that is SO helpful in assessing the little ones. It's called the "clickable image" feature. (Poll Everywhere has lots of options and is free to use, so I definitely recommend signing up for an account!)

When you start a new poll, Poll Everywhere lets you choose how you want that poll to look. Just select the "clickable image" button to utilize this feature.


After that, you can upload your image and get started:


For this example, I just uploaded a picture from Google of 5 lessons from Dr. Seuss. Of course, you can use any picture you want (or make a collage). After the image is uploaded, click on it to set parameters for the answers. So in the picture below, you can see the translucent white box around "1. Today you are you, that is truer than true. There is no one alive who is youer than you" -- that means that portion is a potential answer for voters. Set as many parameters as you want and adjust the size of each. If someone taking this poll clicks anywhere within the translucent box shown below, their answer will be counted for life lesson number one.


After you set answer parameters, move on to the poll display page. It might look a little something like the picture below (notice I changed the question so it fits the image now!):


If you look at the row of icons on the right side of my picture, you'll see 7 options of things you can do with your poll at this point. Here is what each icon means:

  • Paintbrush: change the color scheme of the poll
  • 2nd button from the top: activate the poll and "push" it to student devices
  • Eye with a slash: toggle whether or not the question parameters are seen
  • Green pin: toggle whether or not the green pins are shown when people click answers (as students touch the screen to answer, a green pin will appear on their screen where they clicked)
  • Stop sign: stop the poll
  • File cabinet: clear the answers from this poll
  • 4 arrows: display the poll in full screen
There are even more customization options in the blue boxes to the right of all the icons -- I'll let you explore those for yourself.  

In the picture above, you can see a URL displayed right under the question; students can use that URL to quickly participate in the poll from any device with a browser, so this is perfect for the BYOD classroom. If anyone visits this URL before the poll has been activated, they'll just see a picture of a pie. Not sure why that's the chosen icon, but it definitely makes it easy for students to recognize when they're at the correct page. :) 


For a weather poll for my kindergarten students, I displayed this while they were working:


I didn't make this collage myself (I found it on a free flipchart I got from Promethean Planet), but it's easy to do so with a photo-editing tool or in PowerPoint.

You can string several questions together so that students can take a multi-question quiz; this is what I did for the kindergarten weather poll. I believe Poll Everywhere gives teachers the option for students to have an account so you know who is answering in which way, but there was something that kept me from activating that option... I can't remember if it's because it costs money to do that, or if it's because my students are too young to have e-mail accounts or register for something like this. Or both. ;) In any case, walking the room while students are answering is a quick fix to being able to see which answers below to which students. They can only vote once, so that green pin will stay on the screen until you clear it or move on to the next question.

Here's an example of what students see on their screen:


Below is a collage I quickly made in PowerPoint to use as a warm-up for my 4th graders when we did a matter investigation involving water content of fruit:


I wanted them to be able to see the fruit as they chose the answer, so the clickable image worked well for my 4th graders in this instance.

The possibilities are really endless with this clickable image option! How would you use this in your class (or would you)?

post signature