Image Map

Tuesday, March 22, 2016

How to Create a Custom Google Search for Students

It's scary to even consider asking a child to conduct a normal Google search because you never know what will pop up! And although it's important to teach students how to use the library's search engines, sometimes those databases don't have everything your students need. So what's a teacher to do? 

Answer: create a Google Custom Search.


What Is a Google Custom Search?
Users who are logged in to their Google account can go to this webpage and create a search engine that looks like a regular Google search, but it really only allows visitors to search websites of your choice. 

So, for instance, you could set up a Custom Search that allows students to only access kid-friendly websites. Once you give them that search link, you can rest assured that only appropriate content will appear.

How to Create a Custom Google Search:
1. Log in to your Google account. {If you don't already have a Google account, go to this webpage and create one. You don't even have to use a Gmail address -- you could use an e-mail that you already have and link that to your new Google account, if you want!} 


3. Click "Add" on the top, left of the page (under "Edit search engines"). 


4. The only portion you really have to fill out is the "sites to search" box. As you click in the blank box under "sites to search," a new text box will automatically appear underneath the first one, which allows you to add as many kid-friendly sites as you want to this Custom Search. The name of your search engine is automatically populated, but you can change it if you want. Add advanced options if you wish, although it's not necessary. When finished, click the blue "create" button at the bottom of the page.
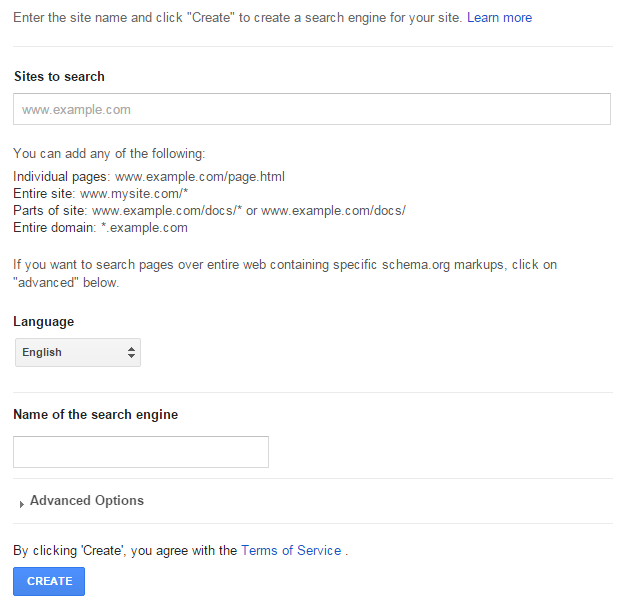

5. After you click "create," you'll see a page that looks like this:
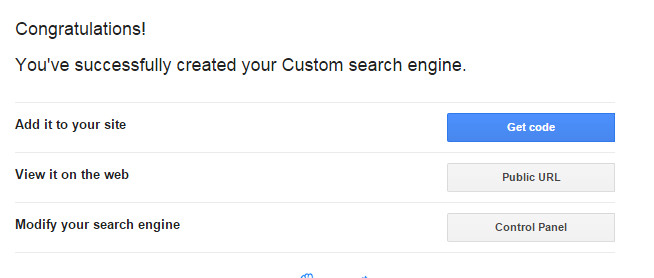

Click "Public URL." A new window will open on your browser, and it should have the name of your Custom Search at the top. Keep in mind that although it looks like a regular Google search, it's the custom one you just created. :) Mine looks like this {click the picture to view the page in your browser...or click here}:


When students search, they should type their words into the text box underneath the title {notice how it says "Google Custom Search" in that box}. 

The search results will only come from the website(s) you specified when you created the Custom Search. So, for instance, if you conduct a search in my Kid-Friendly Custom Google Web Search, you'll only get results from these websites:

As the creator, I can edit or delete this Custom Search at any time. 

Teachers can AirDrop this to newer student iPads and have students save the website to the home screen for quick access all year long. {Read about 8 ways to quickly share links with students if you have older iPads without AirDrop or teach in a BYOD class.} 

Monday, February 1, 2016

3D Map Tours with Apple Maps

With today's academic and scheduling demands, actual field trips aren't always possible. Luckily for today's teacher, virtual field trip opportunities are abundant! A quick and easy "go to" tool is typically Google Earth, as you can zoom in, "stand" on the roads, and turn in a complete circle to see everything around you. 

Until recently, I didn't know that the default Apple Maps app has virtual field trip opportunities, as well -- in the form of "tours." 


Although there is not a tour for every city [yet, anyway!], the tours that are offered provide plenty of classroom fun.

How to access city tours in Apple Maps:

1. Launch the default Maps app, whose icon looks like this:


2. Navigate the map to a large city of your choice by sliding your finger across the screen. {In honor of being in Austin, Texas this week for the TCEA conference, the examples in this post are all about Austin!} 


Any city that has a little black and white bubble next to it that says "3D" has a tour available. For instance, when I look at Texas, I see the "3D" bubble next to Austin, Houston, and San Antonio. If you tap a bubble that says "3D," you should see the name of the city on the right and a blue box that says "Tour" on the left, as shown below:


As soon as you click "Tour," the map zooms in to the city, and you start an up-close flyover. Captions at the bottom show you what you're looking at. The tours I saw took you through the city and showed off local landmarks. Here are a few screenshots from my Austin, Texas tour {click any of the pictures to enlarge them}:


Pros
  • Free.
  • The app comes pre-downloaded onto iPhones and iPads, so you're ready to tour right out of the box. 
  • If you mirror your device to your laptop, you can then display the tour on your Promethean board for all students to see.
  • The tours take just a minute or two, so students get a good look at the city without taking up lots of precious instructional time.

Cons
  • The flyover goes fairly quickly, so it's easy to miss things if you're not watching carefully every second!
  • The only way I could figure out to pause the tour is just to tap the screen {which can be annoying for long periods of time}. I couldn't find a way to rewind or fast-forward at all. 
  • Tours aren't available for every city.

Assuming a 3D tour is available for the particular location you need, I could see this feature being used during reading {to help students understand the setting of the book}, social studies {to make geography come to life}, and science {to show land forms and examples of scientific concepts}. 


If you're interested in more virtual field trip opportunities, consider visiting this Pinterest board:

       Follow Candice's board Virtual Field Trips on Pinterest.    

Thursday, January 28, 2016

Epic Reading

Have you heard of Epic? In a nutshell, it's like Netflix for [children's] books, and it's free if you're an educator!


Here's a little more detail:

Features
  • Access on the web and via mobile app {iOS / Android}
  • 100% free for teachers and school librarians{Parents get 1 month free then pay $5/month}
  • Access over 10,000 books for kids age 12 and under
  • Register up to 36 students under your name
  • Track reading progress of each student, including which books students read and how long they read
  • Students can read the book independently or have it read to them
  • Students can read an unlimited number of books each month
  • Students earn badges to encourage more reading
  • No ads or in-app purchases
  • Pinch your fingers on any book to zoom in

Tour

The first time I logged in to the app, I was immediately directed toward a "Guest" profile {after I logged in as a teacher}, which I suppose is technically a student. Exploring this student profile, here's what I found:

Hold your device in portrait mode to see one page of the book at a time:


Holding the device in landscape mode allows the reader to see a two-page spread:


Regardless of the view, readers can always see how many pages they have left in the book by viewing the count in the bottom, center of the screen.

Need to leave the app but haven't finished the book yet? No problem. Just stick a virtual bookmark in your spot:


You can even bookmark multiple pages, as seen on the top of the screen below with the multiple red dots:


If the child swipes through the book too quickly, he/she gets a notification saying s/he needs to read a little longer. I was worried at first about what this would do for really fast readers, but I swiped through in probably less than a minute when I received the screen on the bottom left... Waiting just an extra minute or so allowed me to move on to the screen on the bottom right and press "finish book!"


When the student marks the book as "officially" complete, there's a time stamp of how long it took for the student to read it cover to cover {this information also appears in each child's reading log so the teacher can view it at a later time}.


After finishing the book, the student earn points toward his/her current level and sees suggestions for his/her next read:


Reading also earns the student rewards, such as new avatars {seen below}. The student can choose to add the book to his/her favorites, share the book with others, or rate the book on a 5-star system.


Students also see the total time it took to read the book cover to cover {this information is also displayed on each child's reading log for teachers to review at a later time}.


Finishing books allows the reader to "level up" and work toward earning more badges.


Use the "switch profile" option to switch to another student profile or the teacher's {the teacher profile can only be accessed if the teacher enters his/her password again}. View a student profile to get more information on the child's reading habits and time in Epic. Here's a student profile page:


From the app, the teacher can click on each individual student to quickly see how much total time each student has spent reading {and narrow that reading log down to a specific week, month, or year}, as well as which books s/he read along the way:


...or the teacher can view all information from the teacher dashboard on the web:


Clicking on a student's profile from the web gives more details about the time spent reading and the number of pages finished:


Finally, Epic provides free teacher resources, which include postcards, ready-made parent flyers, and an introduction video as well as a robust FAQ section that will answer all remaining Epic questions.

Do you use Epic with your students? If so, tell me what details I missed sharing! What do you like or dislike about the tool?