:: June 2014 update:: I elongated this post by giving details about each screen in the Instagram app for iOS devices. I also recorded a more detailed tutorial video.
I made a little video about how to use Instagram on an iOS device, if you're interested. It's not as "fancy" as the videos on
my Screencast channel, but it should get the job done. :) {I don't have any other devices except Apple devices on which to show you a tutorial. If you're on an Android or other device, go to
YouTube and start searching! I'm sure there's a tutorial out there!}
Click the outlined square in the bottom right of the video to make it full screen.
If you'd rather read through a tutorial instead of watching a video, please see the instructions below...
1. Download the
free Instagram app from the App Store. It's important to know that while you can view, like, and comment on photos from
the Instagram website, you
cannot currently upload any photos from the website. You
must use the app on a mobile device.
2. Open the app.
3. If you already have an Instagram account, stop reading this and skip to step 4. Register with Facebook or with an e-mail address. If you register with Facebook, it means that you'll log in using your Facebook username and password, and then Instagram will import all of your Facebook info to your Instagram account. So whatever your current Facebook profile picture is -- that will be your Instagram picture, and so on. Of course, you can always change this later.
I don't ever register with Facebook. First of all, I'm not a Facebook fan, so if I ever want to delete my FB account completely, I'd have all these other accounts hooked up to it that I'd probably lose access to. Second, Facebook is terrible about privacy. They frequently change their privacy settings without telling anyone, and that annoys me. I don't trust Facebook, plain and simple. Third, I am adamant about keeping my professional accounts completely separate from my personal accounts. I don't have a professional Facebook account, so I'd have to connect my professional Instagram account with my personal Facebook account, and that's not okay with me.
People do register accounts through Facebook frequently, though, because it makes it very easy to remember usernames and passwords.
It's totally a personal decision. No judgement from me. :)
If you choose to register with Facebook, you'll just type in your FB username and password and essentially log in to FB through this Instagram app.
If you choose to register with an e-mail account, you'll just fill in the 3 areas below:
I guess there are technically 4 areas to fill in above if you count the profile picture, but since it's not mandatory, I don't think it counts. :) Click the arrow in the top right when you're ready to move on. If you just registered, skip to step 5.
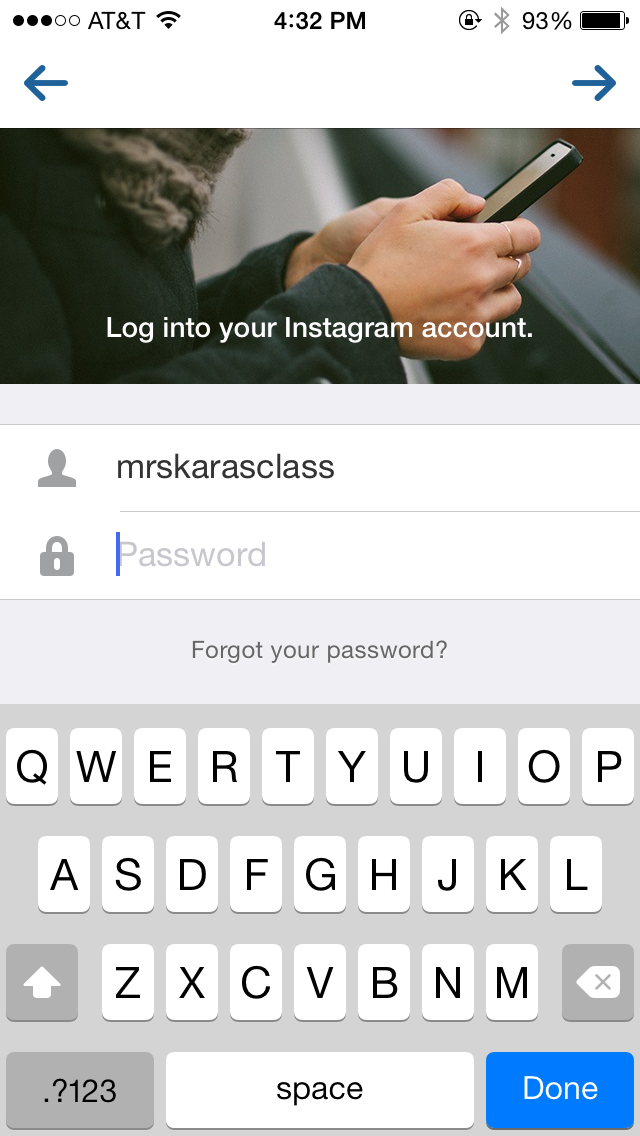
4. If you need to log in, click the "log in" button at the bottom of the launch screen, type in your username and password, and click the arrow in the top right.
 |
| :: July 2015 update - my IG username is now @ckarasedu :: |
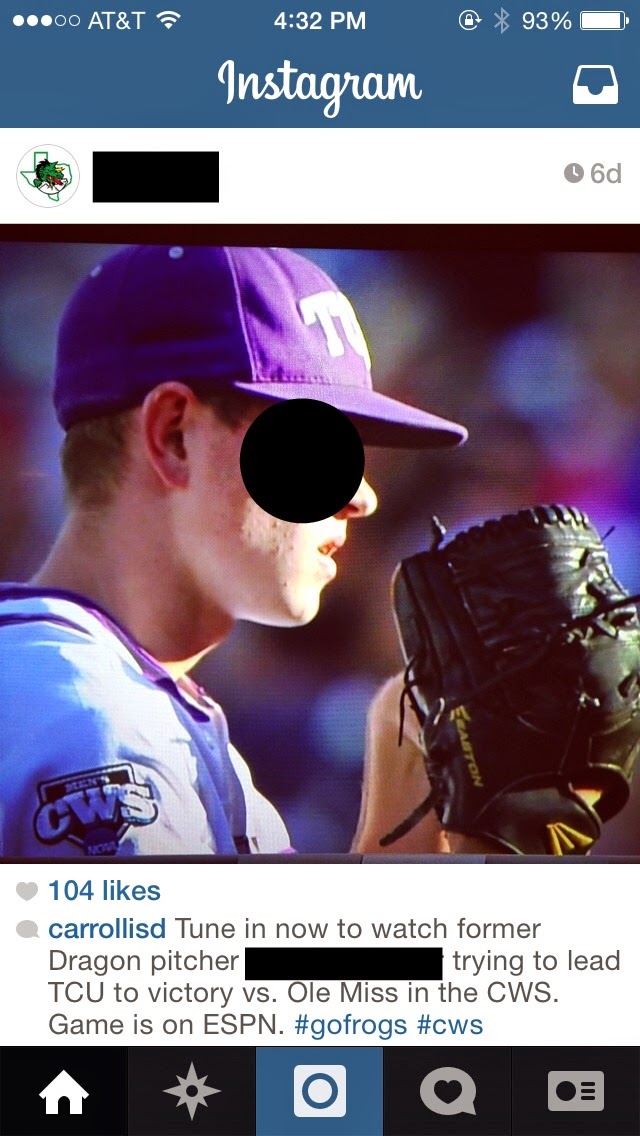
5. Immediately upon logging in to your account, you'll see your home page, which is filled with your feed. "Feed" is short for "newsfeed" in the social media world, which is a timeline or list of all the latest updates from everyone you're friends with or following.
On each picture, you can see the username and profile picture of the person who posted it {below: I blocked the username and their subject's face, just to feel a little more comfortable posting this online...} when they posted it {below: 6 days ago}, how many "likes" that photo has {below: 104}, a caption the poster wrote with the photo -- if any {below: starts with, "Tune in now..."}, and any comments other users have written about that photo {below: not shown. It would be below the poster's caption}. A "like" is a way for someone to acknowledge that they enjoyed seeing a photo without actually having to write a comment. {It's like a Facebook "like."}
Side note: when comment on a photo and talking directly to someone, you want to write @ and then their username to make sure they get a notification about the comment and can know to write you back. :)
6. In the upper, right corner of the screen is a box that looks like an inbox. Those are Instagram Direct Messages. It works much like a private Facebook or Twitter message {DM} in that you only share with a select person or group of people. You can send both photos and videos this way. This is a fairly new Instagram concept -- introduced within the last year, if I remember correctly. I'm not a fan of it as an educator, but since it's a feature, you need to know about it. I personally wouldn't use it with students, but that's just me...
7. Still on the home screen: the star button between the home button and the blue button is your search feature. When you press that button, you automatically see a grid of all the current most popular photos on Instagram. This is mainly for businesses and teenagers obsessed with collecting a lot of false friends. ;) I don't use this page because I don't know any of those people, so I don't really care... But you can also use this page to search for a username or hashtag.
8. The blue button is your "take and/or upload a photo or video to your account" button. Clicking on it takes you to a screen similar to this. The black square that you see in the middle of the picture below is what your camera sees. I had this close-up to a table when I took the screenshot because I didn't want you to see a picture of my messy living room, which is my current view. :)
Use the big, blue button to take a picture from within the Instagram app. You can also use it to take videos within the app if you click the video button on the bottom right.
You can also upload any pictures or videos already on your device by clicking the square on the left of the big, blue button. In the picture below, the square has a picture of the last screenshot you saw, which is the last photo I took. But clicking that square would allow you to browse the rest of your photos/videos and all your albums.
Instagram videos are limited to 15 seconds, so if you upload a video that's longer, Instagram will prompt you to crop it. If you take a video within the app, Instagram will cut the video off at 15 seconds so you don't have to {and can't} do any cropping.
There's a white-inked row sitting on top of the big, blue button. Let's review: Press the grid button to put a grid on the screen while you're taking a photo -- in case you want to follow the photography rule of thirds or something. The middle button is to switch the camera to the front {a la "
Let me take a #selfie"... ugh}, and the right button helps you adjust the flash.
9. Next, add filters and/or edit the photo if you wish. This is where Instagram gets the reputation for "artsy" or "vintage" photos because everyone wants to add some type of fancy filter to their photos to make them look more professional. Adding filters or any other edits is totally optional.
10. Click "next" and see the following screen. Add a caption if you wish. You can "tag" people on your photo by clicking the "tag people" option. This lets you notify another Instagram user that they're in your picture. For instance, if your teammate also has a professional Instagram account and you post a picture of her on your account, you can "tag" her. She'll get a notification that she's in one of your pictures.
The photo map adds a pin to a map about where you were when you uploaded the photo. I'm a privacy weirdo, so I personally find this feature really creepy. But I guess it could add a fun element if you were on a field trip with your students or something...? Anyway, to enable this, just click the toggle next to the word "map."
The list of 4 social media sites you see listed below the "photo map" option are share options. There are a couple other social media sites you can share your Instagram photos on, but these are the main ones. To do so, you'll have to connect the other social media account to your Instagram {more about that later}, and then click the account you wish to share on. For instance, I always click the "Twitter" button so that my Instagram photo is also posted on my Twitter account. It's just a way to crosspost without having to log in to a bunch of other sites.
Notice that the "direct" button is grayed out. That means you're not using the Instagram Direct option. Click it to turn it blue to directly message someone or a group of other Instagram users.
11. Click the "share" button. The screen will go back to your home page or newsfeed. Once the photo or video is posted, you'll see your post as the first thing on your newsfeed {until one of your friends posts something else}.
12. The button that looks like a text speech bubble with a heart in the middle is where you find your notifications. The default notification screen is set to "news," and it shows you any activity that has occurred between you and friends. For instance, you'll see if someone "likes" your post or comments on one of them, if someone tags you in a photo, or if someone comments directly to you by writing the @ symbol in front of your username. There's also another tab that says "followers," and that's your opportunity to see activity that your friends have had. For instance, if I were following @abc123 {I'm making that up... don't search for it} and they liked someone else's picture, I could see the picture that was "liked," so long as @abc123 doesn't have a private profile. It's a little creepy, too, in my opinion, but I guess you could use it to find mutual friends.
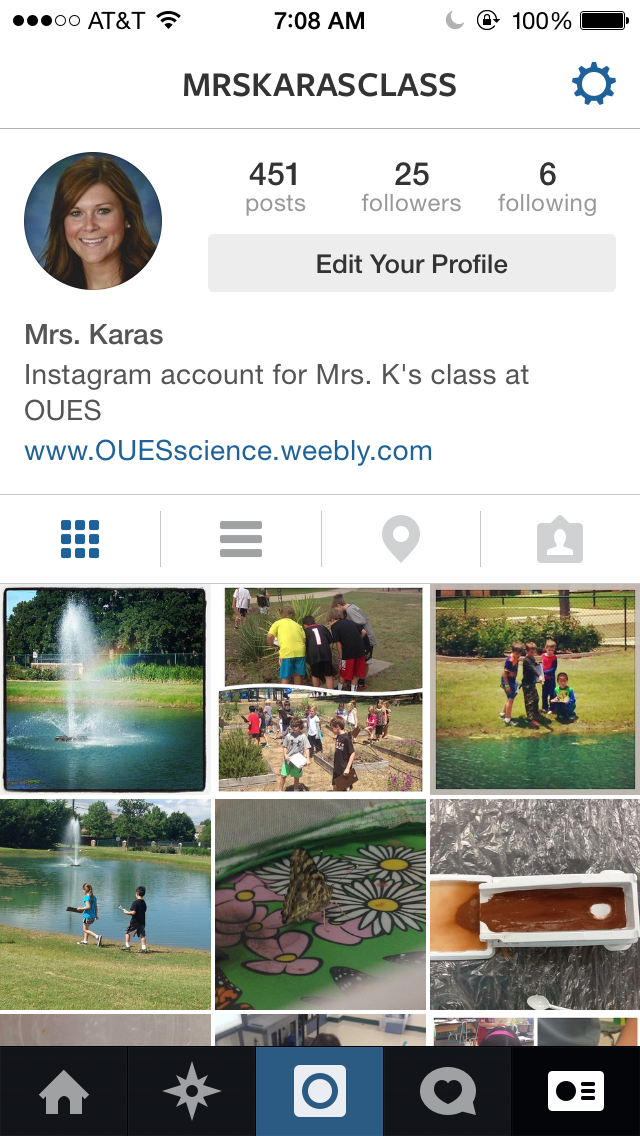
13. Click the business card icon on the bottom right of your home screen to see your profile.
 |
| :: July 2015 update -- my IG username is now @ckarasedu :: |
On your profile page, you can see your profile picture, the "about me" section you typed about yourself, a website that is affiliated with you {if you chose to fill that portion in}, and all your posts. Your posts appear in a grid by default, but you can press the 3 horizontal lines to see all your posts in a larger format like your newsfeed. The water drop button shows you photos that you've added a location to, and the last button the right above your post grid shows you any photos other Instagram users have tagged you in.
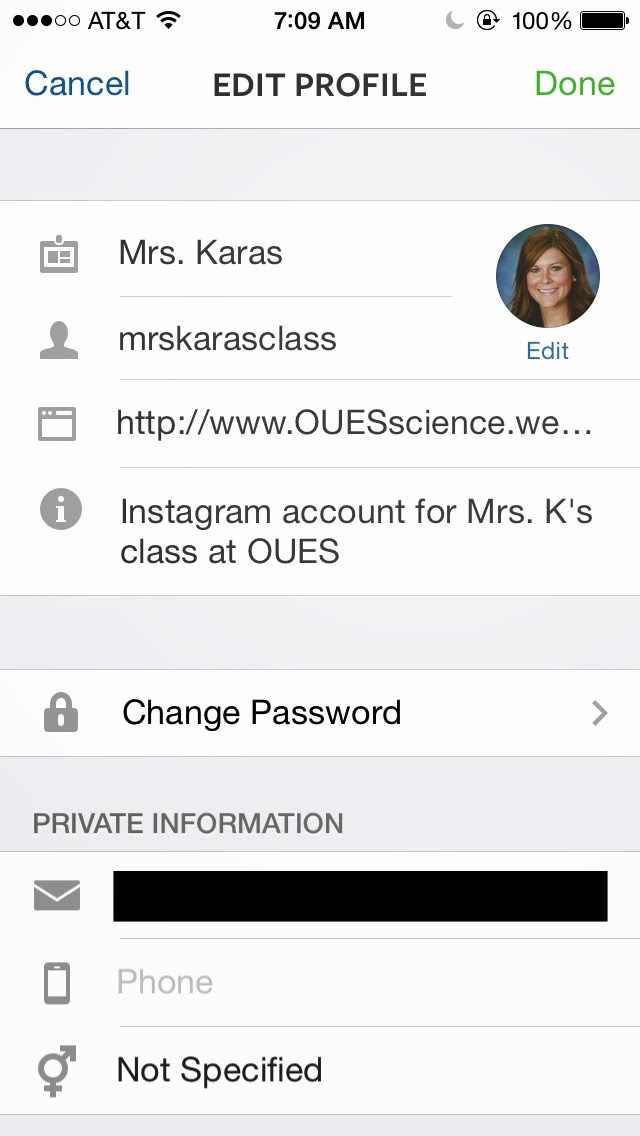
14. At the top of your profile page, click "edit profile" to see some more options. Here, you can edit your profile picture, your displayed name, your username, a website associated with you {optional}, a short bio, and your password.
 |
| :: July 2015 update -- my IG username is now @ckarasedu :: |
Scroll down to see more options:
The "posts are private" toggle allows you to make your profile private. This way, users have to send you a request and you have to accept it in order for them to see any of your posts. This is ideal for teachers who have younger students or who teach a smaller number of students. I don't feel like it's an option for me, though, because I teach over 400 kids a week. I'm still learning all of their parents' names -- I can't memorize their usernames, too! I'm afraid I'd accidentally reject someone and deny them access to see what their kid is doing in my class, so I keep my profile public.
CISD's policy is that you
can post photos of your students on a professional social media account as long as all the students' parents or guardians have signed the photo release. If you get a student whose parents haven't signed the release -- which is rare, I'm told -- you can crop that student out of all photos, black out the face before posting, blur the face before posting, or just make sure he/she isn't in the frame when you take a photo. The way I understand it, as long as the releases are signed, though, you are free to post on your classroom website, blog, and/or social media as long as it's a professional page that you can affiliate with CISD.
15. Go back to your profile page and click the gear button in the upper right corner. You'll see a page like this:
The "find people to follow" tab lets you look at people that have similar interests, similar hashtags, and/or people that your friends follow -- on the chance that you'd see a mutual friend.
The "posts you've liked" tab lets you review all the pictures you've pressed the "like" button on. It does not give you the option to view all the photos on which you've commented, though.
Below are support options.
16. Scroll further, and see options like this:
"Share settings" let you connect your Instagram account to other social media sites. For instance, my class Instagram is connected to my class Twitter. That way, when I post something on Instagram, I have the option to let Twitter post the exact same thing without me having to log in to Twitter manually post it.
Push notifications deal with Apple's notification center. It's handy if you want to respond to likes or comments very quickly, but it's bad because it will drain your battery life more quickly.
The most important feature on the picture above is the "log out" option, though. This is where I can switch back and forth between my personal and private accounts, which makes having a class Instagram super-easy.
Hope that helps! I know it seems like a lot of information, but Instagram is really easy once you get started.
For ideas on getting started with Instagram, please click here.
For ideas on how to use Instagram in your classroom, please click here.


