I talked in this blog post about adding social media buttons under your e-mail signature, so I thought I'd write another post to show you how to do that. :) You can click on any of the photos on this page to see an enlarged version.
1. Find social media buttons. {They're also sometimes called "social media icons."} This Pinterest board has several pins with free social media buttons for you to choose from, or you can just run a Google search for free ones.
2. Download the social media buttons to your computer. A lot of times, artists will make several different sizes of buttons and let the customer choose which ones to use. If that happens, the social media buttons will probably download in a zipped file. You can read this post to refresh your memory on how to unzip files.
3. Pick which buttons you're going to use. You can pick the size and which icons you need. For instance, in my work e-mail signature, I used a button for my science lab website ("homepage"), Instagram, Twitter, and Facebook. Since I don't personally use Facebook in the classroom, I linked to our campus's Facebook page.
You won't typically find a social media icon for a homepage -- I made that one myself. But some button sets will come with a blank template. From there, I just found a picture of a white house and layered it over the blank template. You may also need to re-size buttons if none are to your liking. You can read this post to refresh your memory on editing pictures in PowerPoint.
4. In the Outlook program on your computer, click "file."

5. Click "options" near the bottom of the list.

6. When the pop-up below shows, click "mail."

7. Click "signatures."

8. Type your signature as you normally would. If you want to add a funky font to your signature, you may want to refer to this post and this post.
9. Click the picture frame icon (shown below) and insert a picture from your computer. {You can insert your social media button(s), your signature in a special font, our mascot/logo, or any other picture you want.} Keep doing this until all your pictures are in place.

10. Add link(s) to your picture(s). Select the picture you want to add the link to, as shown below {this example shows my homepage button selected}:
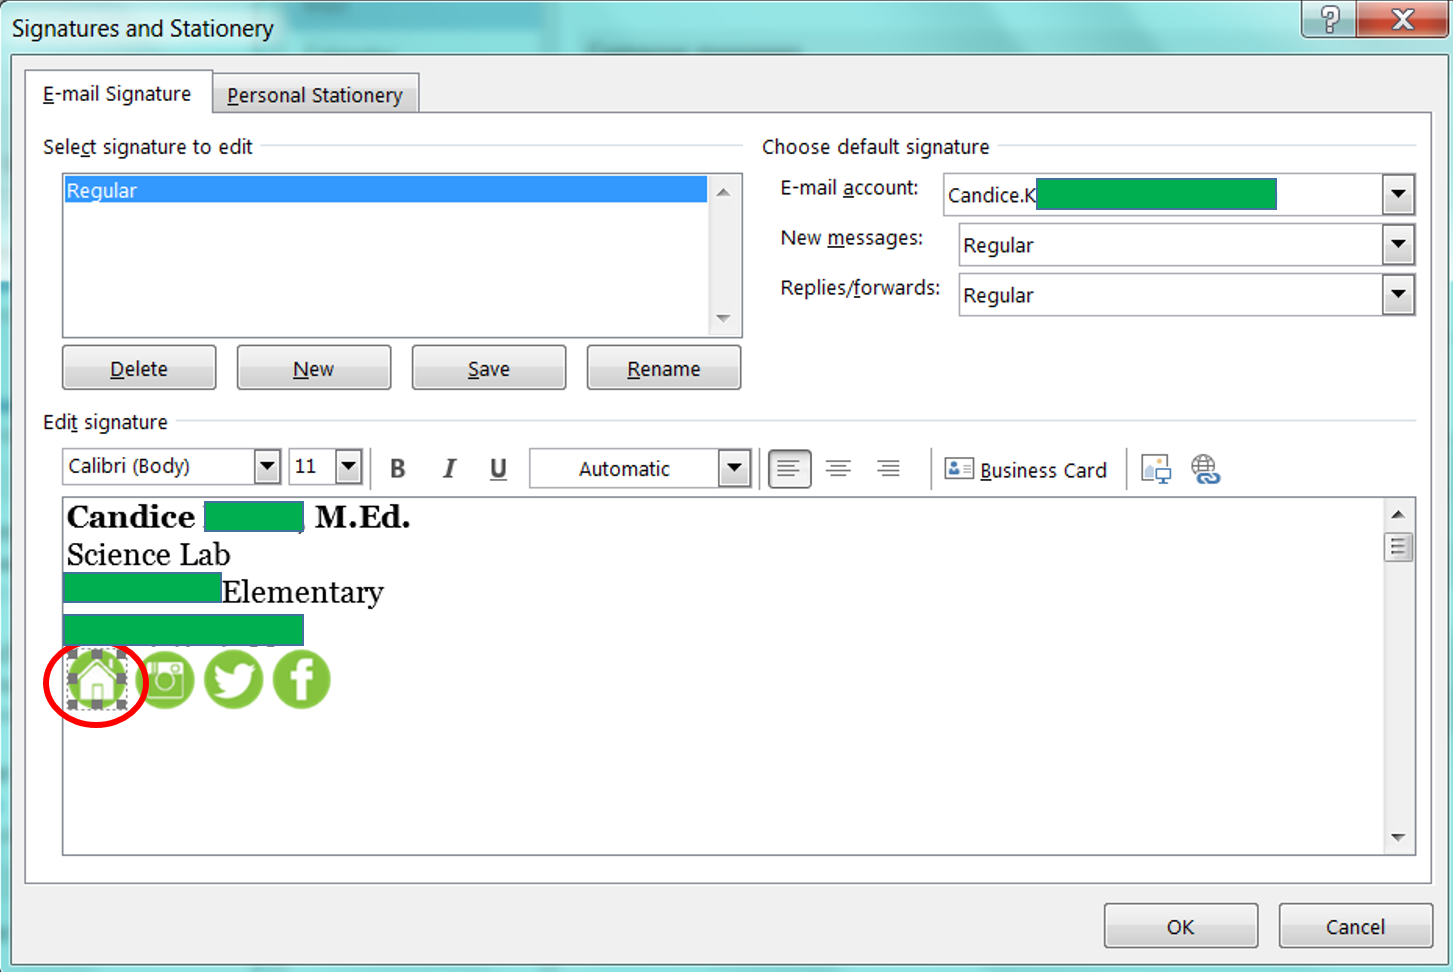
11. While your picture is still selected, click the link button:


12. Make sure "existing file or web page" is selected, and then type the desired URL in the "address" bar. {Make sure to link directly to your profile on social media. For instance, don't link to the Twitter homepage at www.Twitter.com; rather, link to your profile page like this: www.Twitter.com/YourUsernameHere.} You can continue this process of linking individual pictures as much as you want.

13. When you're totally finished, click "OK" twice, as shown below:


If you're in CISD, shoot me an e-mail so I can see your new signature. :)
1. Find social media buttons. {They're also sometimes called "social media icons."} This Pinterest board has several pins with free social media buttons for you to choose from, or you can just run a Google search for free ones.
2. Download the social media buttons to your computer. A lot of times, artists will make several different sizes of buttons and let the customer choose which ones to use. If that happens, the social media buttons will probably download in a zipped file. You can read this post to refresh your memory on how to unzip files.
3. Pick which buttons you're going to use. You can pick the size and which icons you need. For instance, in my work e-mail signature, I used a button for my science lab website ("homepage"), Instagram, Twitter, and Facebook. Since I don't personally use Facebook in the classroom, I linked to our campus's Facebook page.
 |
| The buttons I used |
4. In the Outlook program on your computer, click "file."
5. Click "options" near the bottom of the list.
6. When the pop-up below shows, click "mail."
7. Click "signatures."
8. Type your signature as you normally would. If you want to add a funky font to your signature, you may want to refer to this post and this post.
 | |
|
 |
| "insert picture" icon |
11. While your picture is still selected, click the link button:
13. When you're totally finished, click "OK" twice, as shown below:
If you're in CISD, shoot me an e-mail so I can see your new signature. :)