Image Map

Friday, October 23, 2015

How to Create a Table of Contents in Google Docs

Google Docs {the Google equivalent of Microsoft Word} can be an amazing resource for the classroom. These are my top 5 favorite ideas for using Google Docs in education:
  1. Collaborative writing {up to 50 people can edit a document at the same time} 
  2. Essay/research paper written by students {and then turned in/graded digitally} -- bonus: teachers can see revision history and hold students accountable for edits
  3. Error correction: create a document with deliberate errors, and let students correct it digitally
  4. Reading response journals: eliminate the risk of losing the paper in transit between home and school
  5. Meeting notes: document minutes and discussions at team meetings and easily share with colleagues
Once you start using Google Docs regularly, you might start using it for lengthy documents. When that happens, it's time to start utilizing the table of contents tool to get the document organized again. 


1. Open your document in Google. 

2. Type headers for each section of your document, as shown below:


3. Highlight the first header. Go to format >> paragraph styles >> heading {any you want -- there are 6} >> apply heading, as shown below:


4. The heading you highlighted before should now look different. {For reference, heading 1 is the largest. The text becomes smaller and/or italicized when you choose headings 2-6.}

5. Follow steps 3-4 for all the headings you typed. {So I completed the steps for "Supplies," "Warm Up/Anticipatory Set," "Activity," "Closure/Summary," and "Evaluation/Assessment" in the mock lesson plan example below.}


6. Put the cursor in the spot where you'd like the table of contents to appear. {I always go to the very top of the document.}

7. Click insert >> Table of Contents.
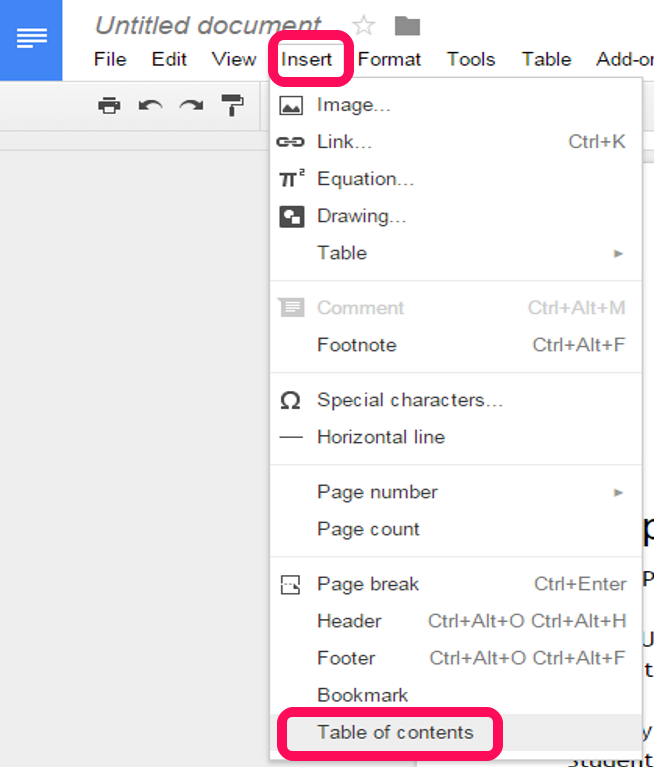


8. Your document should now have a table of contents, like so:


Click on any part of your table of contents to jump to that specific part of the document. 

Click on any part of the TOC to view a refresh button; press if it you need to update any of the heading titles you typed {such as adding a completely new title or editing the spelling/structure of an existing one}. 


Resources

Friday, October 16, 2015

Seesaw: More Options

I used Seesaw {the free ePortfolio tool} with my K-4 students last year, and it helped us make the Science Lab almost completely paperless, so it's no wonder I continue to rave about this tool! As a Seesaw Ambassador {look for me in the southwest section!}, I get constant updates about what the team is doing to improve their {already awesome} tool, so I was inspired to write a series of blog posts on Seesaw. Check back frequently over the new couple of weeks or follow me on Twitter to make sure you don't miss any of this series!

This post covers all those little "extras" that didn't really fit in any other part of this series.
When you log in to the website, click your name in the top, left corner, click your class name, and click "manage class," you'll notice quite a few options.

Review of "Manage Class" Options:

1. Class Settings


  • Class name: students will see the name of your class when they log in, so keep that in mind when naming it. {I recommend naming your class very specifically if your students have multiple teachers using Seesaw.} You can change the class name at any time.
  • Grade level: remember that Seesaw assigns animal icons to grades K-4 and initial avatars grades 5+, but you can change them at any time. 
  • Manage teachers: Seesaw allows you to add co-teachers to any class. Co-teachers have all the same rights the original teacher does -- they'll be able to assign and view work, comment, share, etc. 


2. Students


  • Student sign in mode: Review the two QR code sign in modes in this blog post 
  • Manage students: Add/delete students
  • Student likes and comments: Enable or disable students' ability to like or comment on other students' work
  • Students can see each others' work: self-explanatory :)
  • New items require approval: If you enable this {make it green}, you'll have to manually approve each item that students submit before it actually appears in their journal for their classmates and/or parents to see
  • Enable item editing: Controls whether students can copy and edit another classmate's work {including work you assign to everyone}.


3. Parents


  • Enable parent access: Until you enable this {make it green}, you won't see any of the other options under the "parents" heading
  • Invite parents: allows you to download a parent invitation handout or send parent invitation e-mails directly from within the app {opens your default e-mail provider with a drafted e-mail, so all you have to do is enter parent e-mail addresses and click send!}
  • Manage parents: sorts students whose parents are connected v. students whose parents aren't connected. Allows you to see which e-mail address parents used to view their child's work and gives you the option to remove their access.
  • Pending parent approvals: When you invite parents to view a child's journal, they sign up for an account and choose their child's name from the class roster. You, the teacher, can go to this place to approve or deny each parent. This is just an extra security measure to make sure the parent clicks the correct student when signing up. :) 
  • Parent likes, comments, and sharing: enable or disable any of these things for your group of parents


4. Folders


  • Manage folders: Create folders, assign colors to each folder, and edit names of existing folders
  • Show add to folder step: Do you want to be the only one with access to folders? If so, you can leave this part alone. But if you want students to be able to add their own work to folders, you have to give them access here.


5. Other


  • Save to camera roll: Saves a copy of work to the device's camera roll
  • Video quality: self-explanatory


6. Administrative Details


  • Reset QR code: self-explanatory
  • Archive class: Saves the class roster and all student-submitted work but removes the class from your list {the one you see when you click your name in the top, left corner}. You can archive and un-archive classes as much as you want. Archiving a class frees up a slot in your available classes {since teachers get 10 classes by default}
  • Delete class: permanently removes the class, roster, and all student work from your account


Student Avatars/Profile Pictures

If students sign in with their Google account, their Seesaw avatar is the same as their Google avatar. If you chose another sign in option for students, though, Seesaw automatically assigns an avatar to each user. Students in grades K-4 get a random animal avatar, while students in grades 5+ get their initials. Students who sign in with a QR code cannot change their avatar, but you can change it for them by selecting another animal icon or uploading a photo of your own.

I suggest making this a "getting to know you" activity the first week or two of school -- have students take a selfie on your device, and work with them to change their avatar to their "real" picture. Bonus: at the end of this activity, you'll have a picture of all your students, which will make future substitutes verrrrry happy! 

Premium

Seesaw is, by default, completely free. In fact, all of the options I've talked about in this entire blog post series are 100% free. However, there are some other options in case you feel like spending some money:
  1. Parents can upgrade just their child's account for $10/year. This rolls the student's journal over to the next year so that it can be kept and revisited. 
  2. Schools can upgrade to the school account for $5/student. This option is pretty cool but pricey. With a school account, student journals carry over from year to year, and you get access to an administrator dashboard that gives data on all classroom activities. I was briefly upgraded to an administrator dashboard and took some screenshots so I could share what it looks like before I was downgraded again.


Information blacked out to protect privacy :)

Tweetable:


Other post in this series:
  • Features: available 10.10.15 {what students can do, what parents can do, and what teachers can do}
  • Getting Started: available 10.11.15 {signing up, creating a class, classroom sign in vs. individual sign in, creating folders, helping students sign in}
  • Student Navigation: available 10.12.15 {icon glossary, submitting work, viewing work, copying and editing, feed and calendar view, liking and commenting}
  • Teacher Navigation: available 10.13.15{finding student work in the feed, individual student journal, calendar, folders, flagged work} 
  • Pushing Work to Students: available 10.14.15 {converting printed files to digital ones, sharing PDFs vs. image files, pushing work to everyone vs. pushing work to select students, AirDropping images}
  • Interacting with Student Work on Seesaw: available 10.15.15 {student work: dissected, editing people and folders, downloading and sharing items}
  • More Options: available 10.16.15 {managing class, students, parents, folders, other, and administrative details; student avatars; premium version}

Thursday, October 15, 2015

Seesaw: Interacting with Student Work

I used Seesaw {the free ePortfolio tool} with my K-4 students last year, and it helped us make the Science Lab almost completely paperless, so it's no wonder I continue to rave about this tool! As a Seesaw Ambassador {look for me in the southwest section!}, I get constant updates about what the team is doing to improve their {already awesome} tool, so I was inspired to write a series of blog posts on Seesaw. Check back frequently over the new couple of weeks or follow me on Twitter to make sure you don't miss any of this series!

This post is all interacting with student work on Seesaw.
When a student submits work into his/her journal, the default view is a newsfeed, similar to Facebook or Instagram. {Read more about navigating Seesaw in this blog post.}

Here is what the newsfeed currently looks like in my test class {click here if you have trouble viewing it below}:


You can interact with student work as you please. From the web, you interact with student work directly from the newsfeed. From the app, you sometimes need to click on the work in order to see all interaction options.

Student Work: Dissected


Interacting with Student Work


1. Like. Much like Instagram or Facebook, the "like" button allows you to quickly share appreciation for the submission. I have not found a way to sort work by "liked" and "not liked." If you choose to enable it, students can "like" other students' work, and parents can "like" their own child's work.  

2. Comment. Modeled after social media, you can add a comment of your choice to the submission. I have not found a way to sort work by comments. If you choose to enable it, students can comment on other students' work, and parents can comment on their own child's work.  

3. Flag. Only the teacher can flag work or see flags on work, so it's a great way to remind yourself to review something, bookmark a great example, etc. Learn more about flagging work by viewing option 5 in this blog post. To flag work, click the flag button at the bottom of a submission.

4. Folder. If you have folders enabled {read more about folders in this post}, click the folder icon to view and/or edit which folder this work was turned into. 

5. More options. Clicking on the "..." shows this:


Keep in mind that students do not have these options. :) Most of these options are self-explanatory, but let's review a couple:
  • Edit people: Edit which child's journal this work appears in -- handy if your class is in "classroom sign in mode," and a child accidentally turns work in to another student's journal
  • Edit folders: See and edit which folders the work is turned in to {if folders are enabled}
  • Copy & edit: Make a copy of the item, edit it, and turn it in to your own journal {students do have this option}
  • Download item: Right now, all downloads come in the form of a picture file, which means no videos are downloaded at all. Pictures that have audio recordings on top of them allow the user to download the audio separately, but there isn't a way to download everything as one file yet. 
  • Share item: Share on social media, share via the link {I might use this to e-mail a parent or administrator outstanding work}, and embed the work directly onto your class blog or website, as shown below.

    Tweetable:

    Other post in this series:
    • Features: available 10.10.15 {what students can do, what parents can do, and what teachers can do}
    • Getting Started: available 10.11.15 {signing up, creating a class, classroom sign in vs. individual sign in, creating folders, helping students sign in}
    • Student Navigation: available 10.12.15 {icon glossary, submitting work, viewing work, copying and editing, feed and calendar view, liking and commenting}
    • Teacher Navigation: available 10.13.15{finding student work in the feed, individual student journal, calendar, folders, flagged work} 
    • Pushing Work to Students: available 10.14.15 {converting printed files to digital ones, sharing PDFs vs. image files, pushing work to everyone vs. pushing work to select students, AirDropping images}
    • Interacting with Student Work on Seesaw: available 10.15.15 {student work: dissected, editing people and folders, downloading and sharing items}
    • More Options: available 10.16.15 {managing class, students, parents, folders, other, and administrative details; student avatars; premium version}