
I used Seesaw {the free ePortfolio tool} with my K-4 students last year, and it helped us make the Science Lab almost completely paperless, so it's no wonder I continue to rave about this tool! As a Seesaw Ambassador {look for me in the southwest section!}, I get constant updates about what the team is doing to improve their {already awesome} tool, so I was inspired to write a series of blog posts on Seesaw. Check back frequently over the new couple of weeks or follow me on Twitter to make sure you don't miss any of this series!
This post is all about signing up, creating classes, organizing work in folders, and getting students logged on to Seesaw.

While it is possible to sign up through the app, signing up through the website is probably the easiest of the two; therefore, this tutorial will feature screenshots from the website.
Sign up for Seesaw
1. Click here to sign up for a Seesaw account.

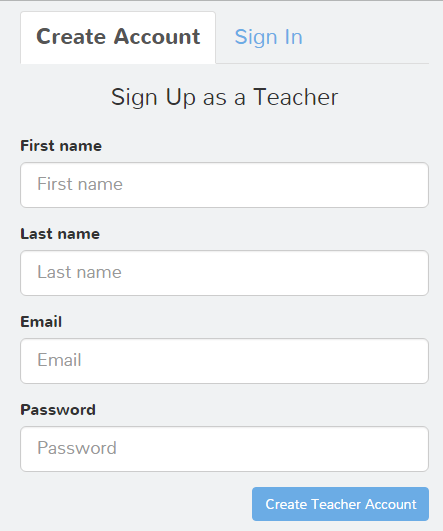
2. Click "I'm a teacher."

3. Fill in the appropriate fields {or scroll down and click "teacher sign in with Google" to connect your Google and Seesaw accounts}.
Create a class in Seesaw
I believe users start out with 10 classes. If you need more, you can e-mail the Seesaw team and explain your situation; they are amazingly accommodating and will probably grant you more classes! If all else fails, you can have more than one account and link yourself as a co-teacher so you only have to log in to one class. :)
1. Once you're inside your Seesaw account, click your name and/or profile picture in the top, left corner.

The screen will slide to the right and reveal a menu on the left. Scroll all the way to the bottom of the menu, and click "+ new class."

2. Unless your students have email addresses or Google accounts, click "Use a class code."

3. Fill in the appropriate information in the pop-up box. If you select an elementary grade, student avatars automatically appear as cartoon animals. If you select a secondary grade or "other," student avatars populate as their first and last initial. {You can change avatars later.} Keep in mind that students will see the class name when they first log in. It's especially important to use a good naming convention if other teachers in your building use Seesaw, too.

If you have a class list already handy, click "paste list of student names."

Add one student name per line {first name, last name format} and click the green check. I recommend adding yourself as a student -- I will talk more about that in a later post.

Click the green check again to create your class.
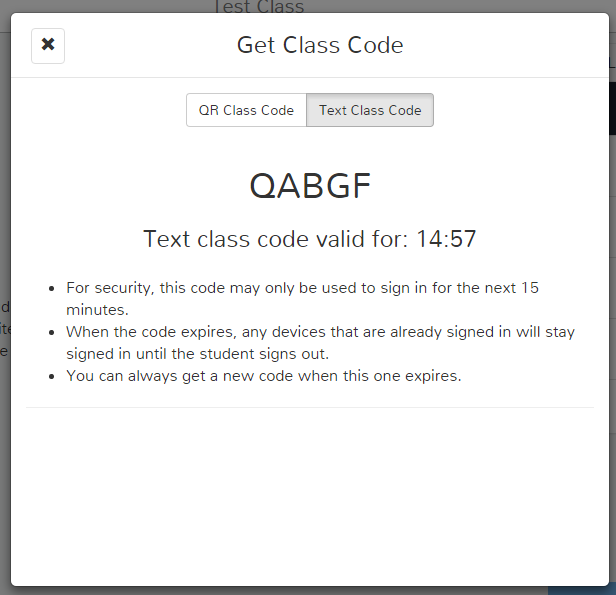
Seesaw will automatically e-mail you the QR code students use to sign in, but you can access it or the text code at any time by clicking "get class code" in the upper, right hand corner of your dashboard on the website.

The QR code is probably the quickest and easiest way for students to join your class from their device. Be aware that students will scan the QR code from inside the Seesaw app. The code will not work if students try to scan it from a QR code reading app {such as QRreader or Scan}. The text code is great if a student doesn't have a camera on his/her device, or if you need someone to join remotely. Seesaw generates a text code from your teacher dashboard online only, and the code expires in 15 minutes, as shown below:
A note about student accessibility:
When using the class code sign-in option, the default setting is one where students can view other students' work. Obviously, if you are giving any type of assessments through Seesaw, it would be best to turn this option off. To do that, sign in to your teacher account via the web, click your name in the left corner, click the class name, and choose "manage class." Under the "students" heading, you will see this:

Classroom sign in means that students can scan a QR code to log in to the class. That iPad remains logged in to that class until a student signs out. Students can see each others' journal work and comment/like each others' work if the teacher enables that option.
If you click on "classroom sign in," you'll see another option: "individual student sign in." There's a big warning under this option that says it's for 1:1 classrooms only, which I think scares a lot of people off. In reality, you can use this sign in option even if you're not a 1:1 school. The "individual student sign in" option still lets students sign in with a QR code, but when they sign in, they're prompted to choose their name from the class list. Once they choose a name, they see that person's journal and only that person's journal. The device remains logged in to that student's journal until the student signs out. This sign in mode does not even give the option for the teacher to enable liking or commenting of other students' work, since students only have access to their individual journal.
You can switch back and forth between sign in options, but students will be logged out of the app on all devices each time you switch the sign in mode.
Create folders to organize work {optional}
You can create color-coded folders and give students the option to submit their work to folders to keep your Seesaw feed nice and organized.
To create a folder, go to the web version and click your name in the top, left corner. Click your class's name and then "manage class." Scroll down until you see the section on folders:

Click "manage folders." At the bottom of the pop-up box, click "+ New Folder." You'll see a screen like this:
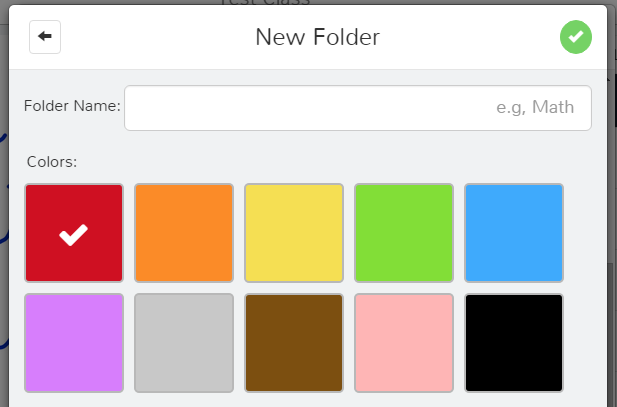
Name the folder and choose the color for it. After you click the check mark, you'll see a list of all the folders you created for that class:

Add as many folders as you want. When finished, click the "X" in the top, left corner. If you want students to be able to add work to folders themselves, be sure to enable access. Do this by finding the folder section in the "manage class" pop-up, and clicking "show add to folder step." Change yours to say "students & teachers," as shown below:

Let students sign in on personal devices
Since most teachers in CISD are using iPads, this section of the tutorial will focus on iOS. Be aware that students can use Seesaw from an Apple device, Android, Chromebook, or just the a computer with the website!
2. Click "I'm a student."

2. Scan the QR code (provided by the teacher).

If a QR code is not available, the teacher can pass on a text code (that expires in 15 minutes). The student could then press "Use a Text Code" and type the code on the following screen:

3. Once inside, your students will see a quick welcome message and then the main dashboard:


4. Find more options by clicking on the silhouette of the people in the top, left corner.

Students can add an item by clicking on any square on the main dashboard or by clicking "add item" in the options screen. Feed view lets students view a stream of work, while calendar view lets students view work only from a specified date {more information will be given on this in a later post}.
Tweetable:
Other post in this series:
- Features: available 10.10.15 {what students can do, what parents can do, and what teachers can do}
- Getting Started: available 10.11.15 {signing up, creating a class, classroom sign in vs. individual sign in, creating folders, helping students sign in}
- Student Navigation: available 10.12.15 {icon glossary, submitting work, viewing work, copying and editing, feed and calendar view, liking and commenting}
- Teacher Navigation: available 10.13.15{finding student work in the feed, individual student journal, calendar, folders, flagged work}
- Pushing Work to Students: available 10.14.15 {converting printed files to digital ones, sharing PDFs vs. image files, pushing work to everyone vs. pushing work to select students, AirDropping images}
- Interacting with Student Work on Seesaw: available 10.15.15 {student work: dissected, editing people and folders, downloading and sharing items}
- More Options: available 10.16.15 {managing class, students, parents, folders, other, and administrative details; student avatars; premium version}
No comments:
Post a Comment